ApeX Demo Account
How to Connect your Crypto Wallet in ApeX
How to connect Wallet to ApeX via MetaMask
1. Firstly, you need to go to the [ApeX] website, then click on [Trade] in the top right corner of the page.
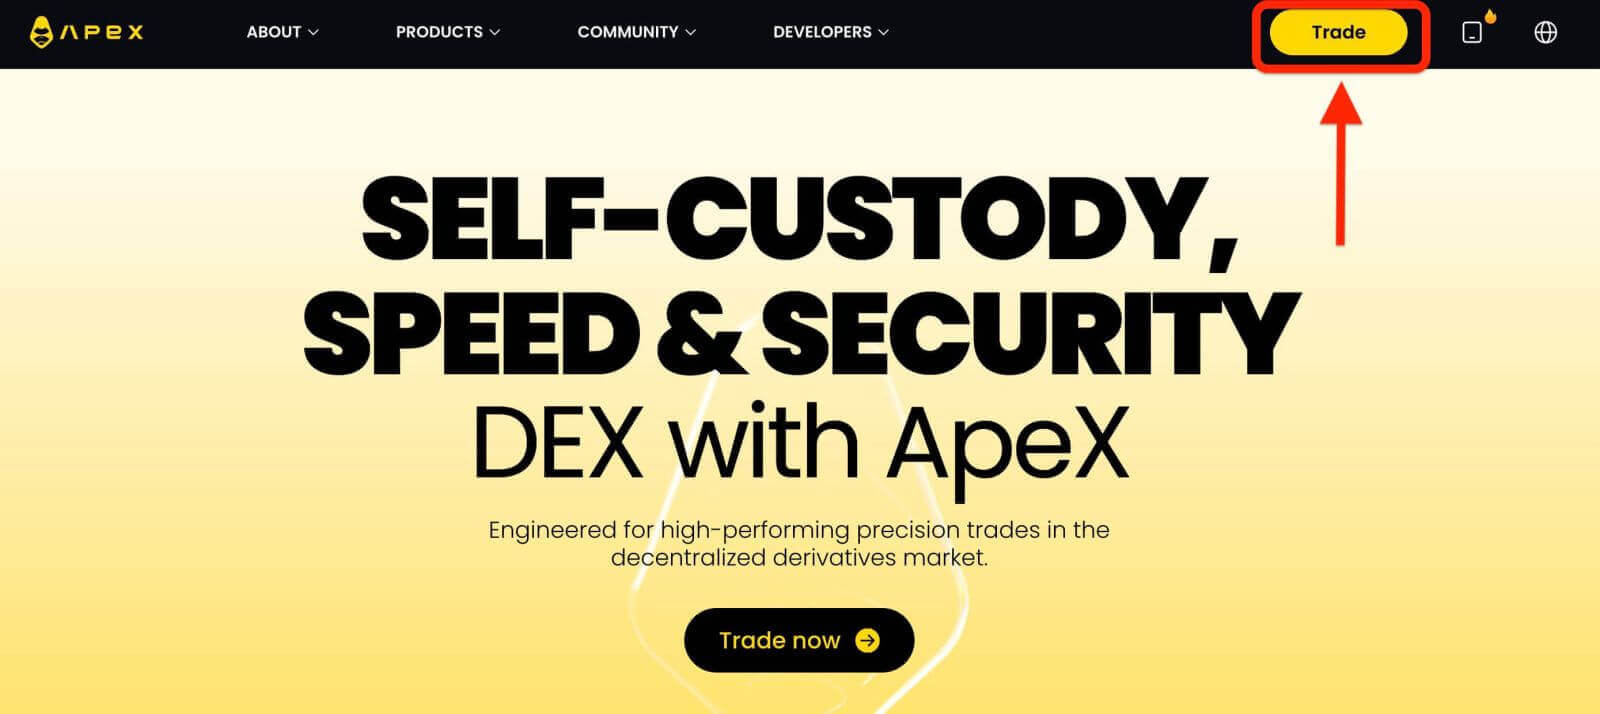
2. The website lets you in the Main Home page, then continue to click on the [Connect Wallet] in the top right corner.
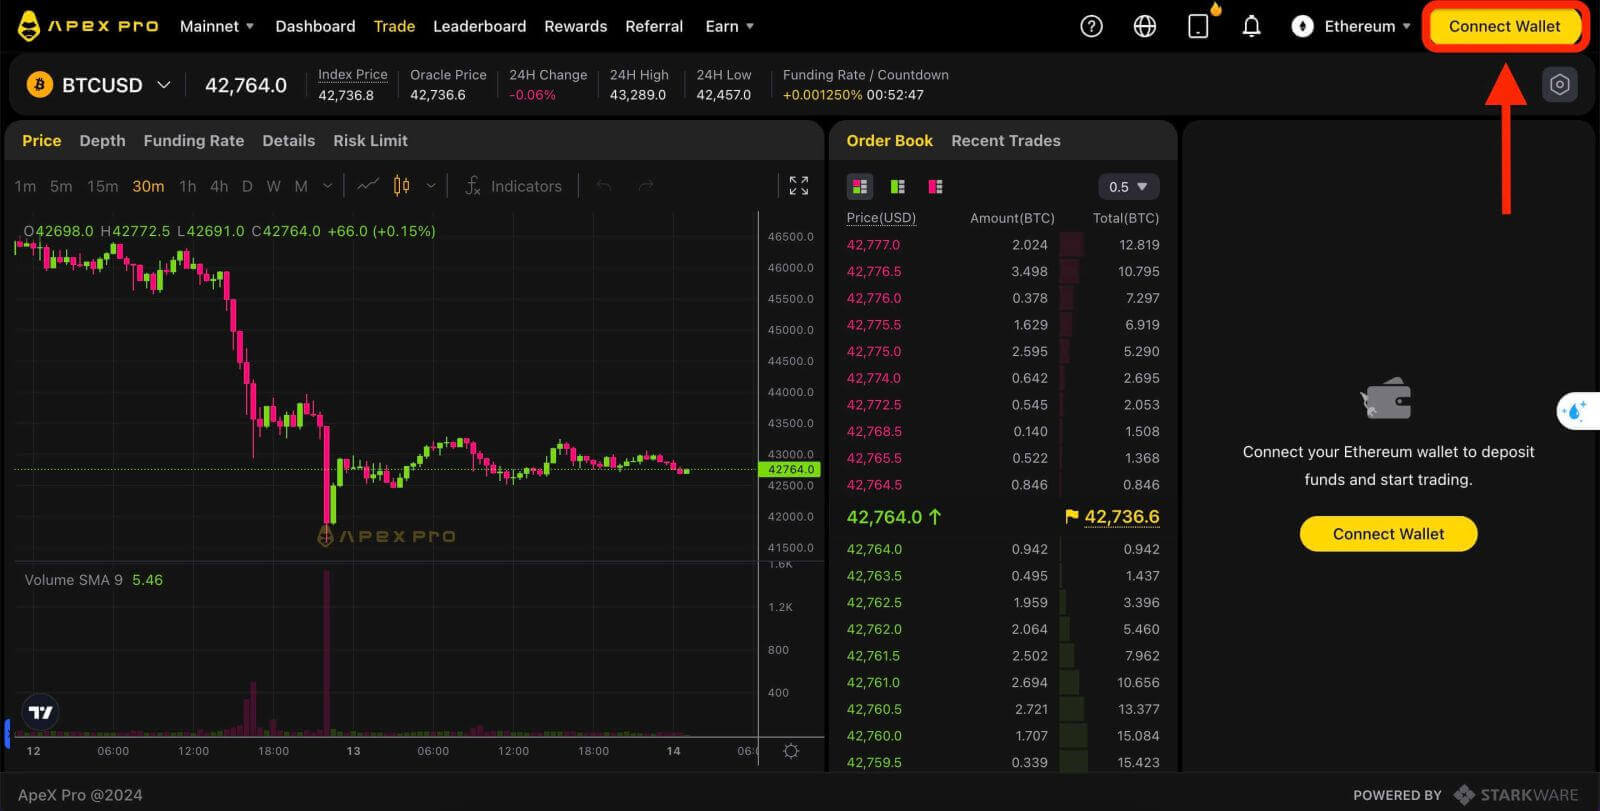
3. A pop-up window comes up, you need to choose and click on [Metamask] to choose Metamask wallet.
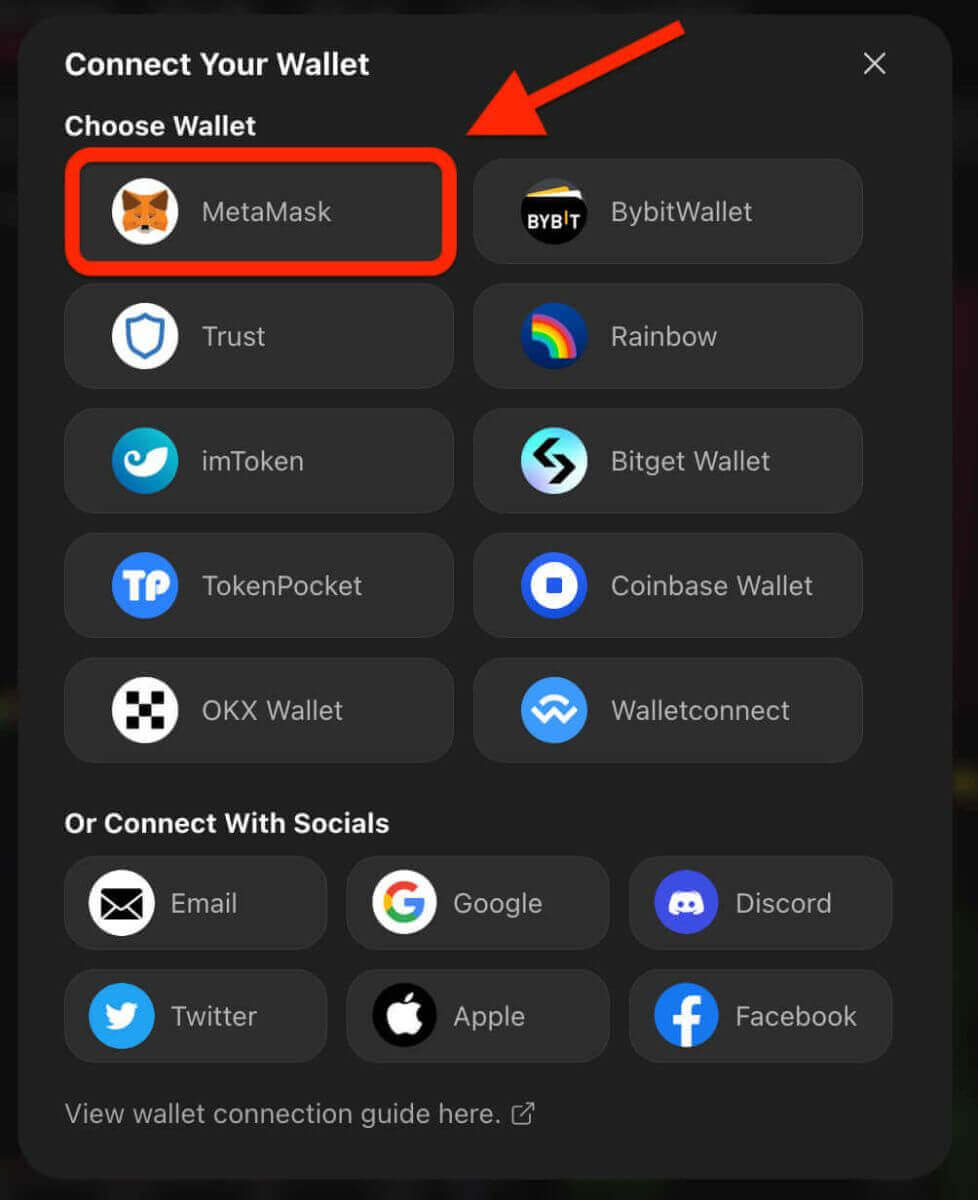
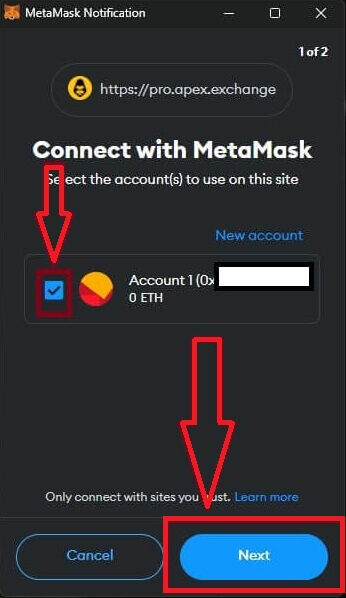
4. A Metamask prompt window will appear. Please approve the next two transactions including: Verifying your account(s) and confirming the connection.
5. Select your account(s) to use on this site. Tap on the blank square cell on the left side of the account you want to connect with ApeX. Last, click [Next] to continue to the second step.
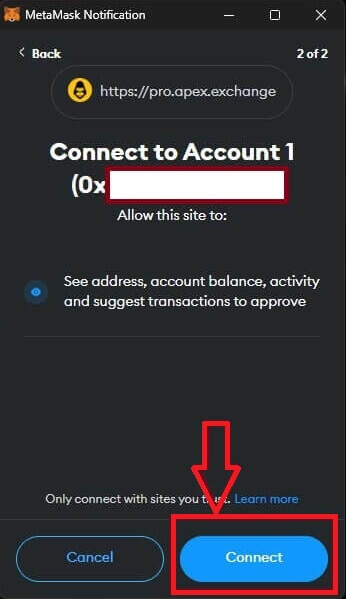
6. The next step is confirming your connection, you need to click on [Connect] to confirm your choice of account(s) and the connection with ApeX, if you are not sure about your choice of account(s) or connecting to ApeX you could click on [Cancel] to canceling this process.
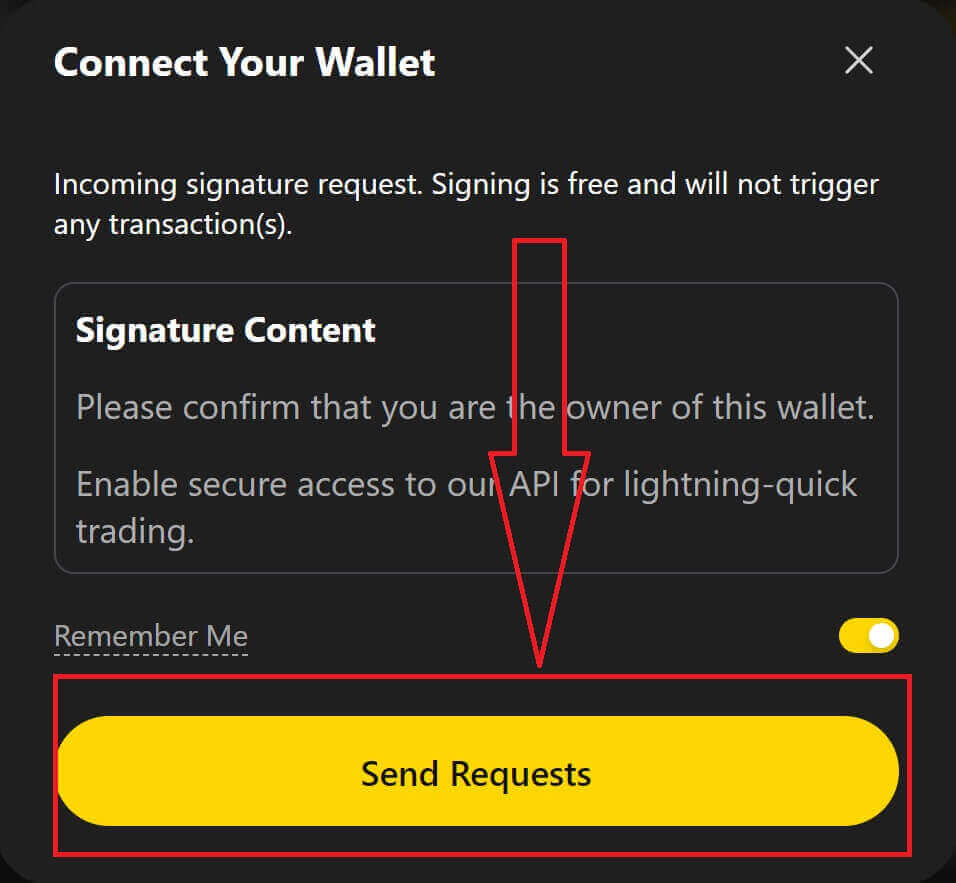
7. After the first step, if it is a success, you will get to the home page of ApeX. A pop-up Request will come up, you need to click on [Send Requests] to continue to the next step.
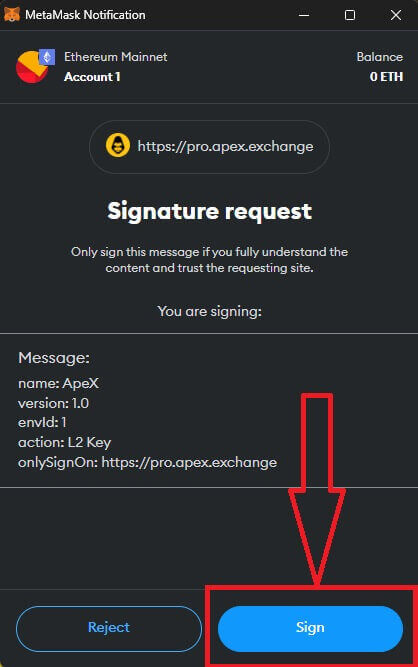
8. A pop-up window will come up to ask you for your signature to confirm that you are the owner of this wallet, click on [Sign] to complete the connection process.
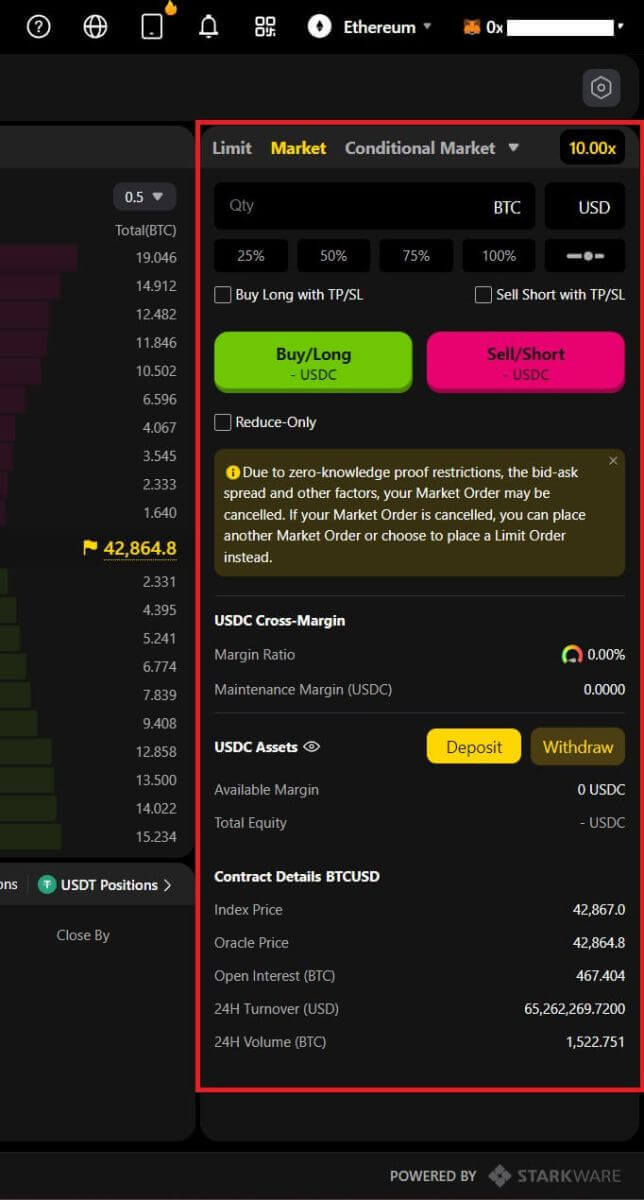
11. If it is a success, you will see an icon and your wallet number on your desktop in the top right corner of the ApeX web, and can start to trade on ApeX.
How to connect Wallet to ApeX via Trust
1. Firstly, you need to go to the [ApeX] website, then click on the [Trade] in the top right corner of the page.
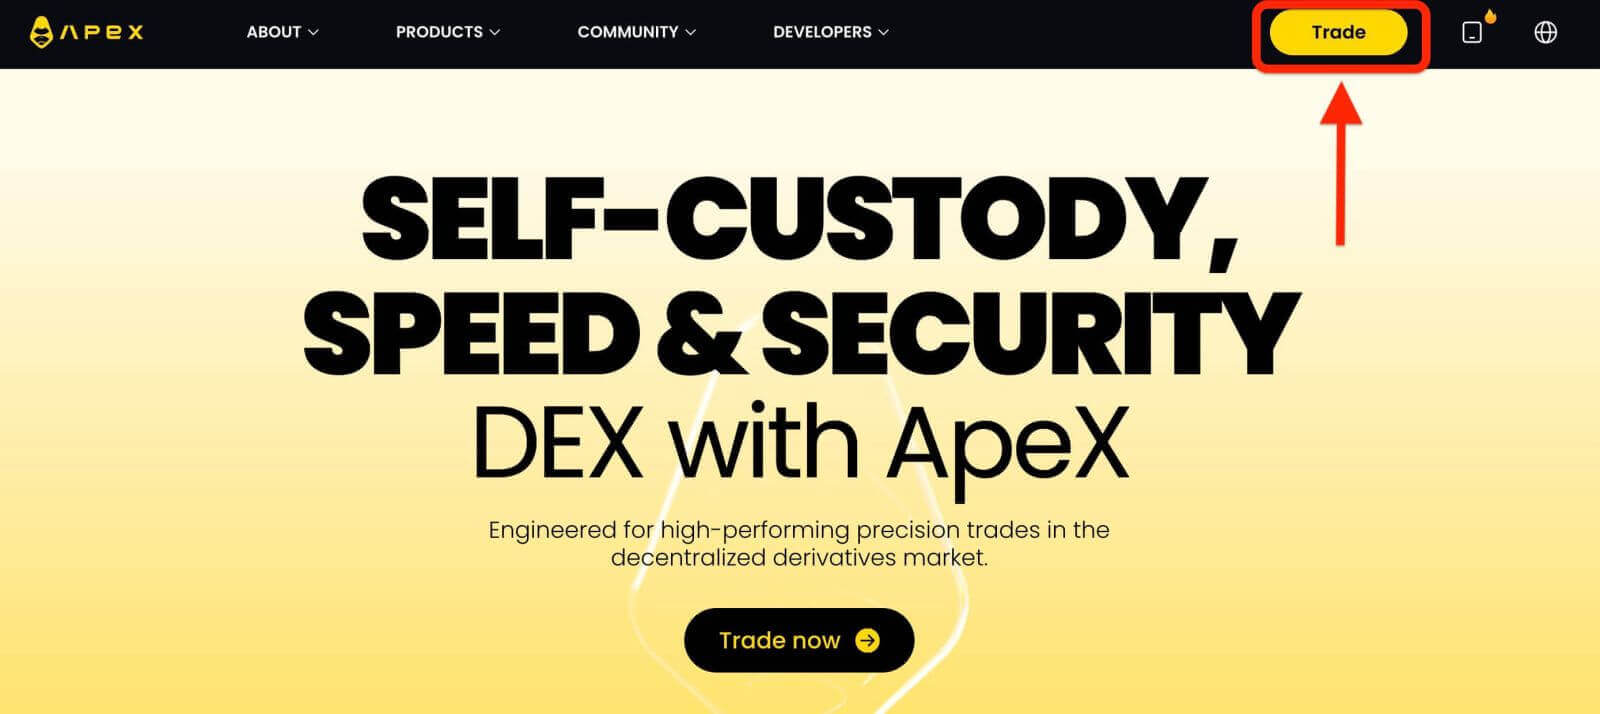
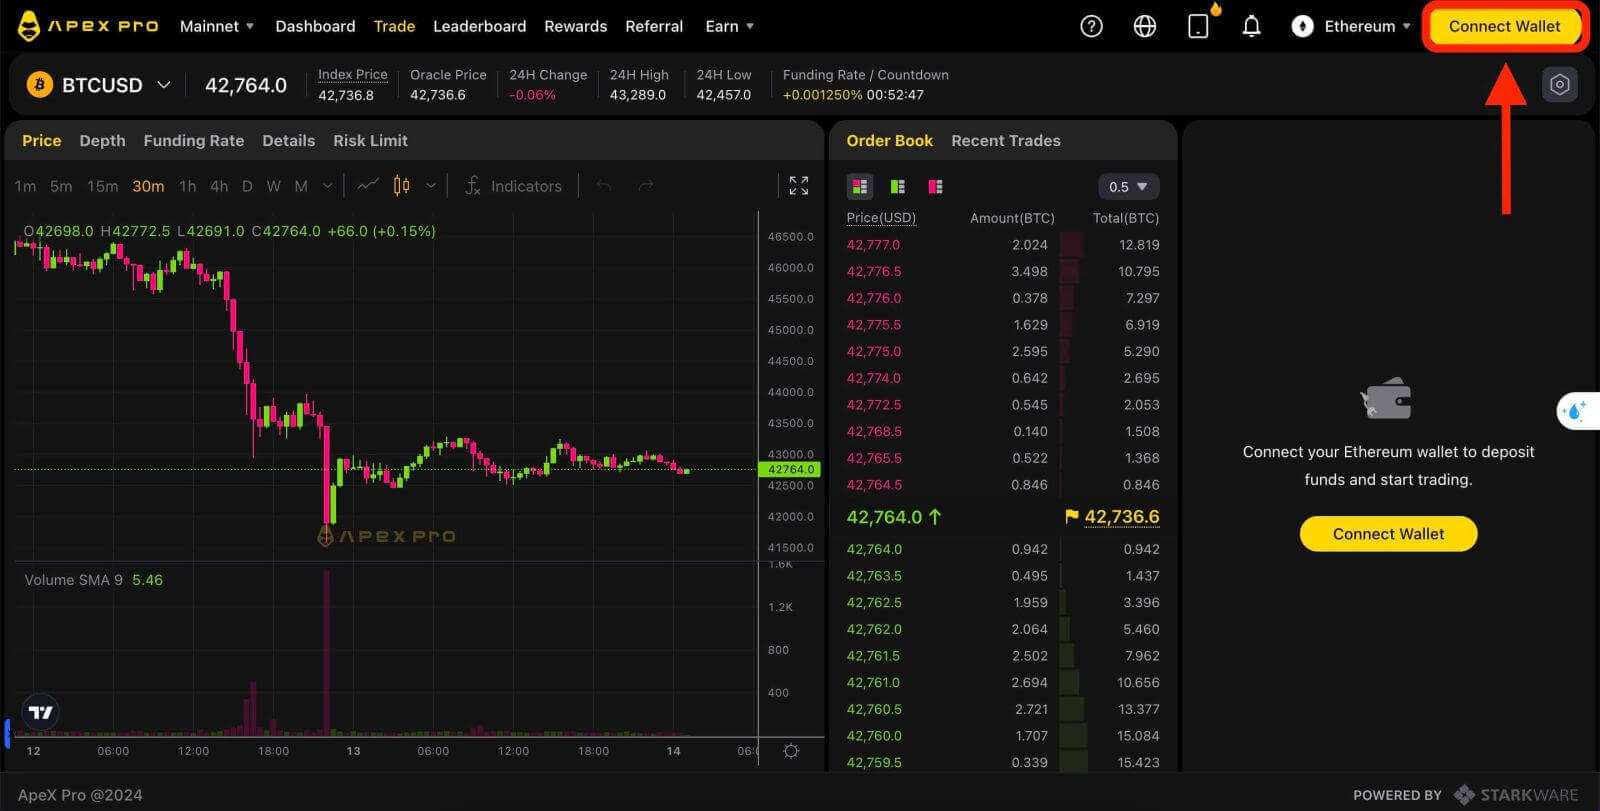
2. The website lets you in the Main Home page, then continue to click on the [Connect Wallet] in the top right corner.
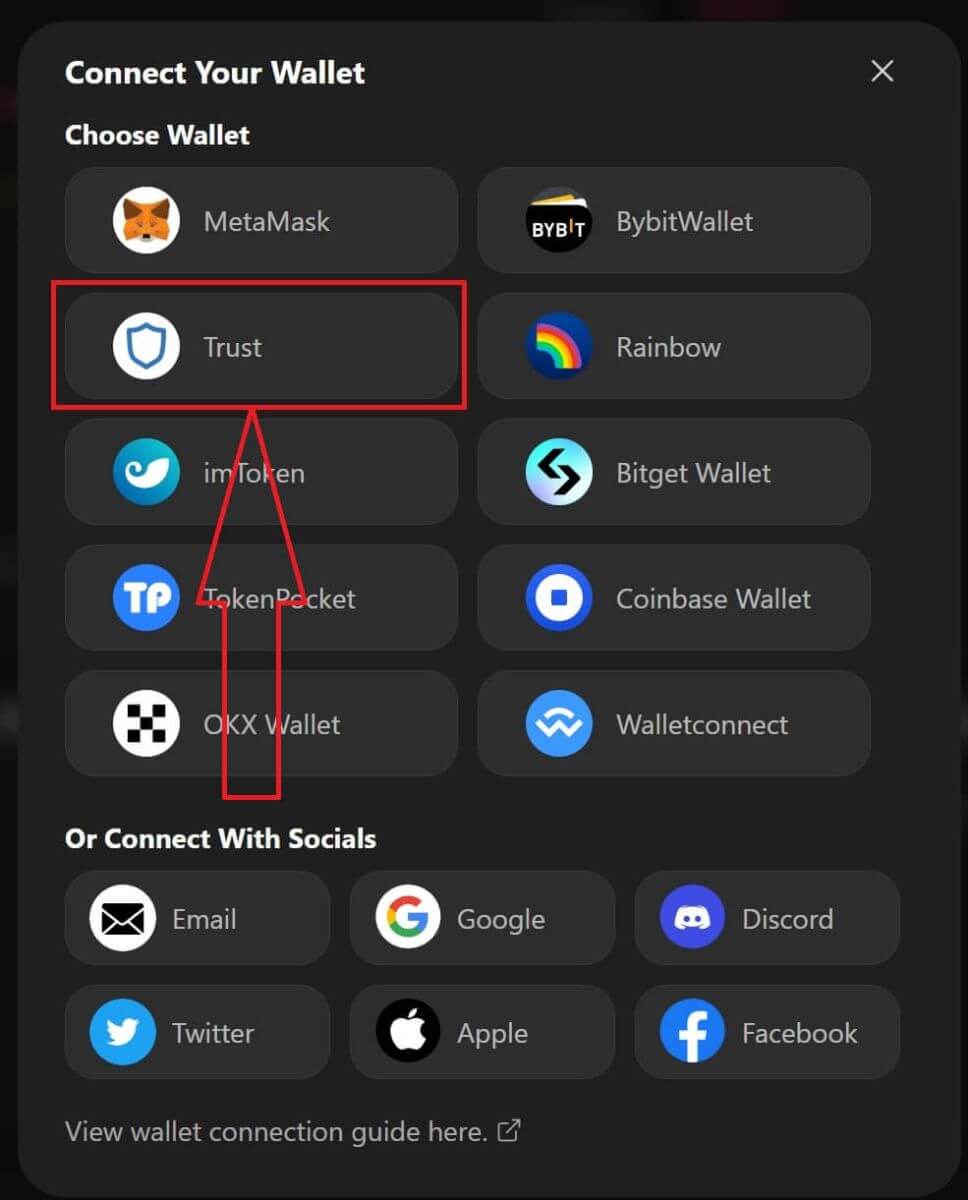
3. A pop-up window comes up, you need to choose and click on [Trust] to choose Trust wallet.
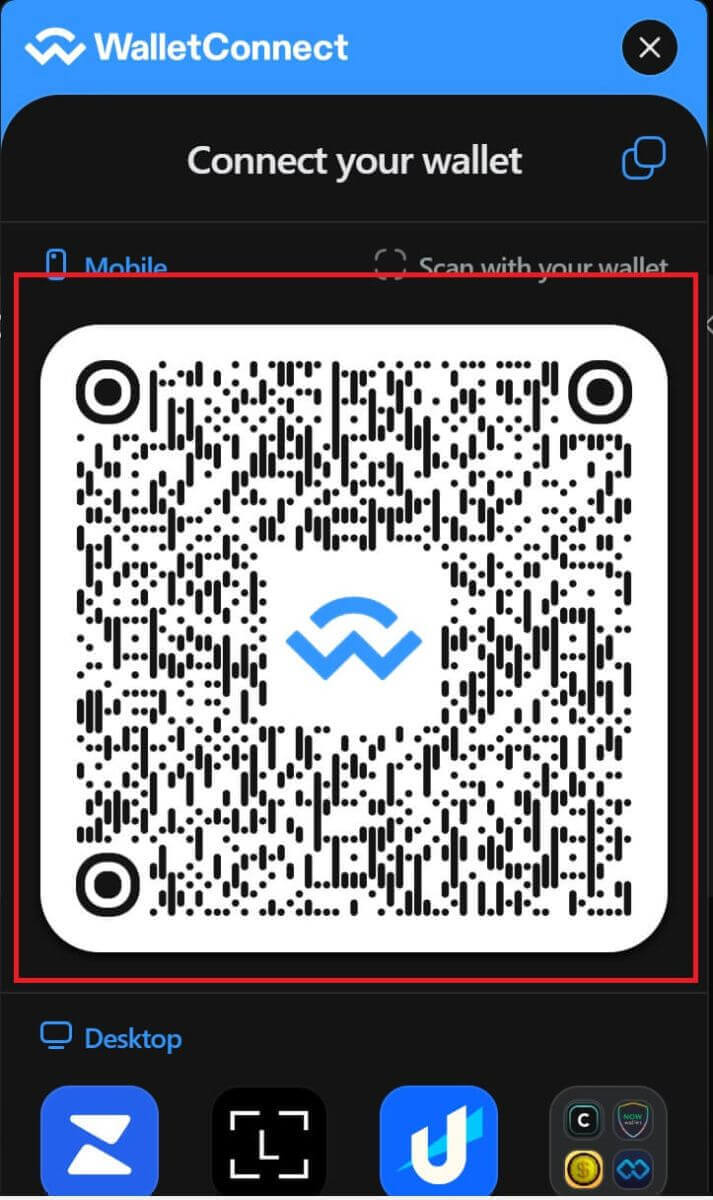
4. A QR code to Scan with your wallet on your mobile phone will appear. Please scan it by Trust app on your phone.
5. Open your phone and open the Trust app. After you get to the main screen, click on the setting icon in the top left corner. It will lead you to the settings menu. Click on [WalletConnect].
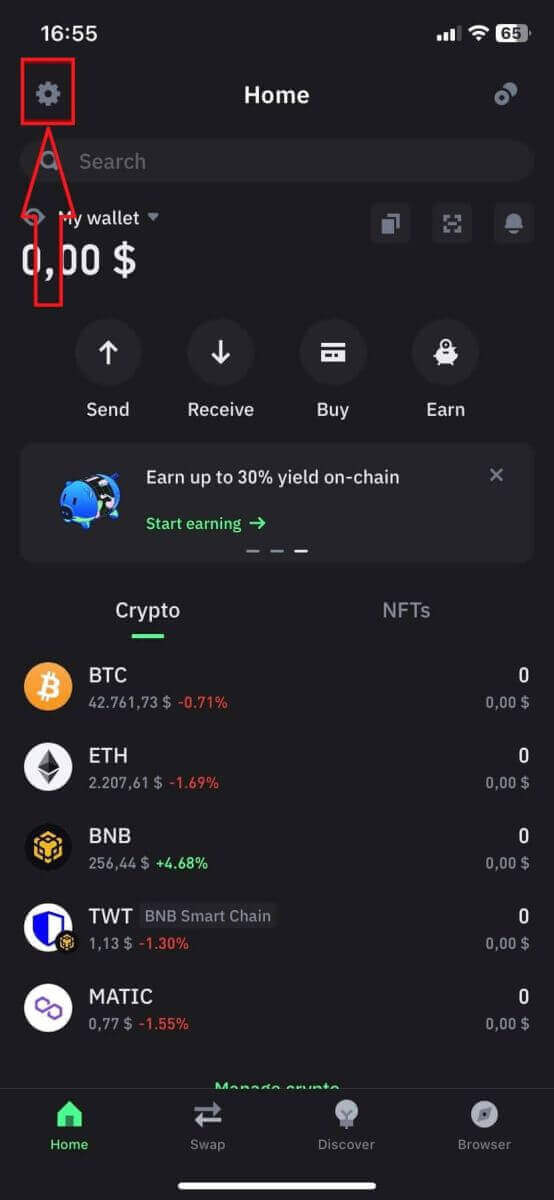
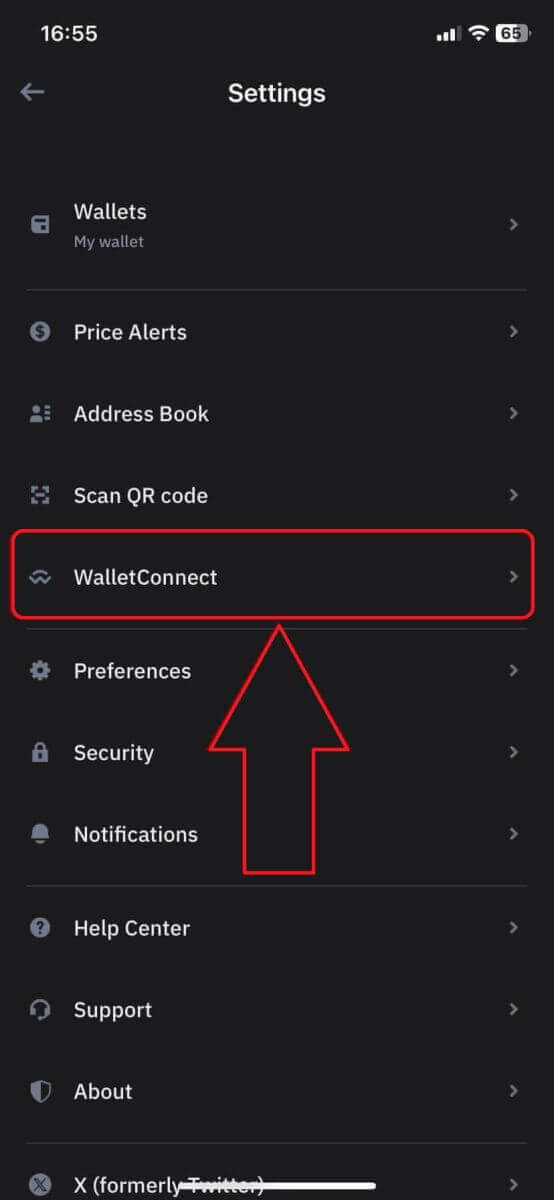
6. Choose [Add new connection] to add the connection with ApeX, it will lead to a scanning screen.
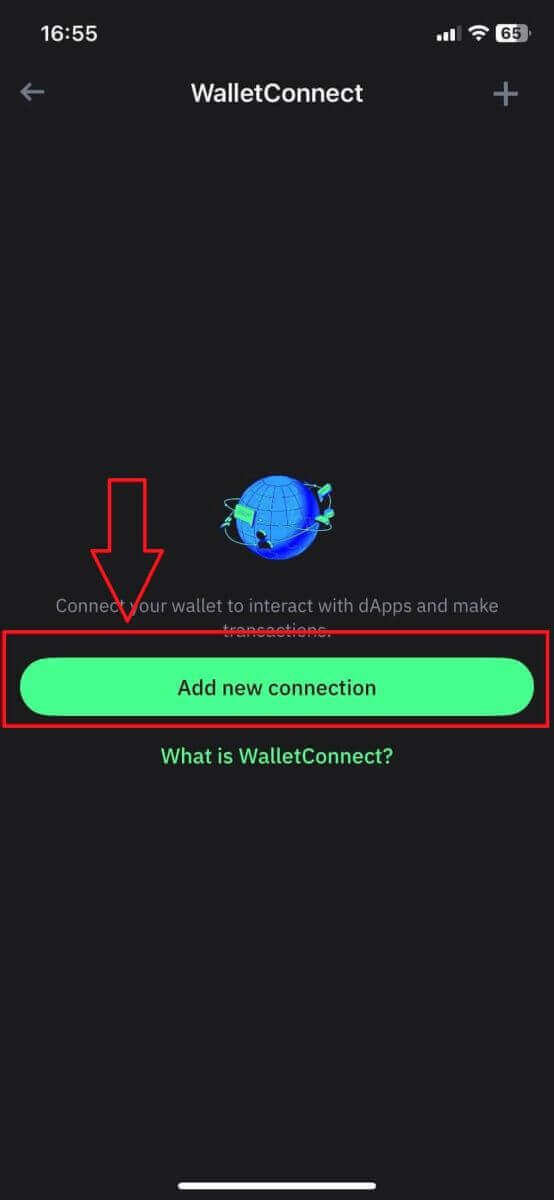
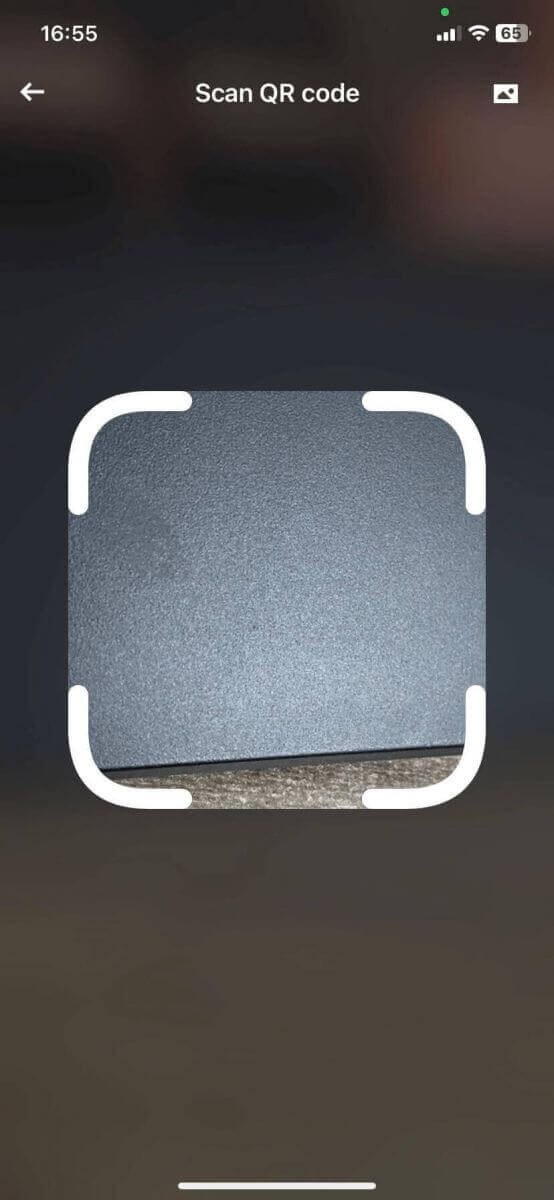
7. Now you need to point your phone’s camera to the QR code on your desktop screen to connect with Trust.
8. After scanning the QR code, a window will ask you whether to connect with ApeX.
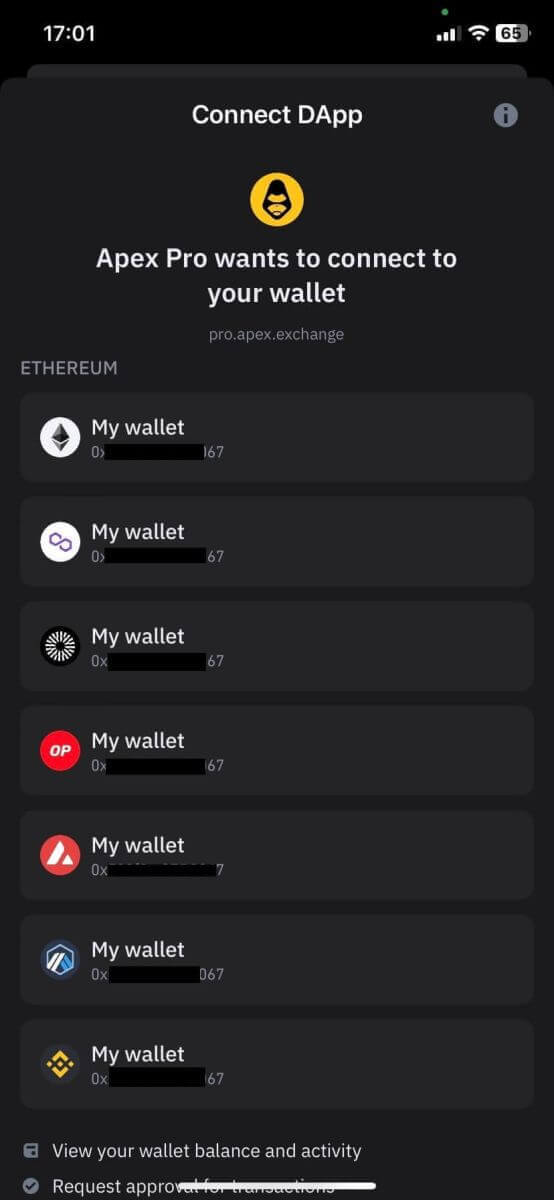
9. Click on [Connect] to start the connection process.
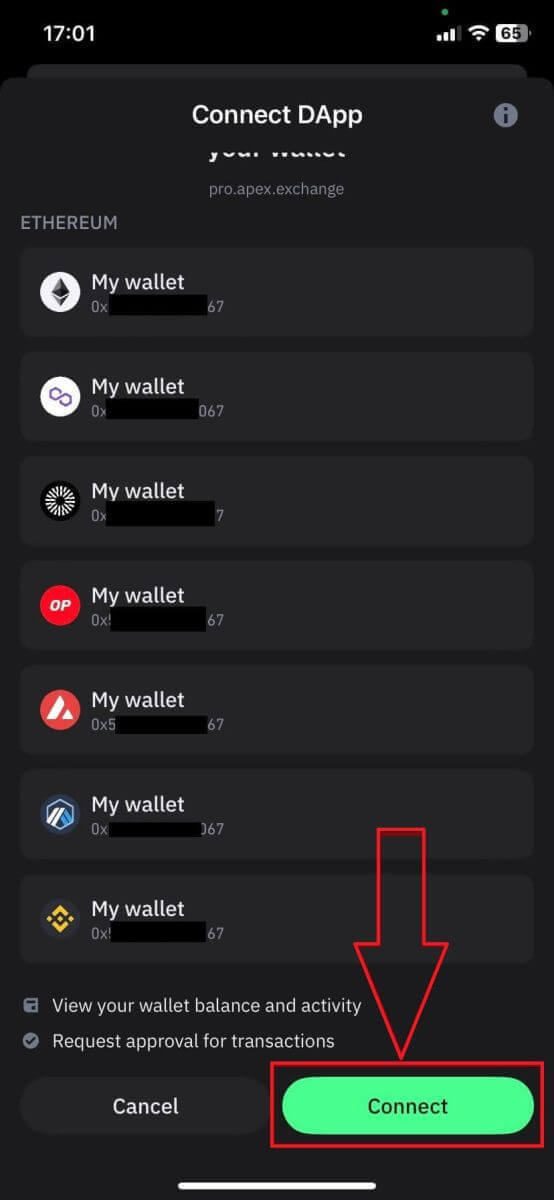
10. If it succeeds, it will pop up a message like the above, and then continue with your connection process on your desktop.
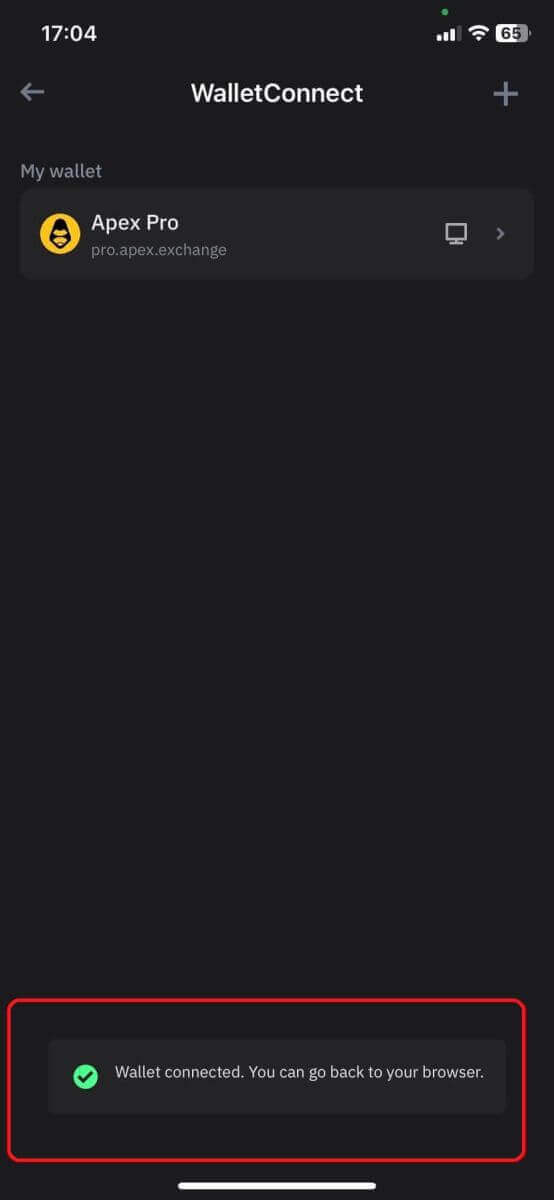
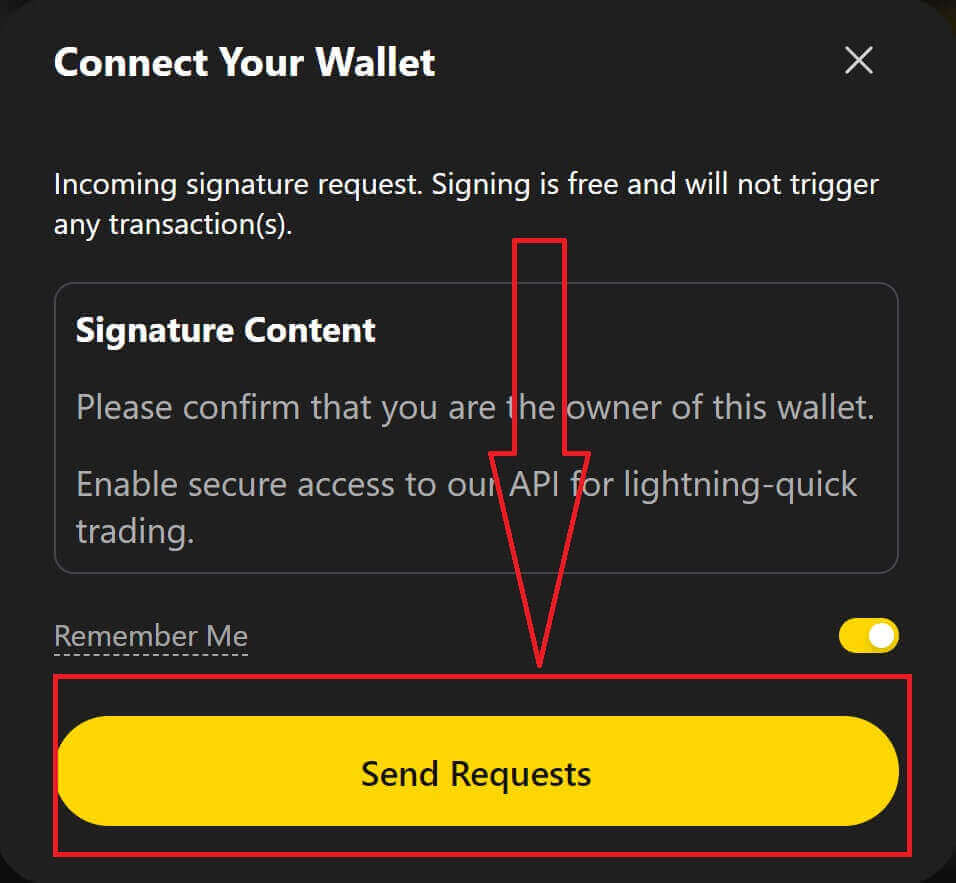
11. A pop-up window will appear to ask you for a Signature request on your phone, this step needs you to confirm you are the owner of that Trust wallet. Click on [Send Request] to continue the connection process on your phone.
12. A pop-up window will appear on your phone, click on [Confirm] to complete the connection process.
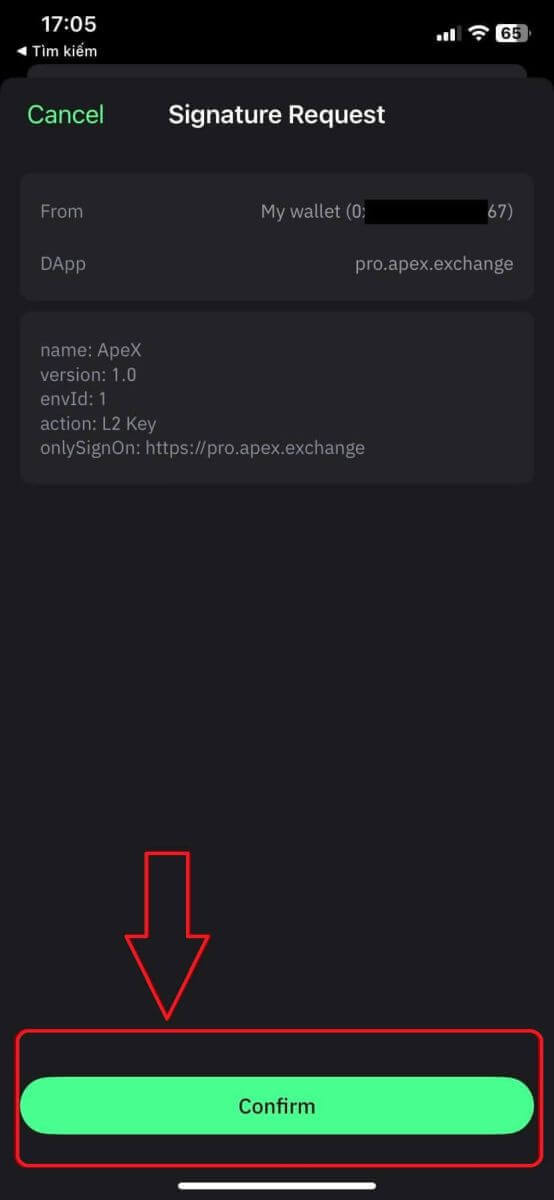
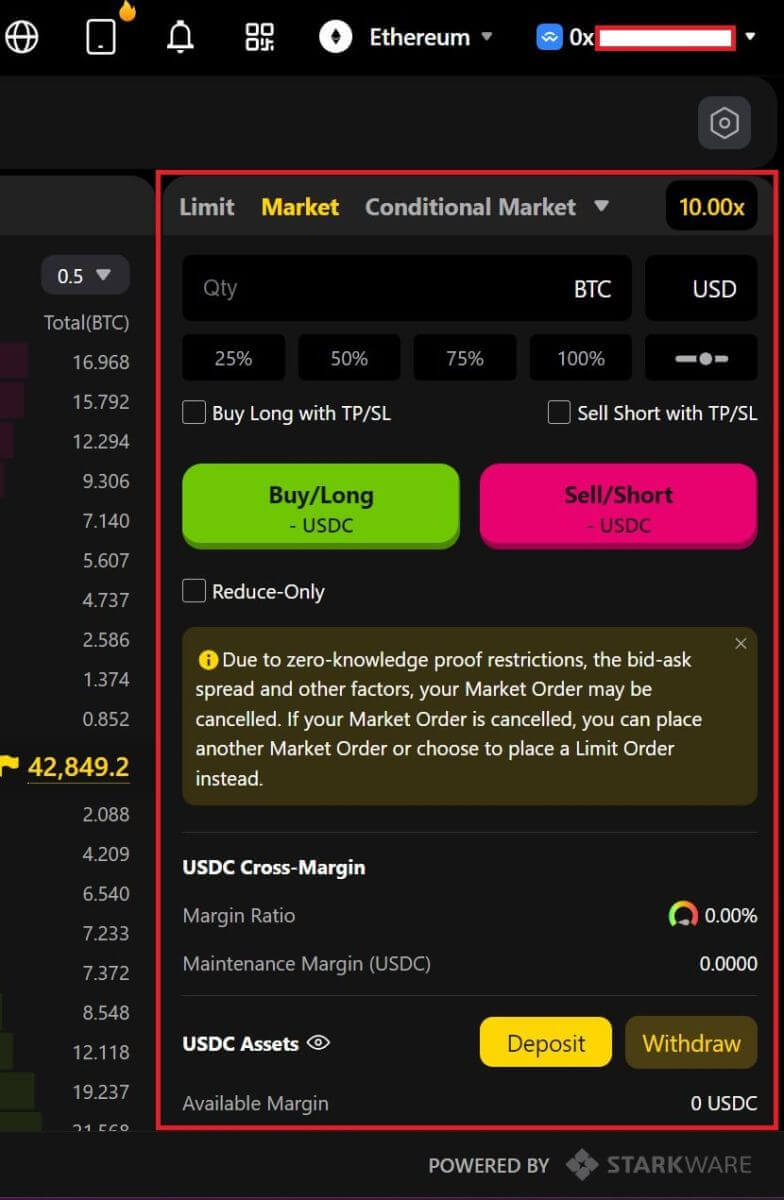
13. If it is a success, you will see an icon and your wallet number on your desktop in the top right corner of the ApeX web.
How to connect Wallet to ApeX via BybitWallet
1. Firstly, you need to go to the [ApeX] website, then click on the [Trade] in the top right corner of the page.
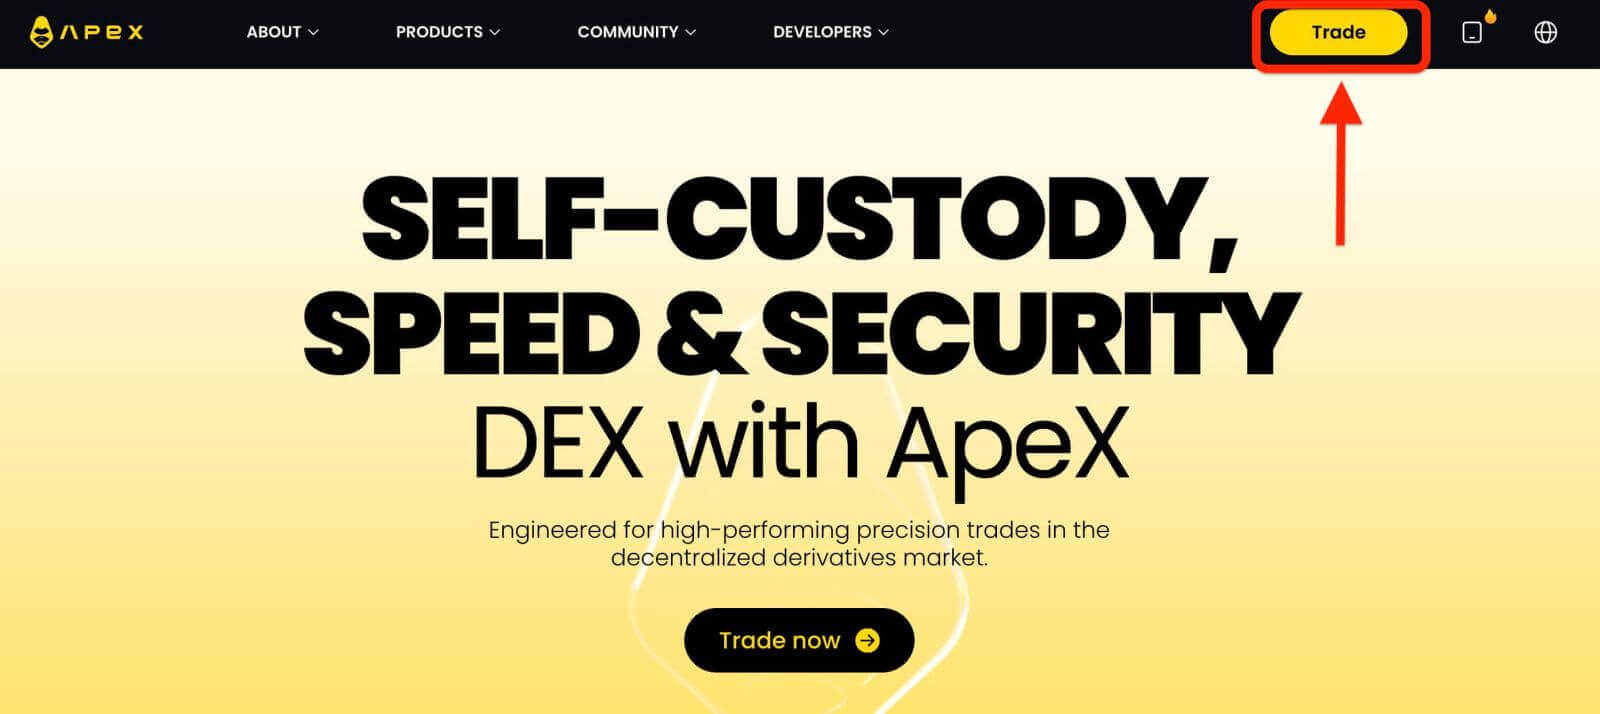
2. The website lets you in the Main Home page, then continue to click on the [Connect Wallet] in the top right corner.
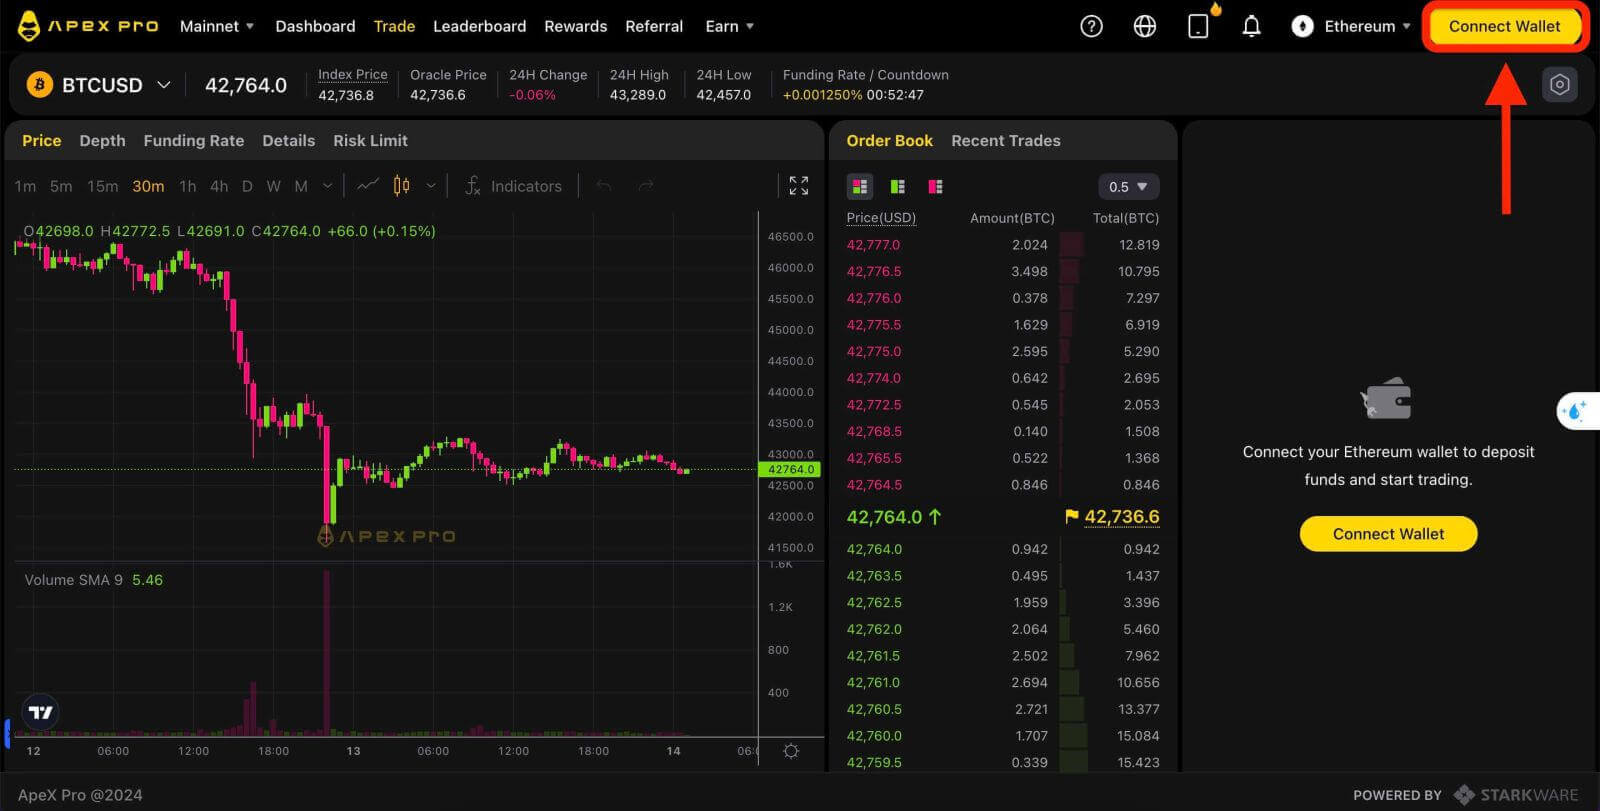
3. A pop-up window comes up, you need to click on [BybitWallet] to choose BybitWallet.
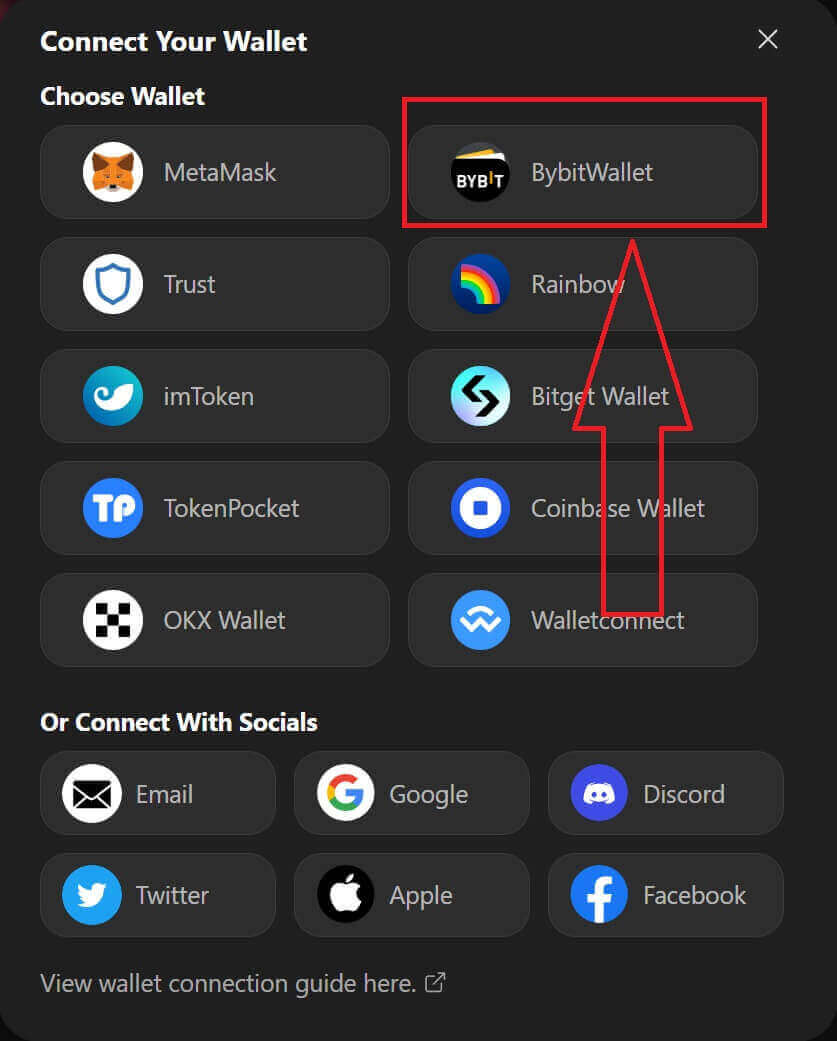
4. Before that, make sure that you have added the BybitWallet extension on your Chrome or any Internet Explorer.
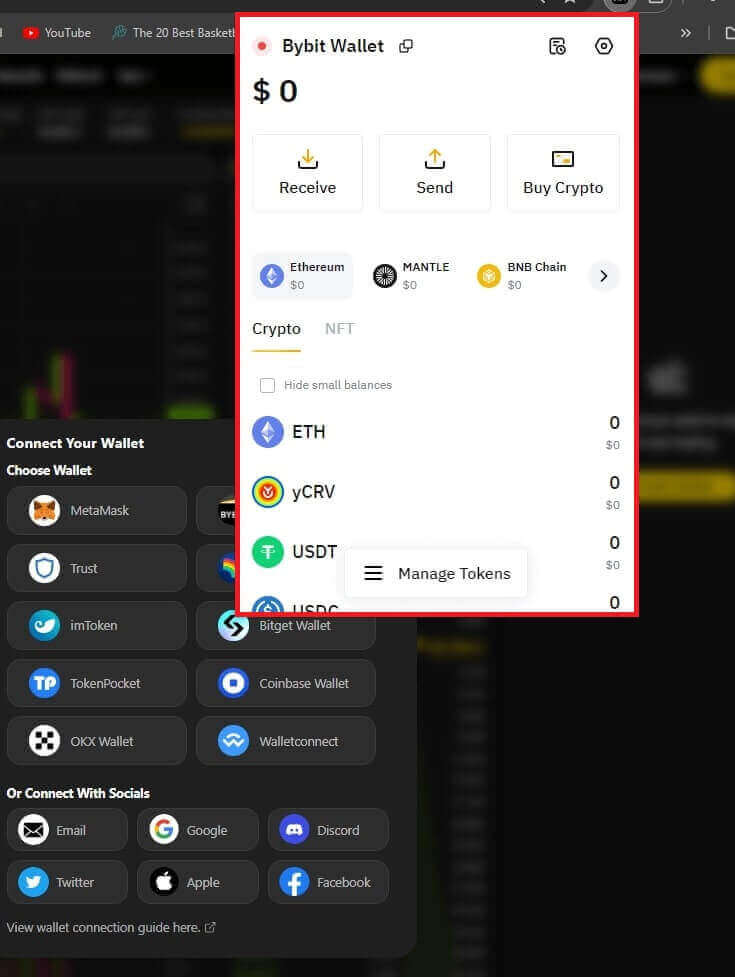
5. Click on [Link] to start the connection process.
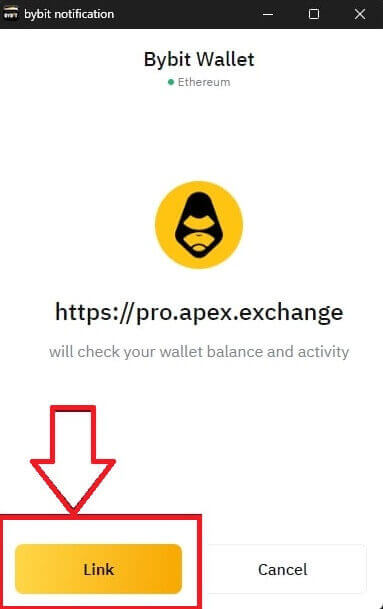
6. After connecting, A pop-up Request will come up, you need to click on [Send Requests] to continue the next step.
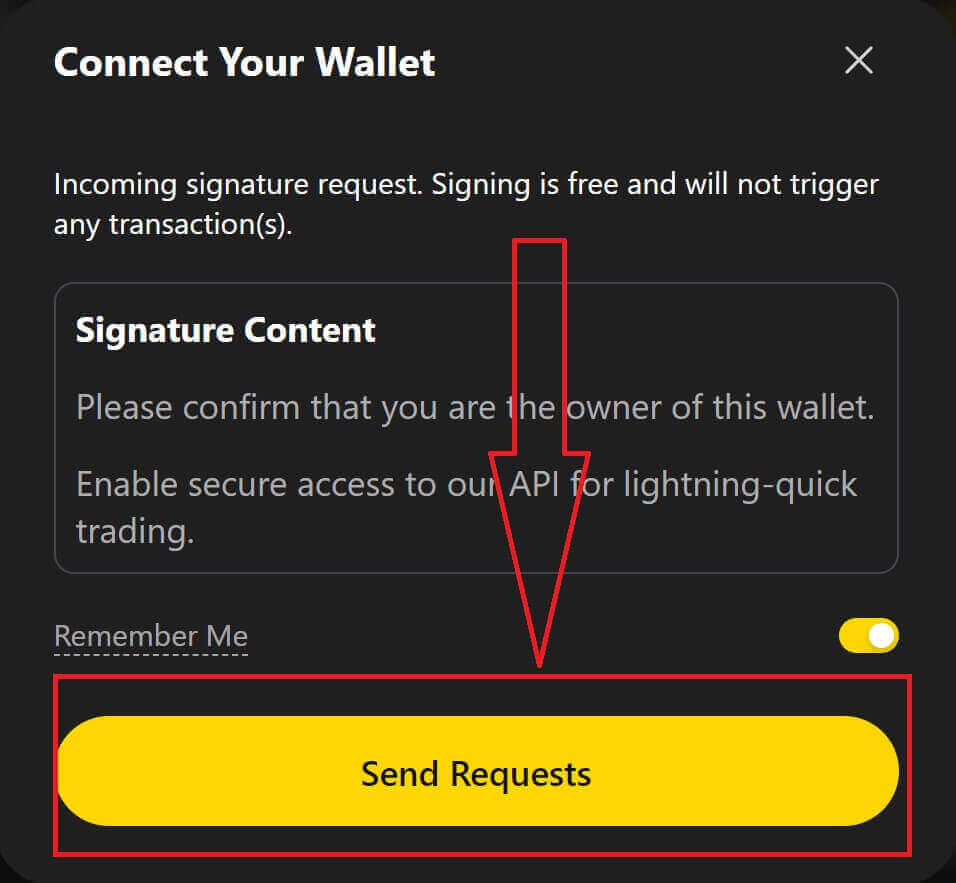
7. A pop-up window will come up to ask you for your signature to confirm that you are the owner of this wallet, click on [Confirm] to complete the connection process.
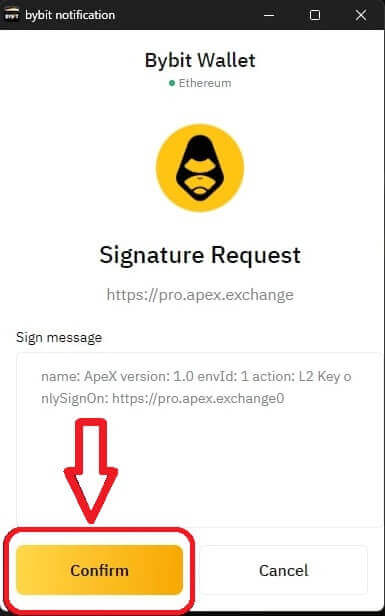
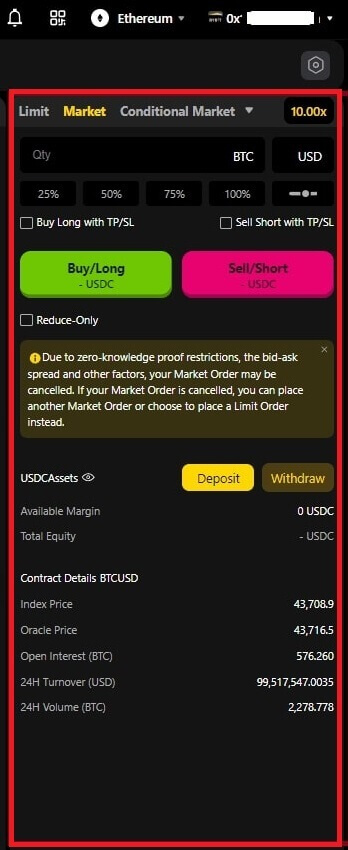
8. If it is a success, you can start trading in ApeX.
How to connect Wallet to ApeX via Coinbase Wallet
1. Firstly, you need to go to the [ApeX] website, then click on the [Trade] in the top right corner of the page.
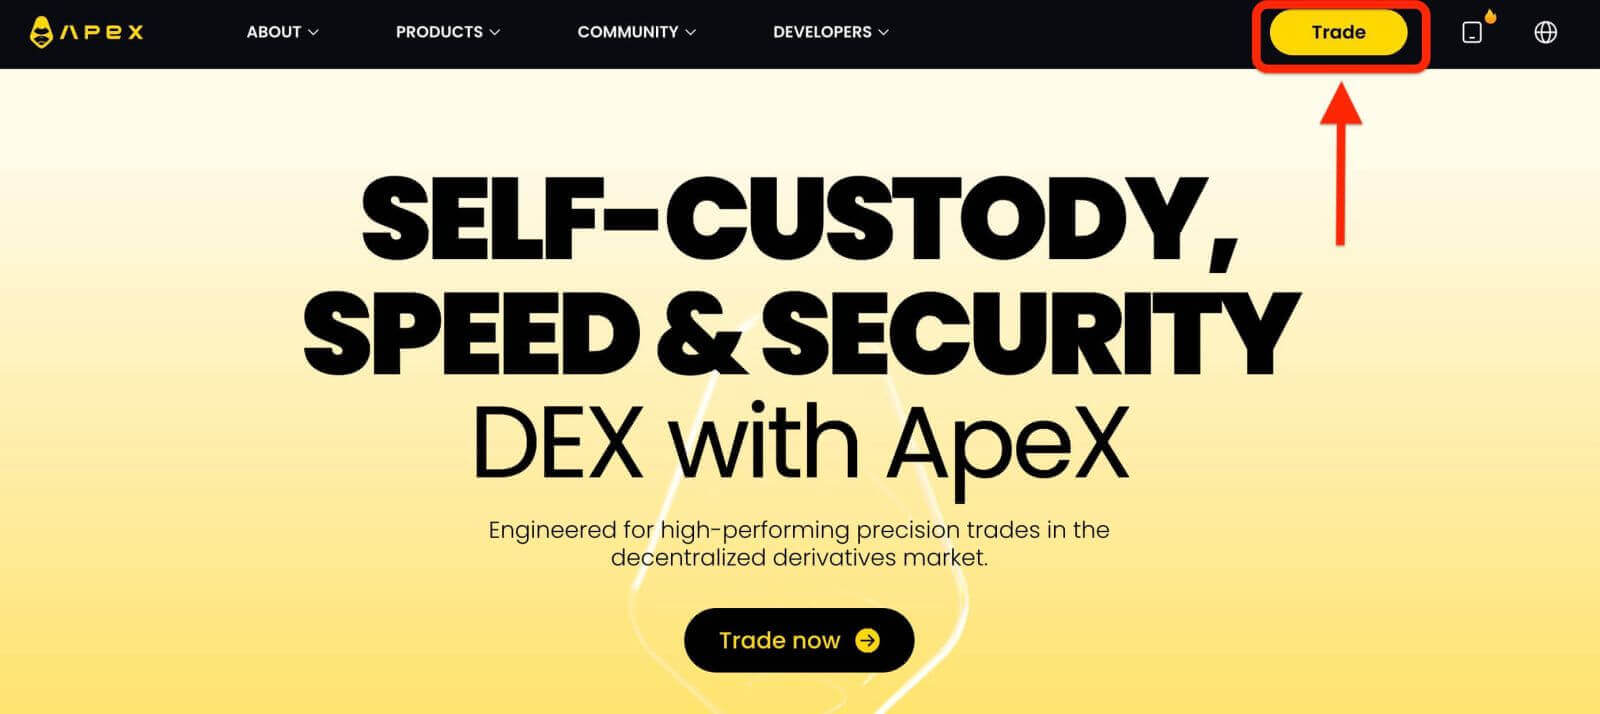
2. The website lets you in the Main Home page, then continue to click on the [Connect Wallet] in the top right corner.
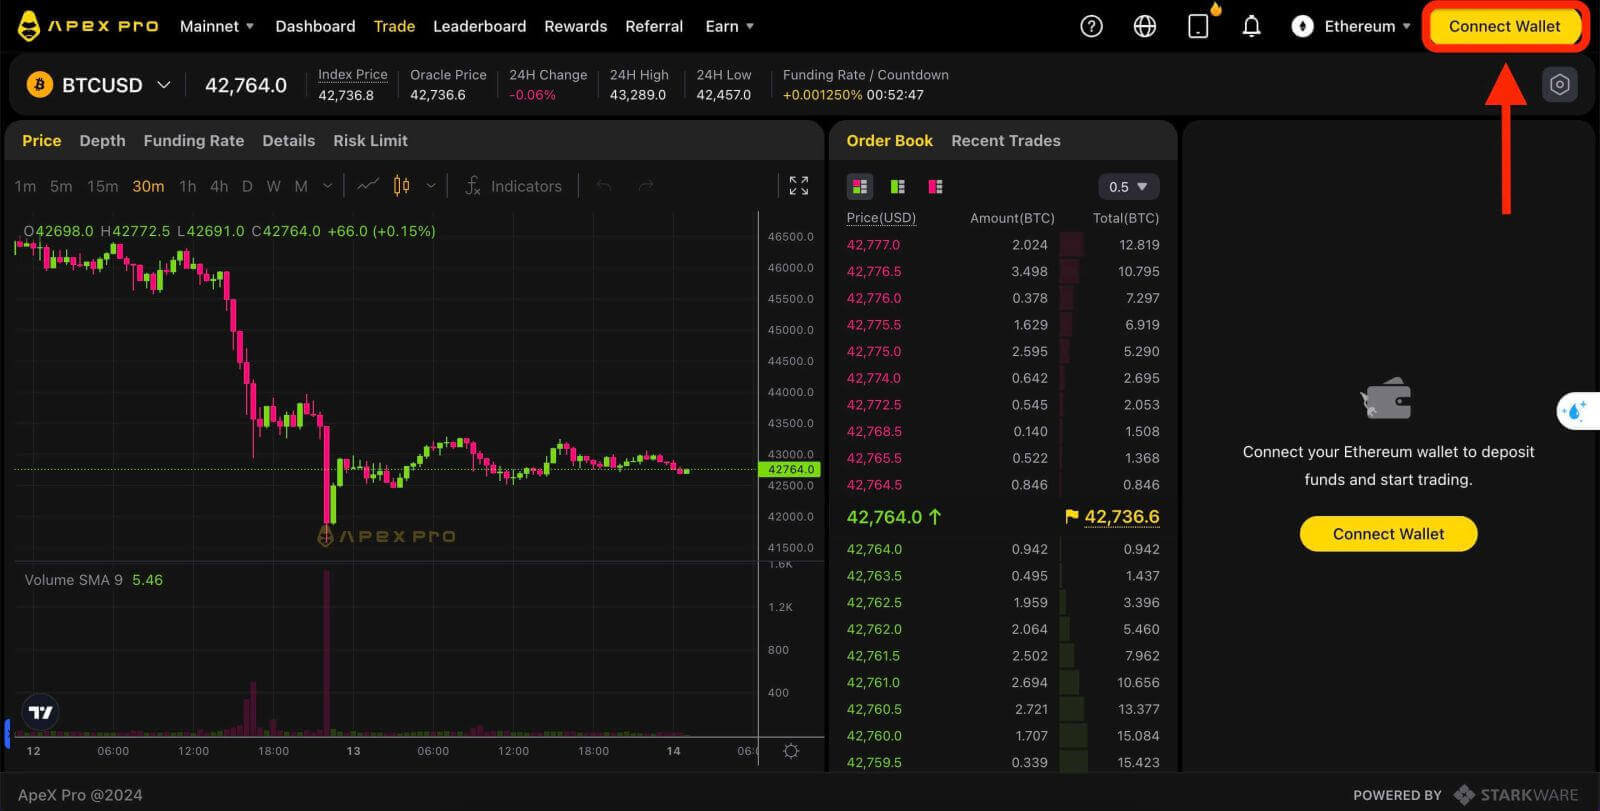
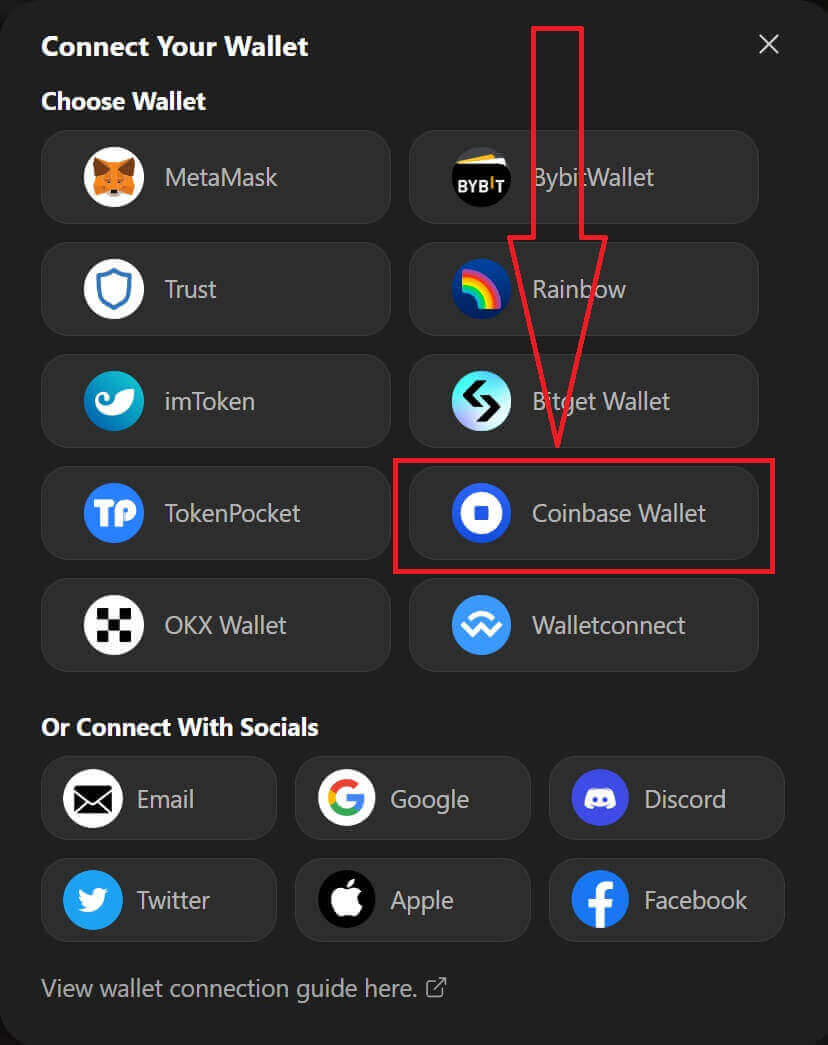
3. Click on [Coinbase Wallet] to start connecting.
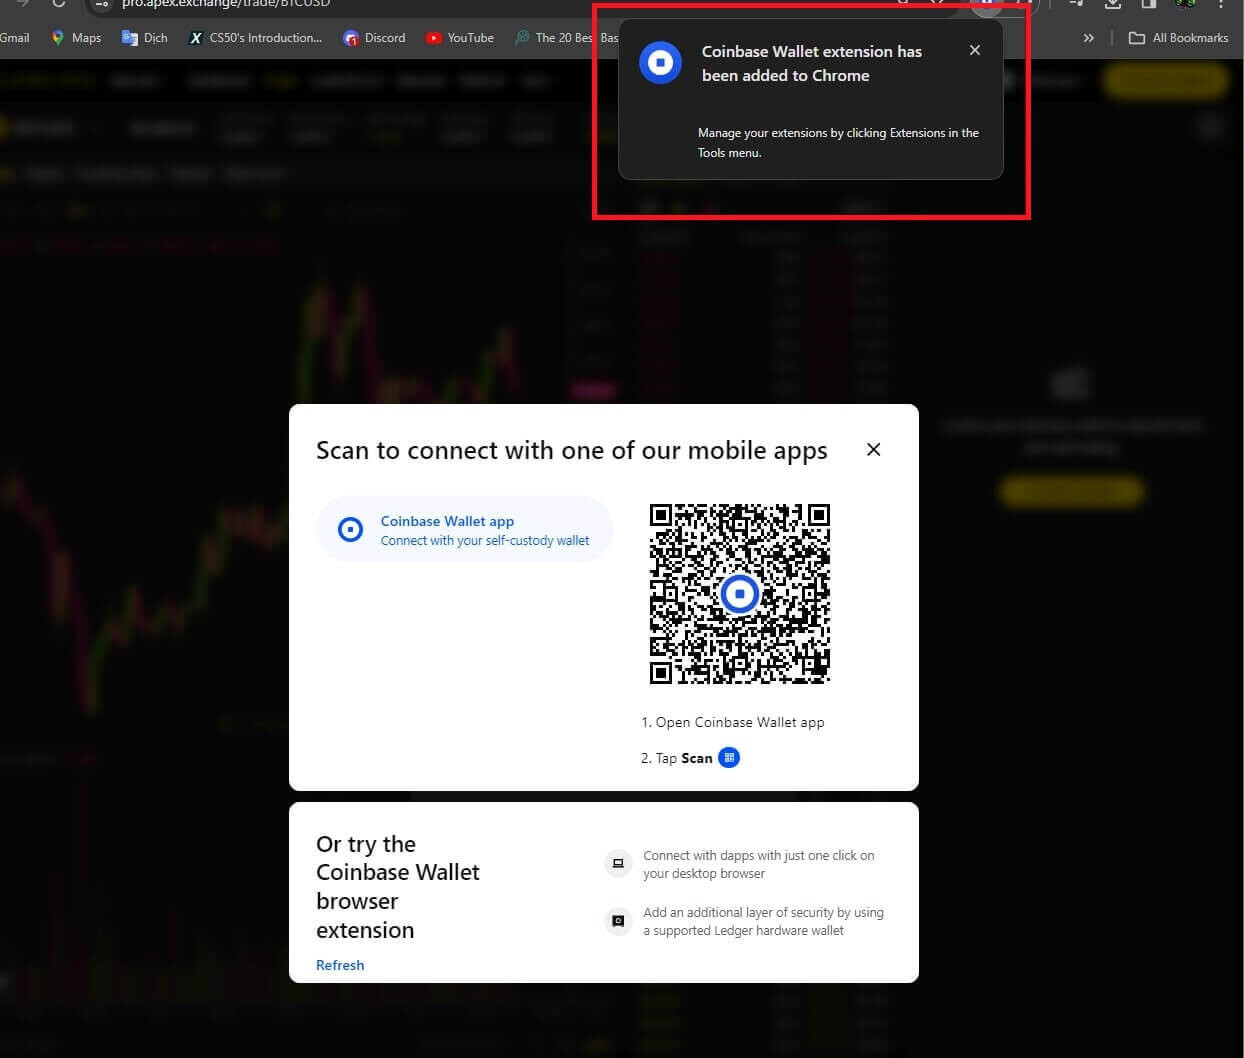
4. First, add the browser extension of Coinbase Wallet.
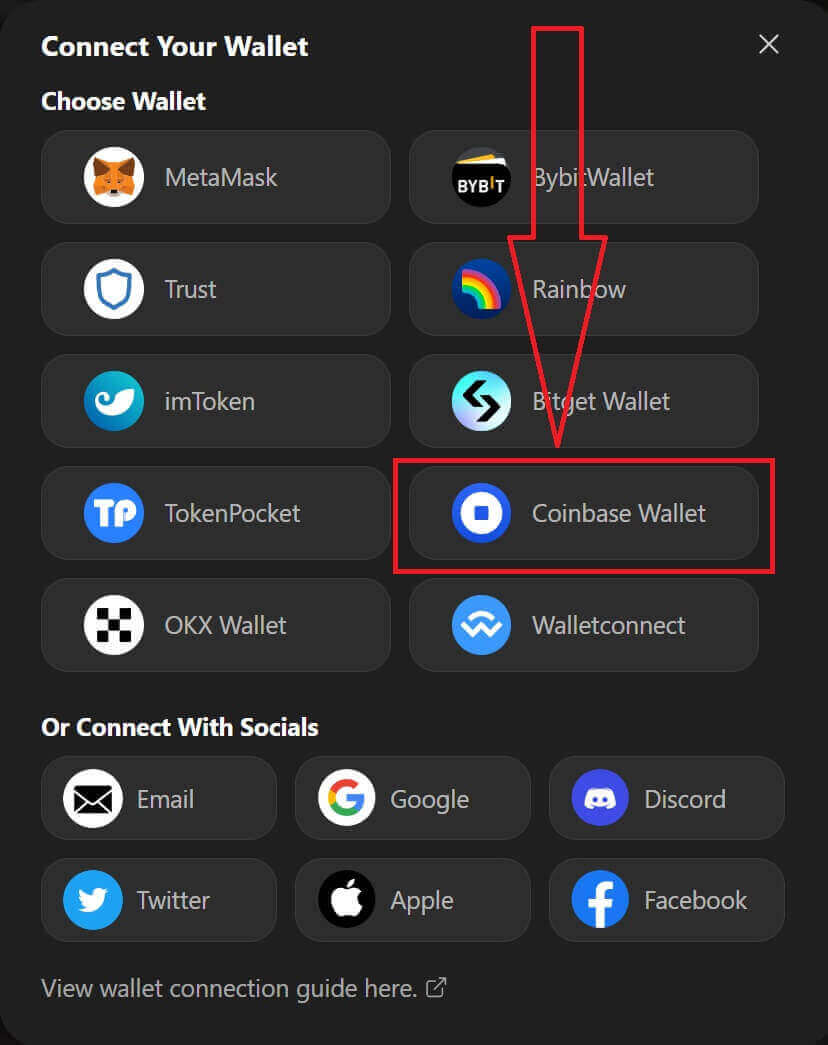
5. Refresh the tab then click [Connect Wallet] again, a pop-up window comes up, you need to click on [Coinbase Wallet] to choose Coinbase Wallet.
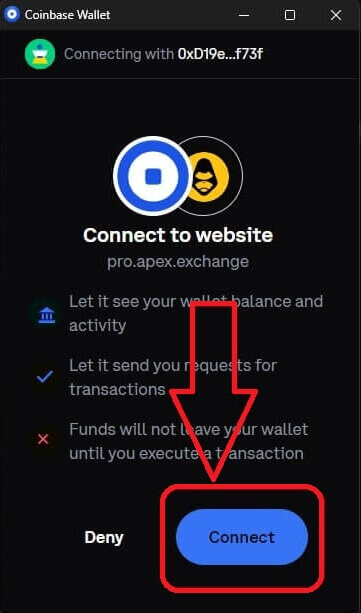
6. Click on [Connect] to start the connection process.
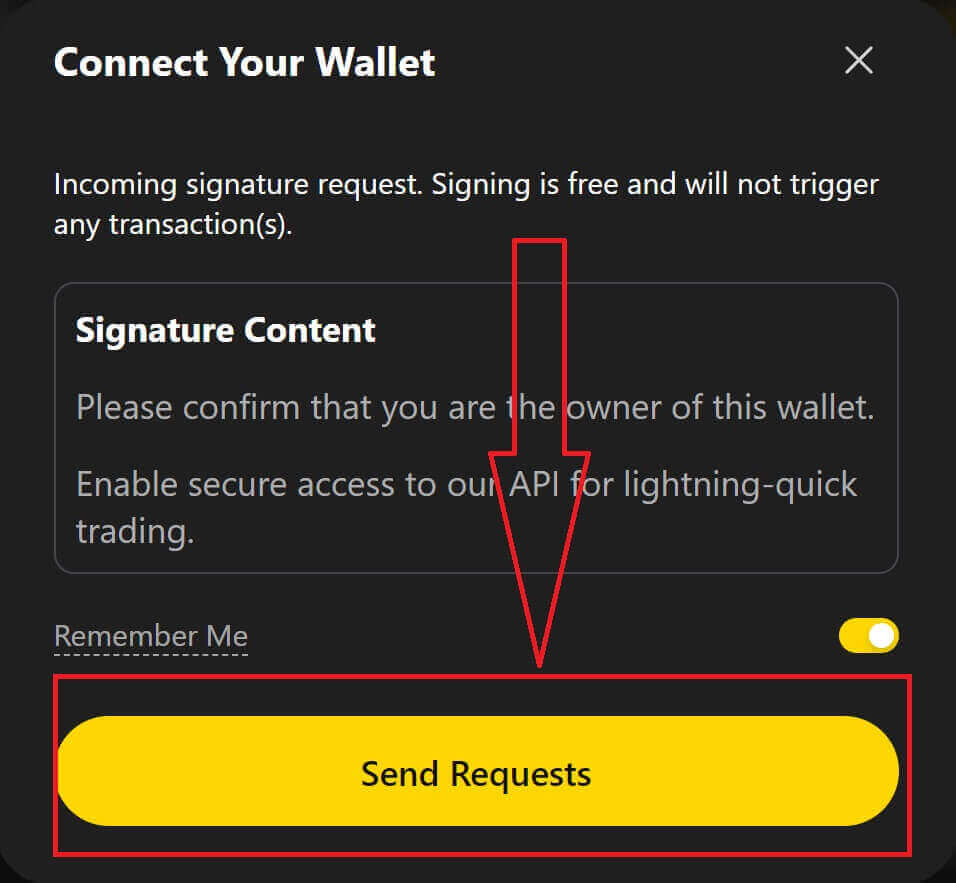
7. After connecting, A pop-up Request will come up, you need to click on [Send Requests] to continue the next step.
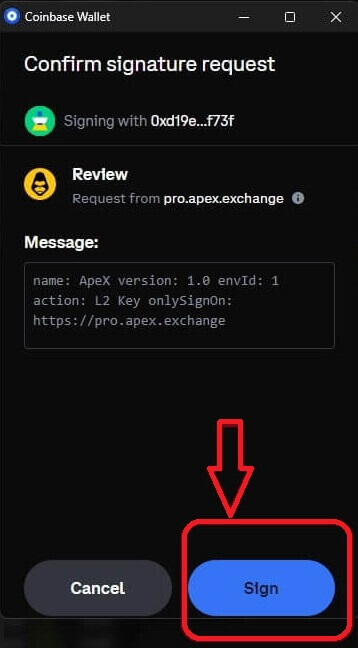
8. A pop-up window will come up to ask you for your signature to confirm that you are the owner of this wallet, click on [Sign] to complete the connection process.
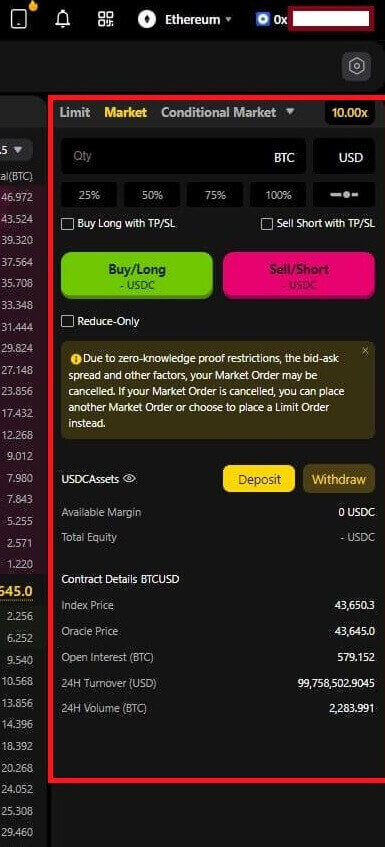
9. If it is a success, you can start trading in ApeX.
How to connect Wallet to ApeX via Google
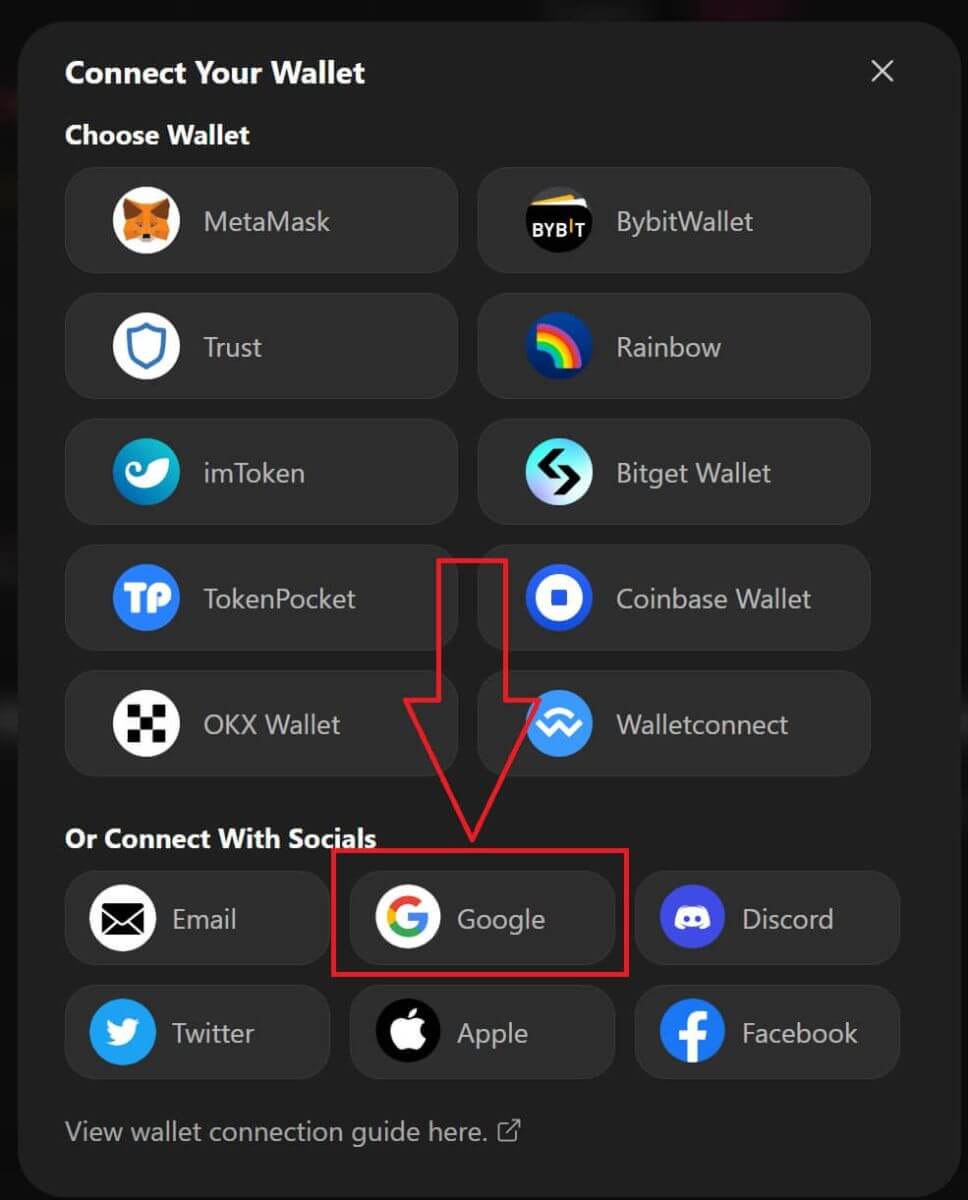
1. If you want to create an account before connecting your wallet to [Apex], you can also do it by logging in with your [Google] account.
2. Choosing the [Google] tag to create an account.
3. A pop-up window will appear asking you which [Google] account you want to use for signing in. Choosing your account or logging in to your account then the system will take it from here.
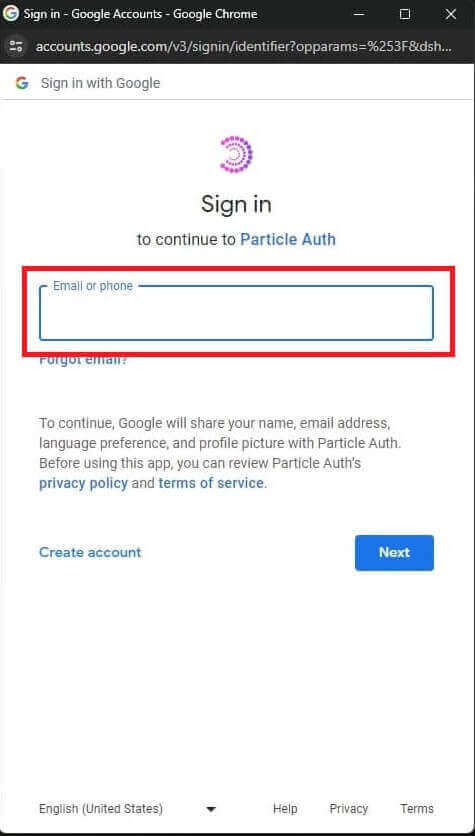
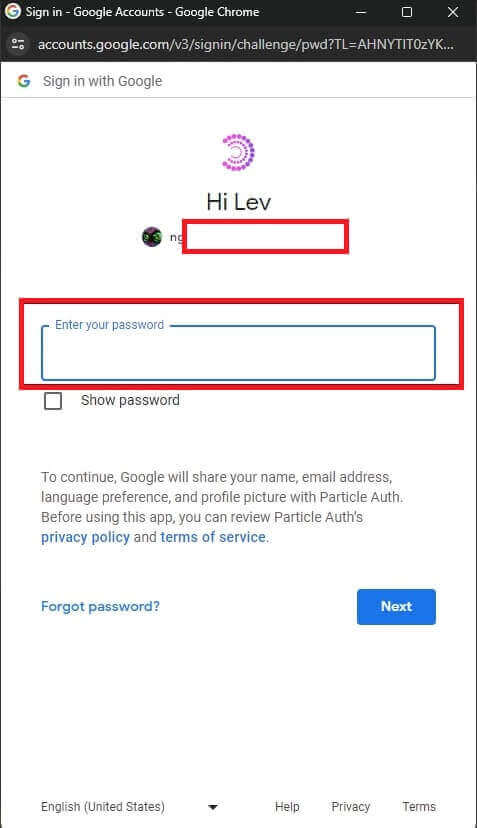
4. You have created an account in [ApeX], to start trading in [Apex] you need to connect your wallet to [ApeX], by following the tutorials above.
How to connect Wallet to ApeX via Facebook
1. Same as using [Google] account to create an account on [ApeX], you could also do it by logging in with your [Facebook] account.
2. Choosing the [Facebook] tag to create an account.
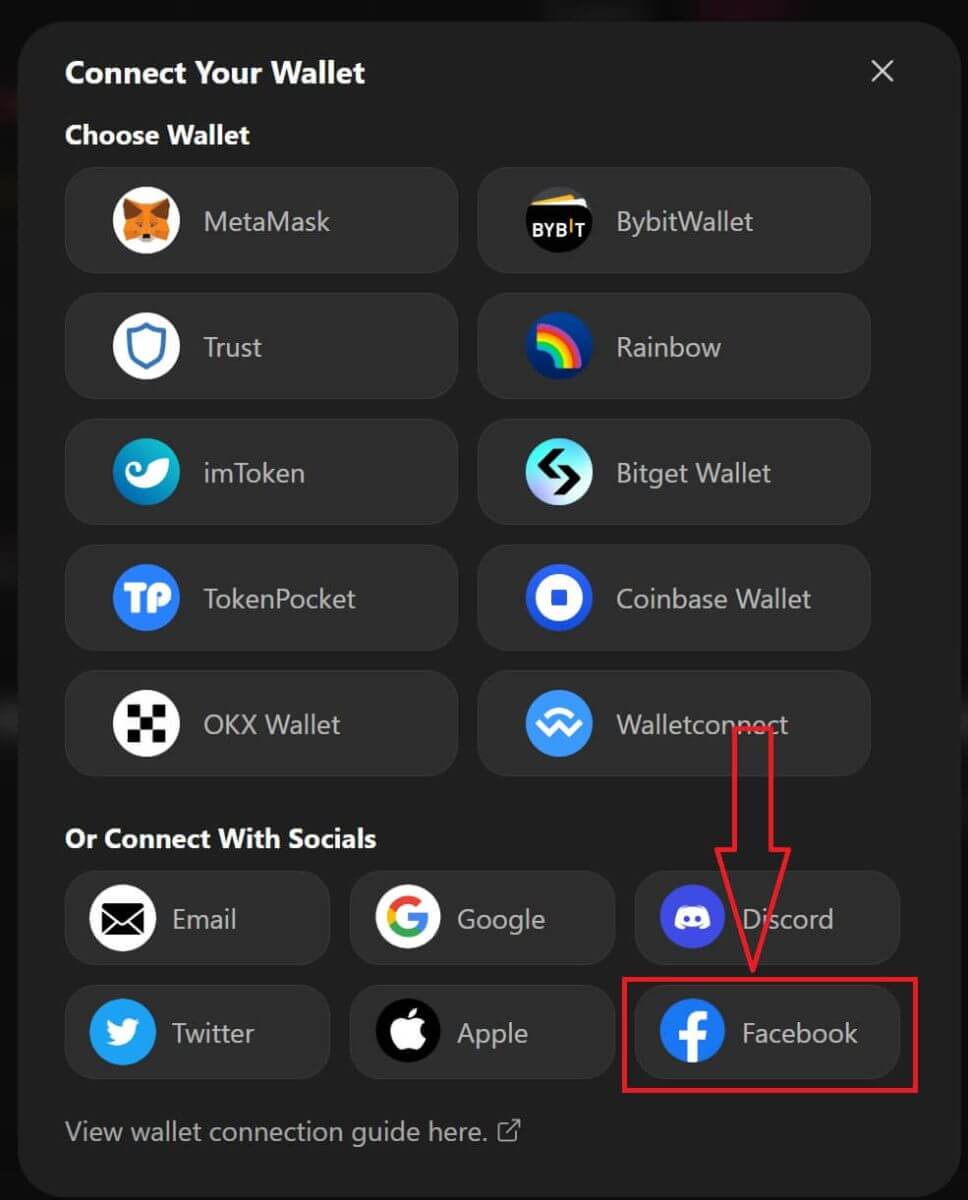
3. A pop-up window will appear asking you which [Facebook] account you want to use for signing in. Choosing your account and confirm then the system will take it from here.
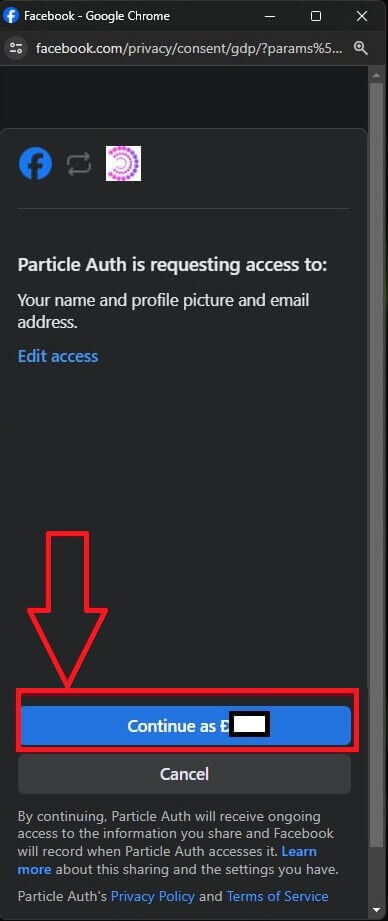
4. You have created an account in [ApeX], to start trading in [Apex] you need to connect your wallet to [ApeX], by following the tutorials above.
How to connect Wallet on the ApeX App
By QR code
1. After connecting your wallet on the ApeX desktop, the fastest way to sync your connection to the ApeX app is to sync your account/wallet connection to the app by the QR code.
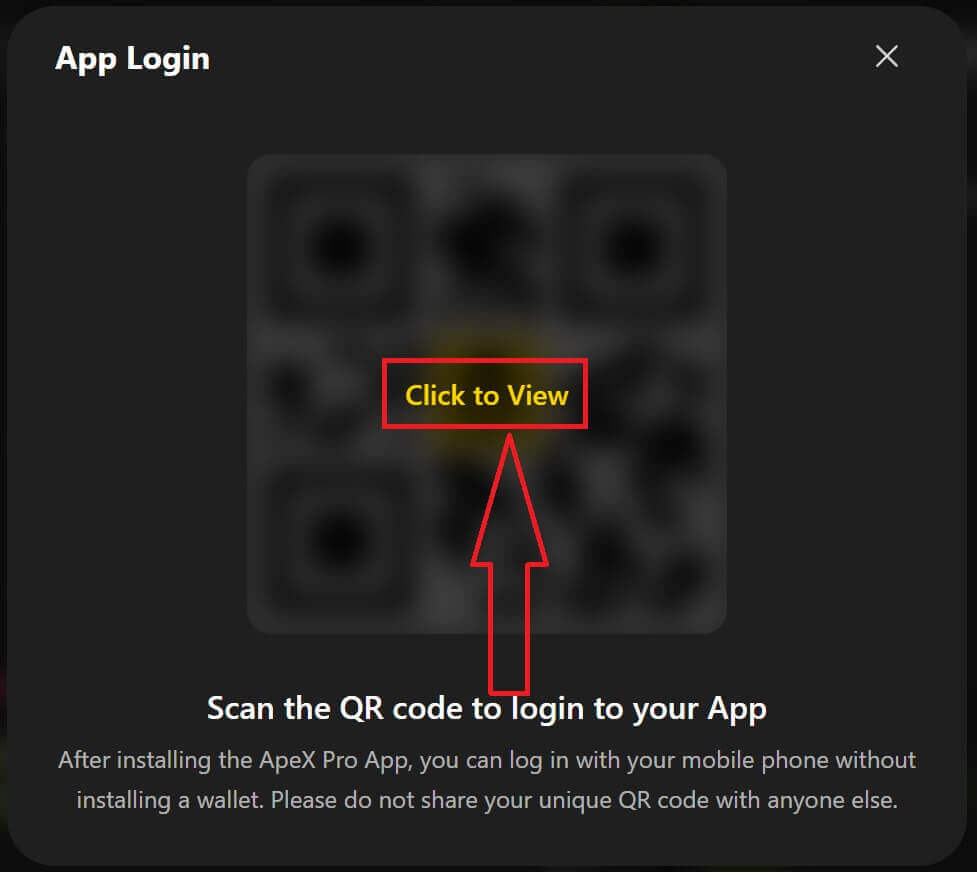
2. In the Mainnet of [ApeX] click on the QR code icon on the top right corner.

3. A pop-up window will come up, click on [Click to View] then your QR code will appear then open the ApeX app on your phone.
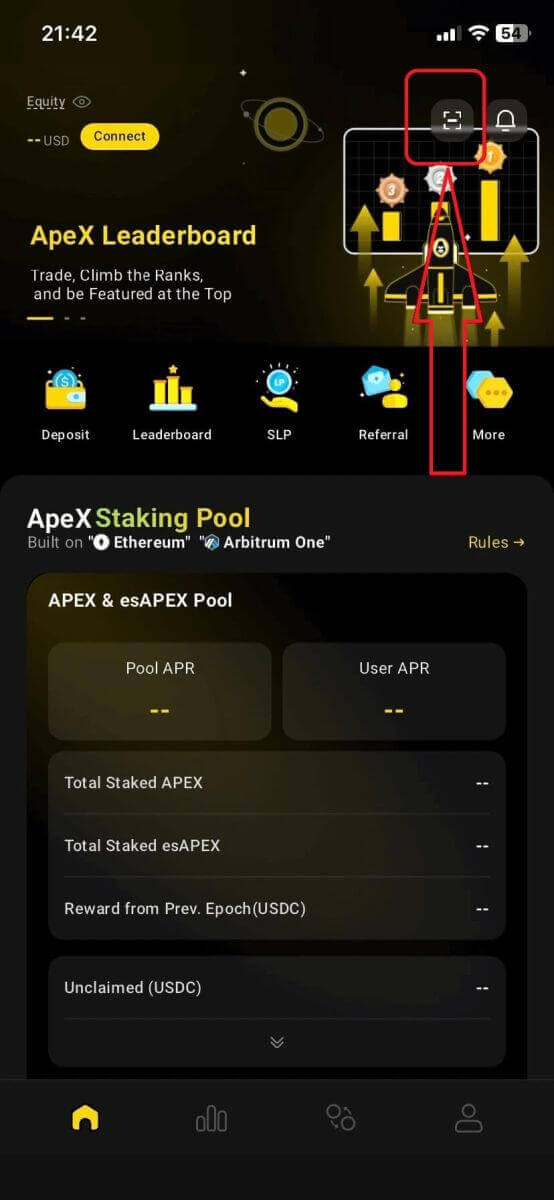
4. Click on the Scan icon in the top right corner.
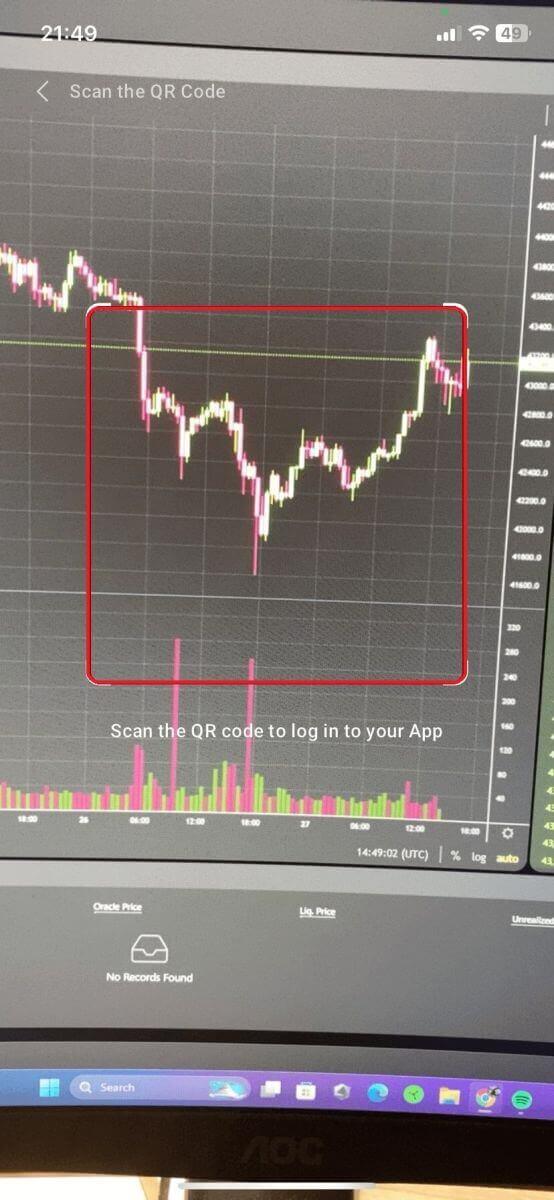
5. The scanning screen will appear, make sure to set your QR code in the red frame to log in to your app successfully.
6. If the connection is successful, it will appear a pop-up message like the one below in your Apex app.
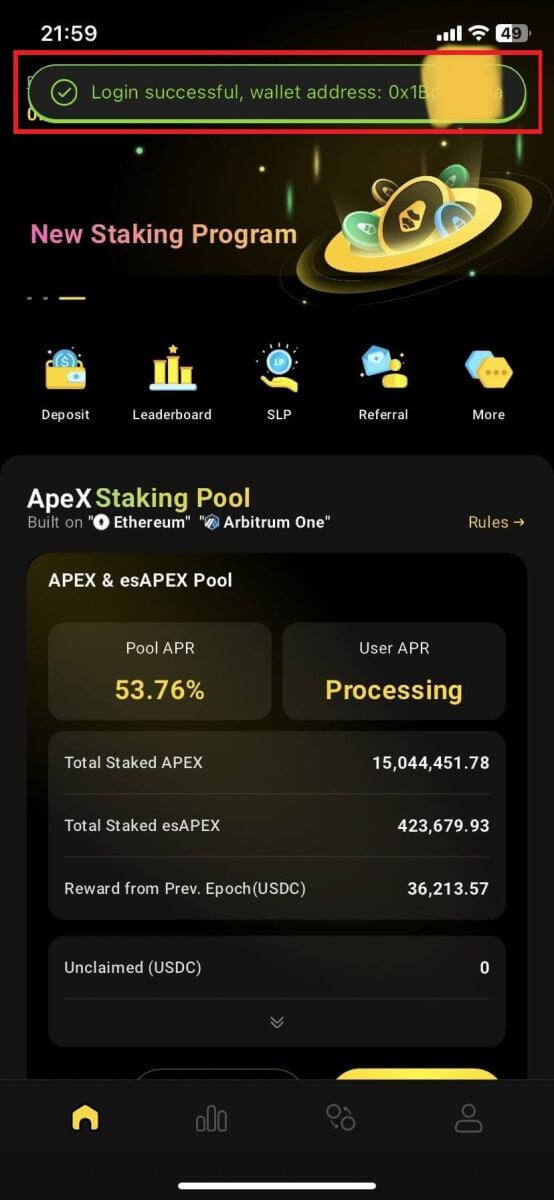
7. The connection will depend on which connection have you connected to ApeX on your Desktop.
Connect a wallet
1. First, choose the [Connect] button in the top left corner of the main home.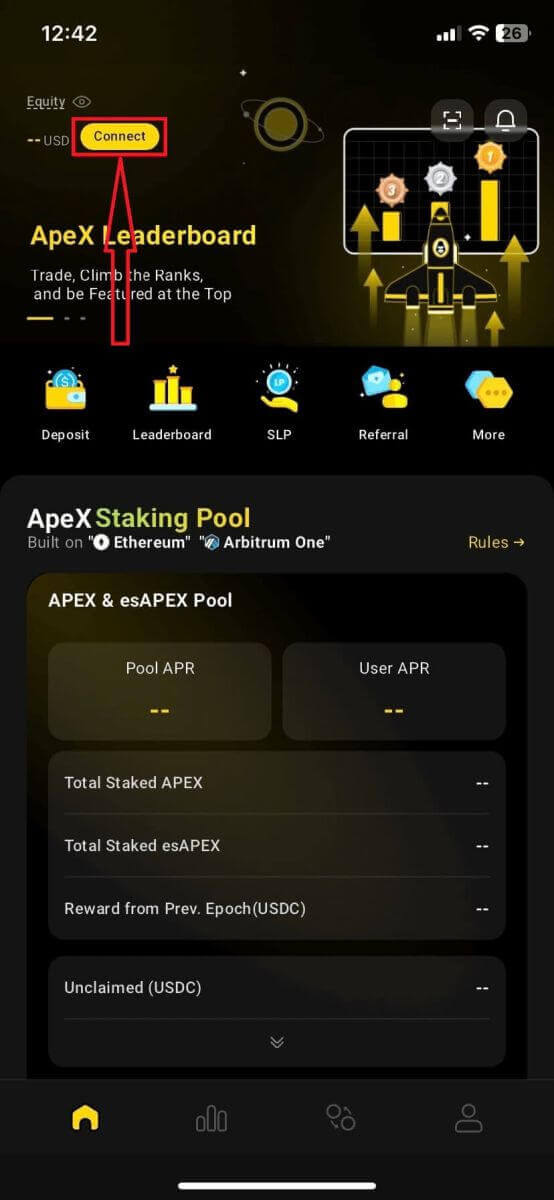
2. A pop-up window will come up, choose the chain you want to connect to and select the wallet you want to connect to.
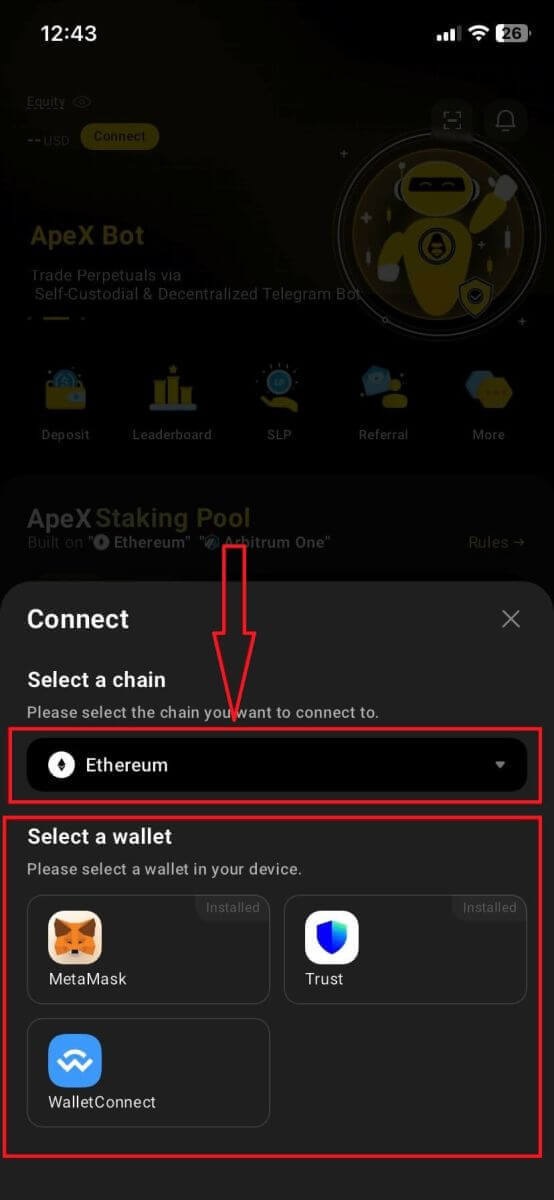
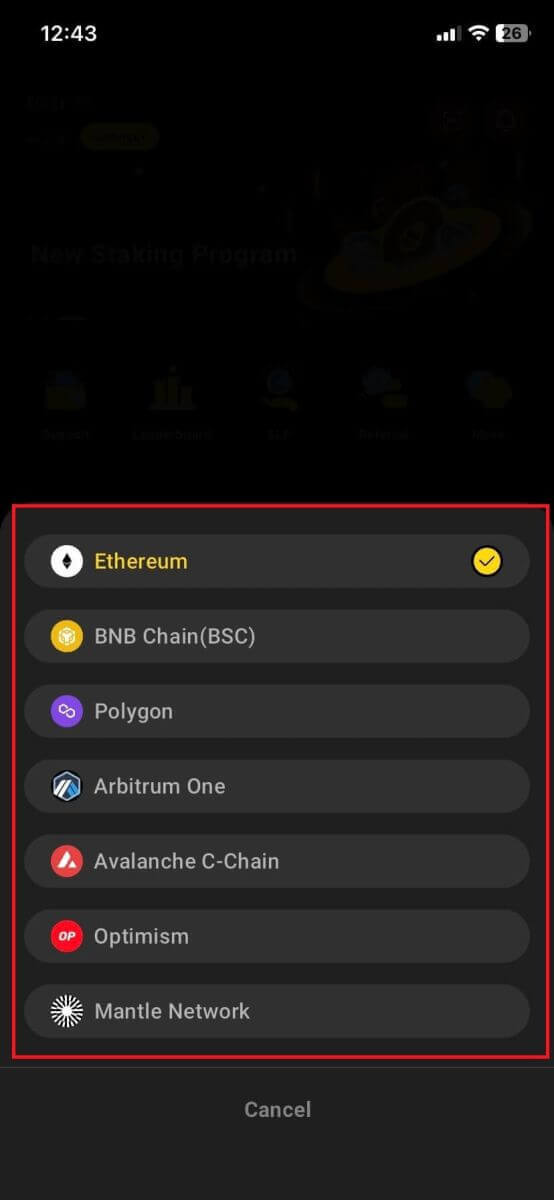
3. The app will need you to confirm the connection and verify it. The app of the wallet you choose will come up to ask for your confirmation about this.
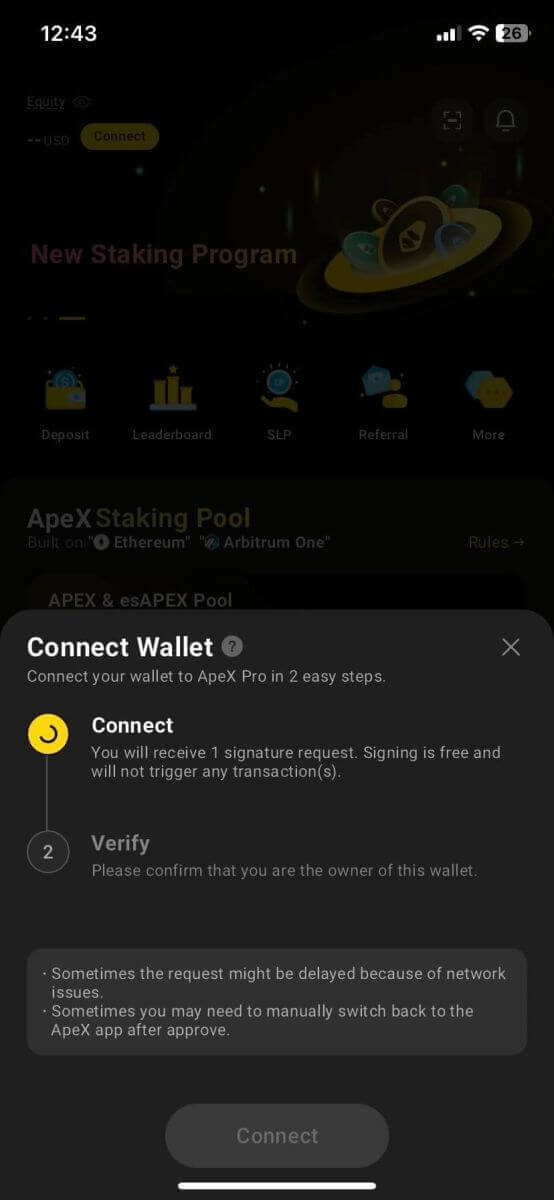
4. Choose [Connect] to start the process.
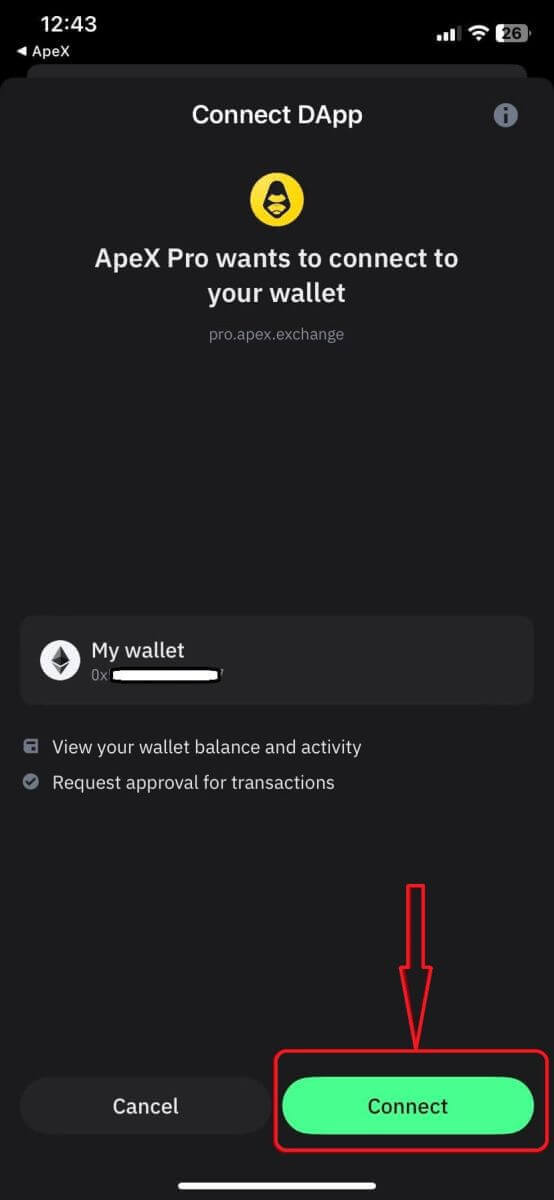
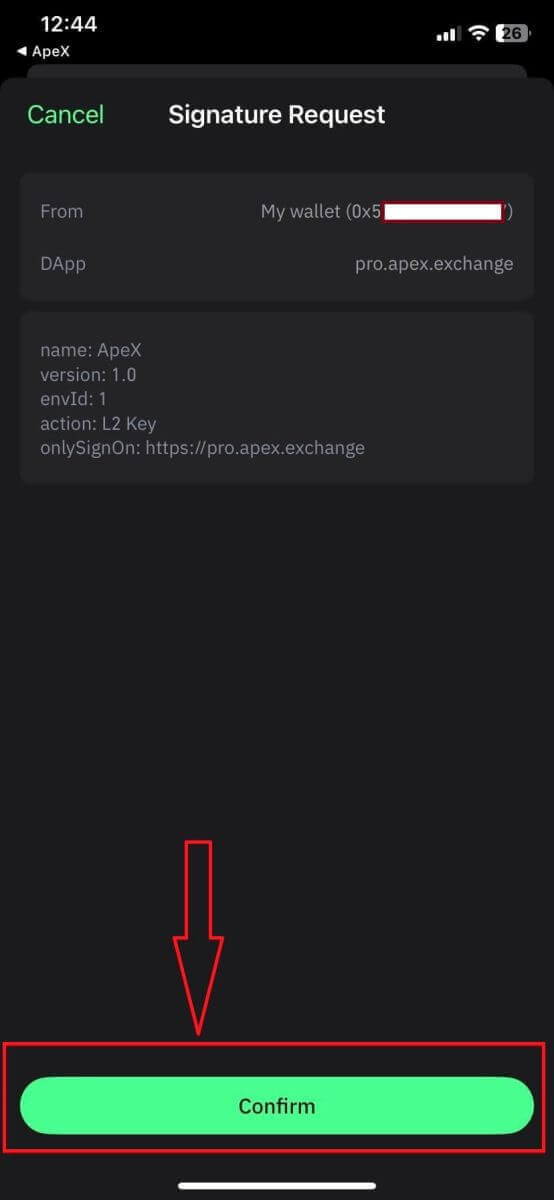
5. Click [Confirm] to complete the signature request
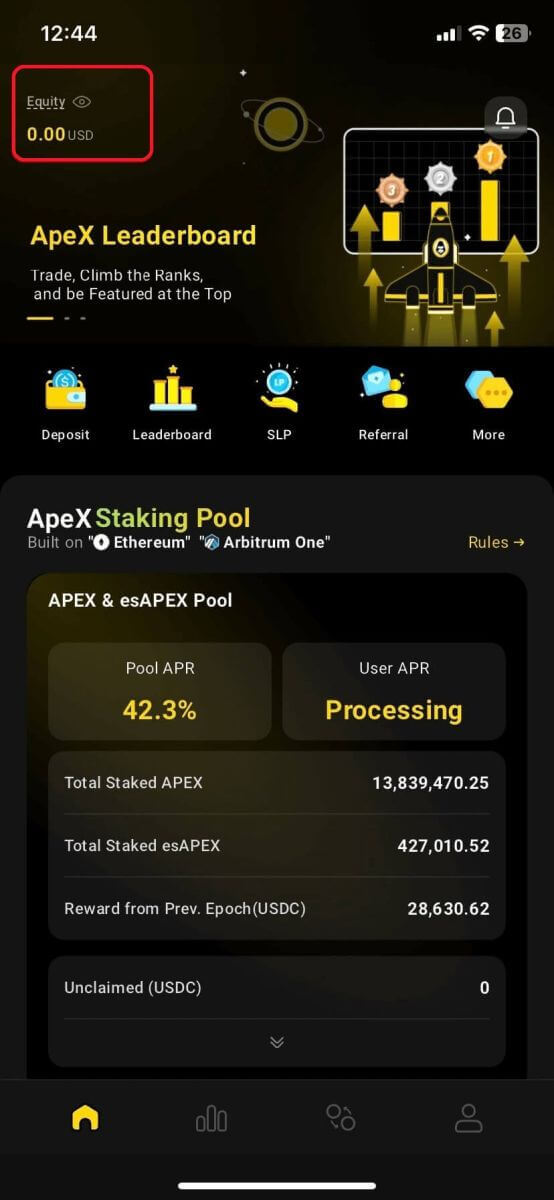
6. Here is the home page after finishing the connection.
Frequently Asked Questions (FAQ)
Is your platform safe? Are your smart contracts audited?
Yes, smart contracts on ApeX Protocol (and ApeX Pro) are fully audited by BlockSec. We are also planning to support a bug bounty campaign with secure3 to help mitigate the risk of exploits on the platform.What wallets does Apex Pro support?
Apex Pro currently supports:- MetaMask
- Trust
- Rainbow
- BybitWallet
- Bitget Wallet
- OKX Wallet
- Wallet connect
- imToken
- BitKeep
- TokenPocket
- Coinbase Wallet
Can Bybit users connect their wallets to ApeX Pro?
Bybit users can now connect their Web3 and Spot wallets to Apex Pro.How do I switch to testnet?
To view the Testnet options, connect your wallet to ApeX Pro first. Under the ’Trade’ page, you will find test net options displayed next to the Apex Pro logo on the top left hand of the page.Select the preferred Testnet environment to proceed.

Unable to Connect Wallet
1. There could be various reasons for the difficulty in connecting your wallet to ApeX Pro on both the desktop and the app.
2. Desktop
- If you use wallets like MetaMask with in-browser integration, ensure you’re signed into your wallet via the integration before logging in to Apex Pro.
3. App
- Update your wallet app to the latest version. Also, ensure your ApeX Pro app is updated. If not, update both apps and try connecting again.
- Connectivity issues might arise due to VPN or server errors.
- Certain wallet apps might require being opened first before launching the Apex Pro app.
4. Consider submitting a ticket through the ApeX Pro Discord helpdesk for further assistance.
How to Deposit into ApeX
How to Deposit on ApeX (Web)
1. First, go to the [ApeX] website, then log in to your [ApeX] account. Make sure that you have already connected your wallet to [ApeX].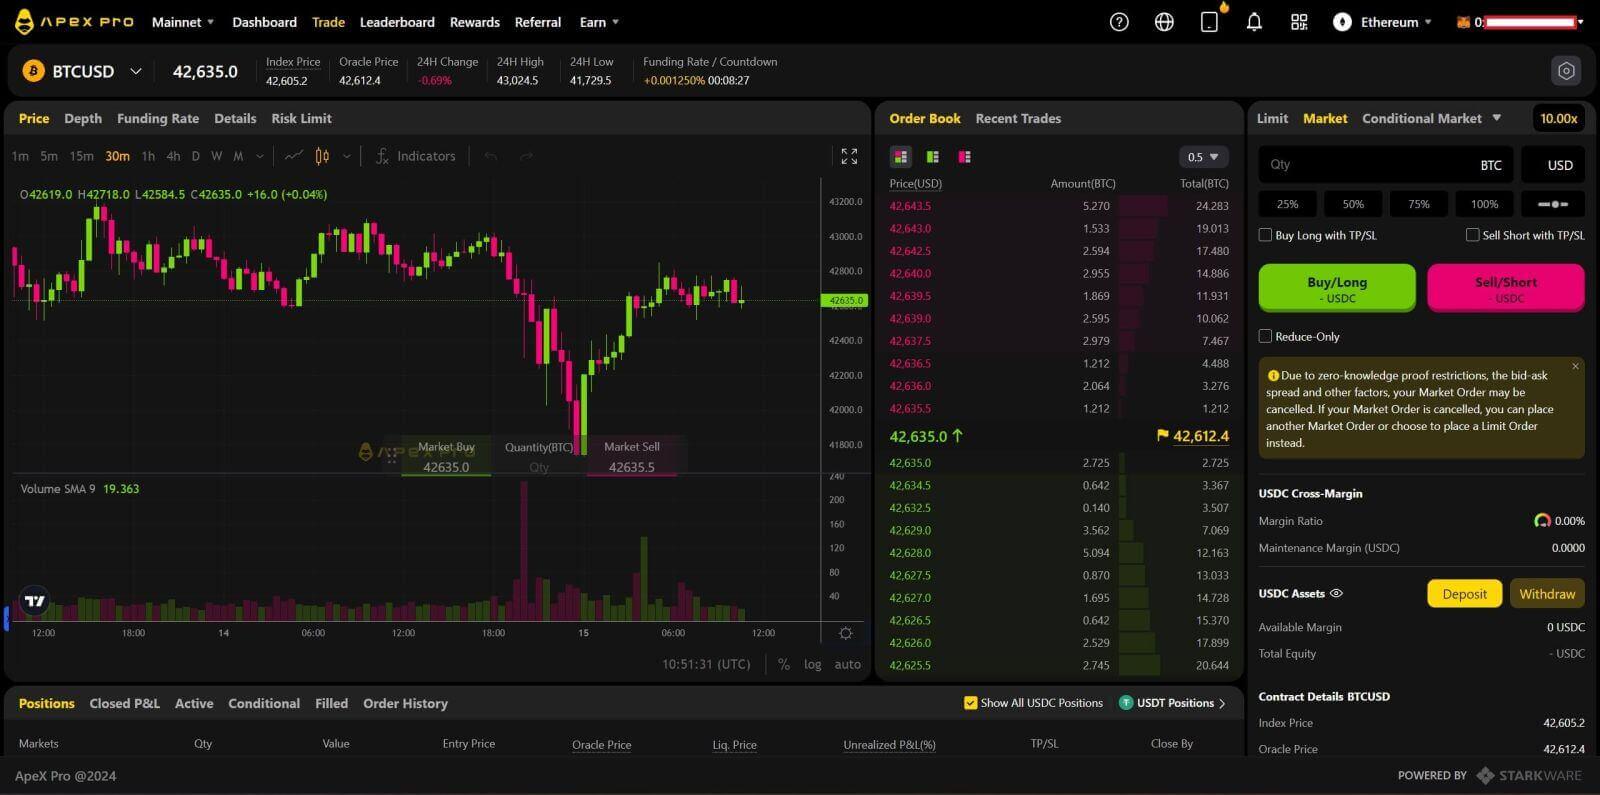
2. Click on [Deposit] on the right side of the page.
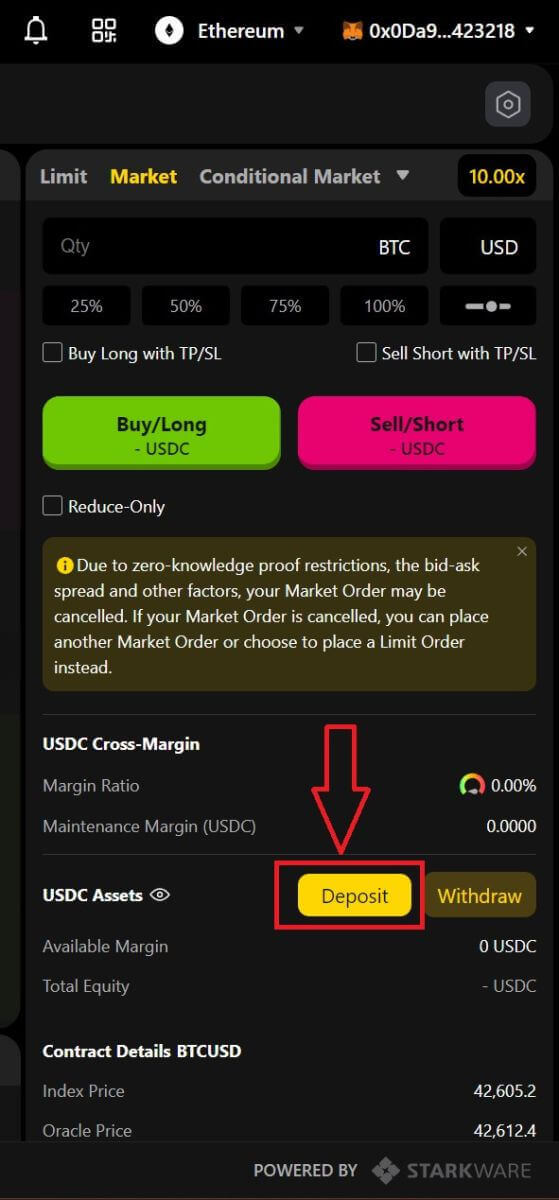
3. Select the network where you have funds available to deposit, such as Ethereum, Binance Smart Chain, Polygon, Arbitrum One, etc.
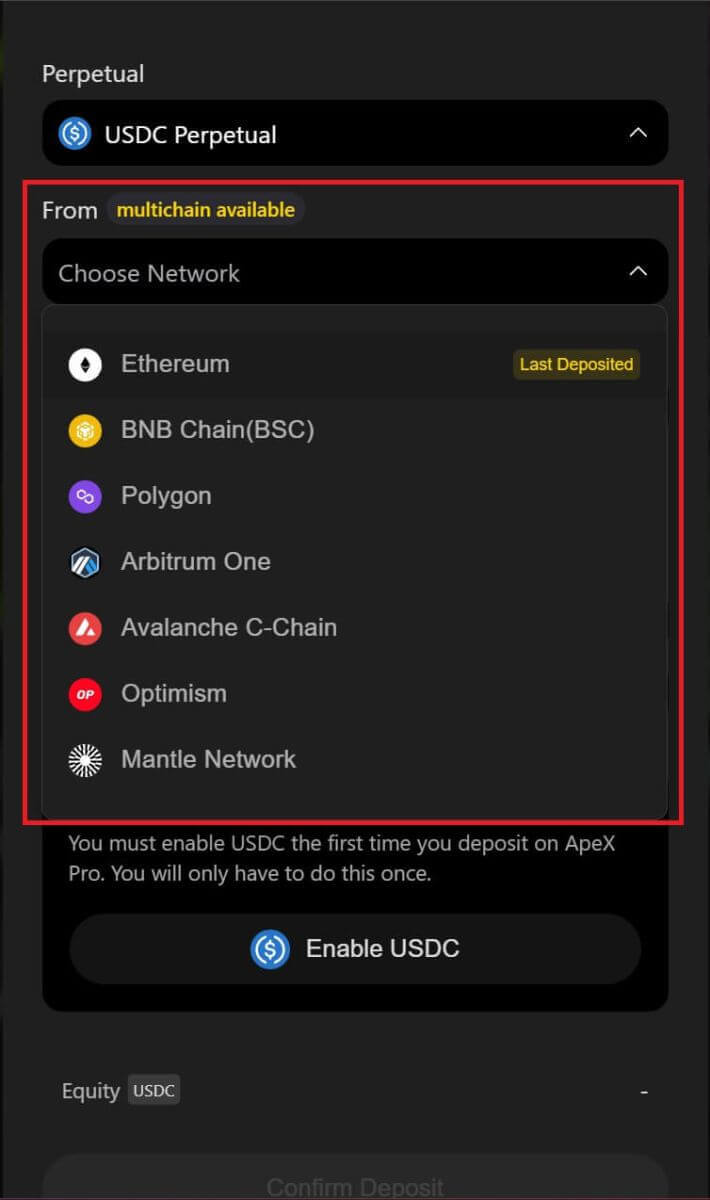
* Note: If you are not currently on the selected network, a Metamask prompt will appear asking for permission to switch to the selected network. Please approve the request to continue.
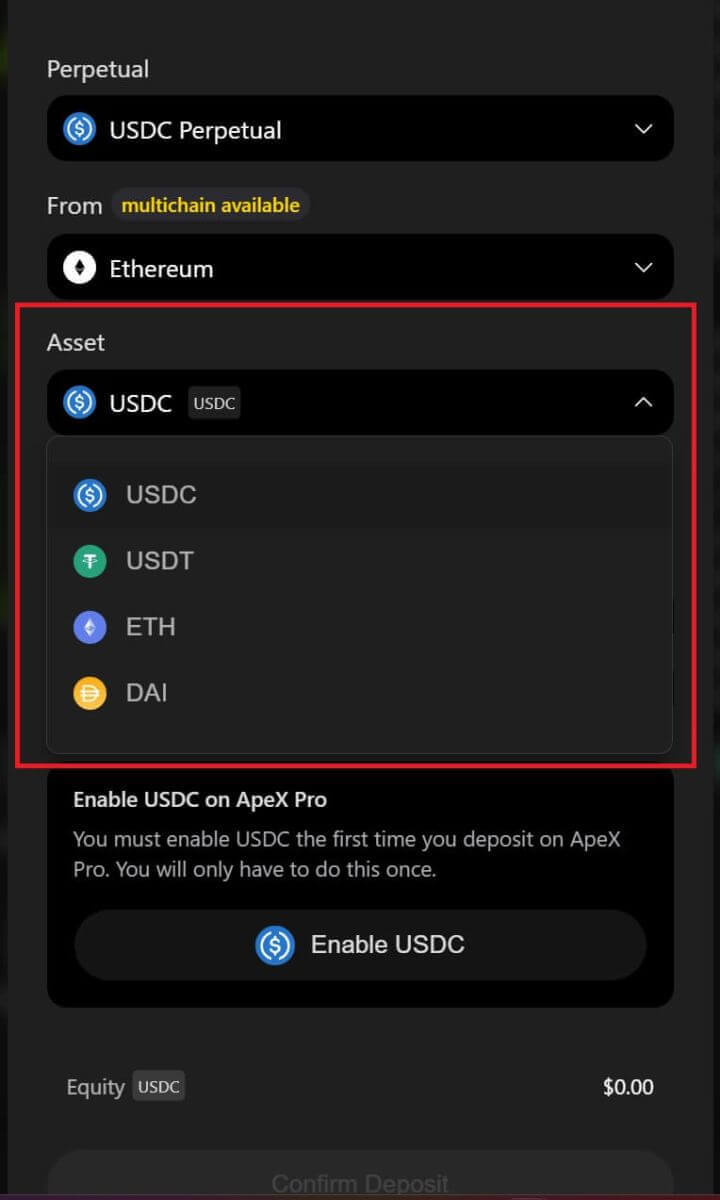
4. Select the asset you want to deposit, choose among of:
- USDC
- ETH
- USDT
- DAI
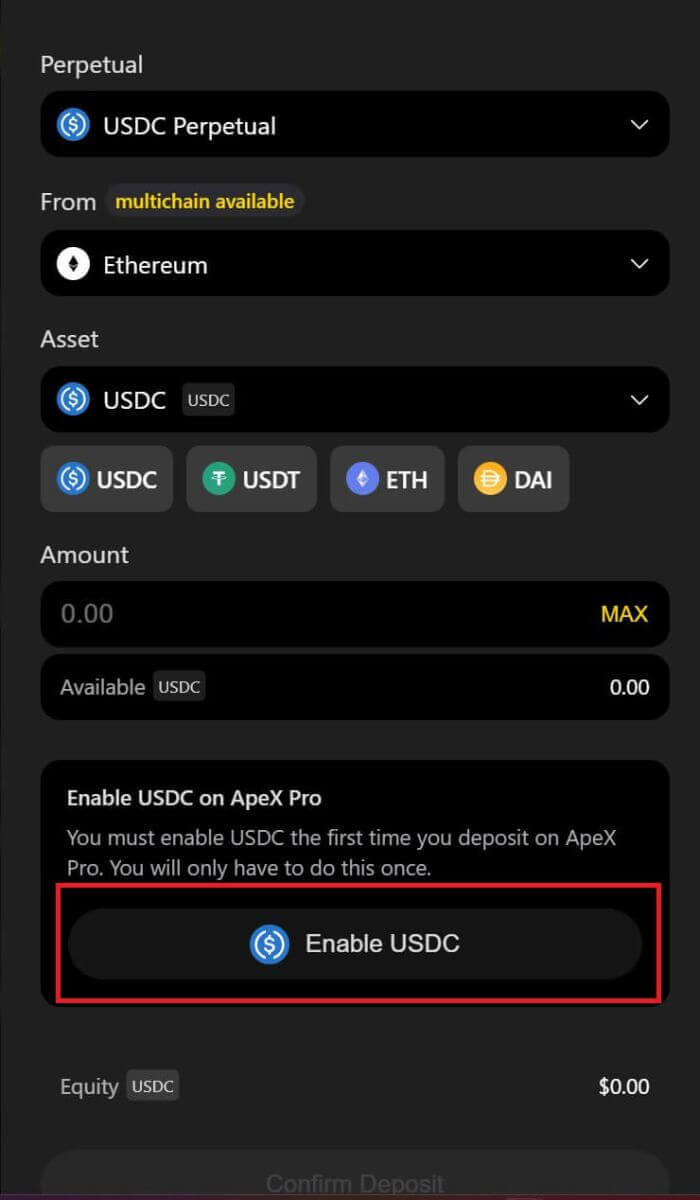
5. Please enable the selected asset to deposit. This action will cost a gas fee, so make sure you have a small amount available to sign the contract on the chosen network.
The gas fee will be paid in ETH for Ethereum and Arbitrum, Matic for Polygon, and BNB for BSC.
How to Deposit on ApeX (App)
1. Click on the profile icon in the bottom right corner.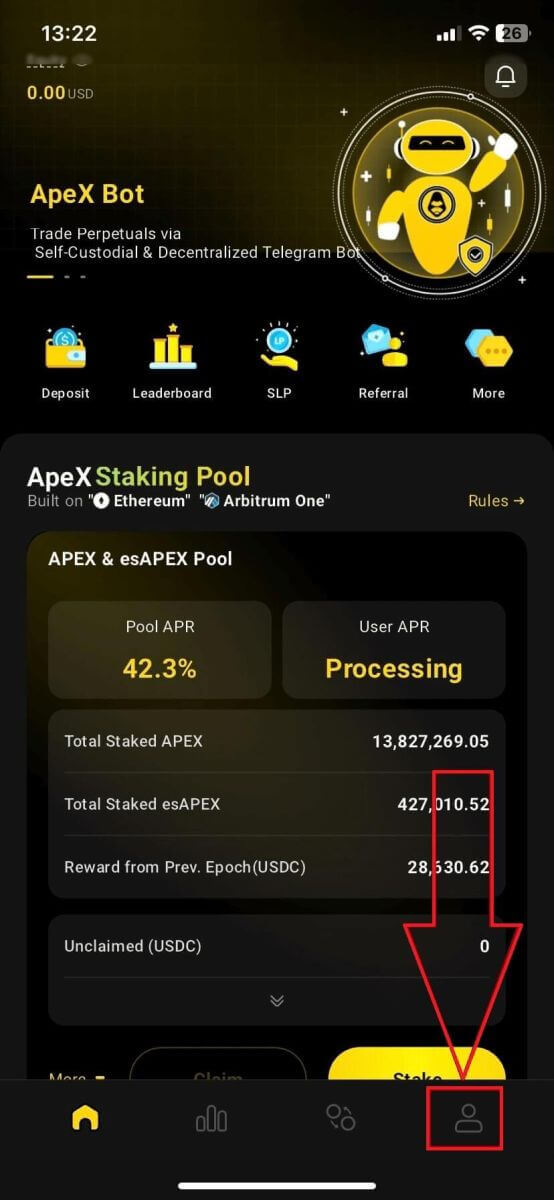
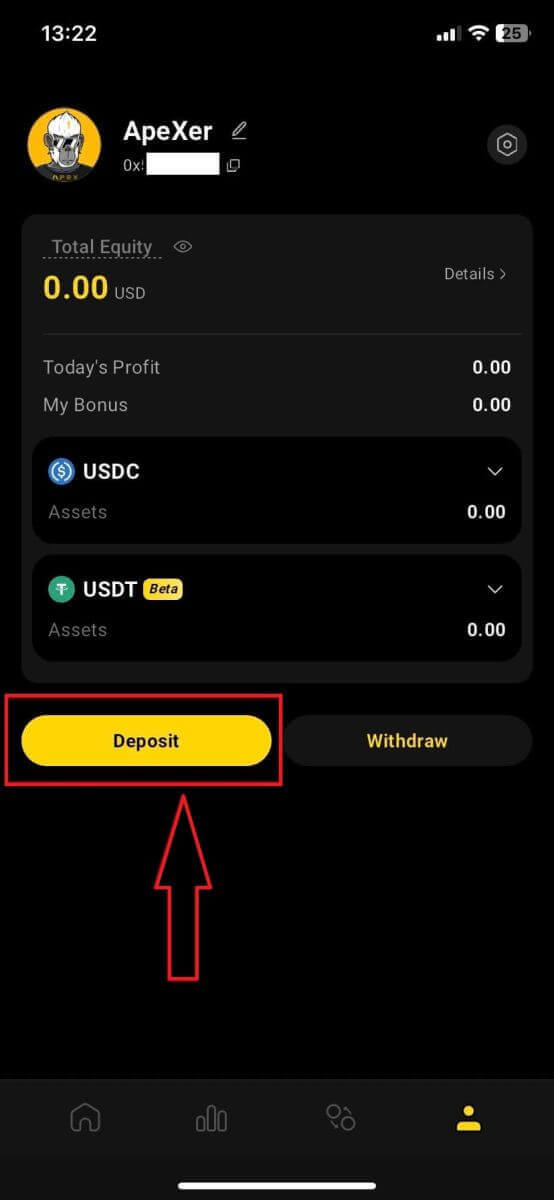
2. Choose the [Deposit] button.
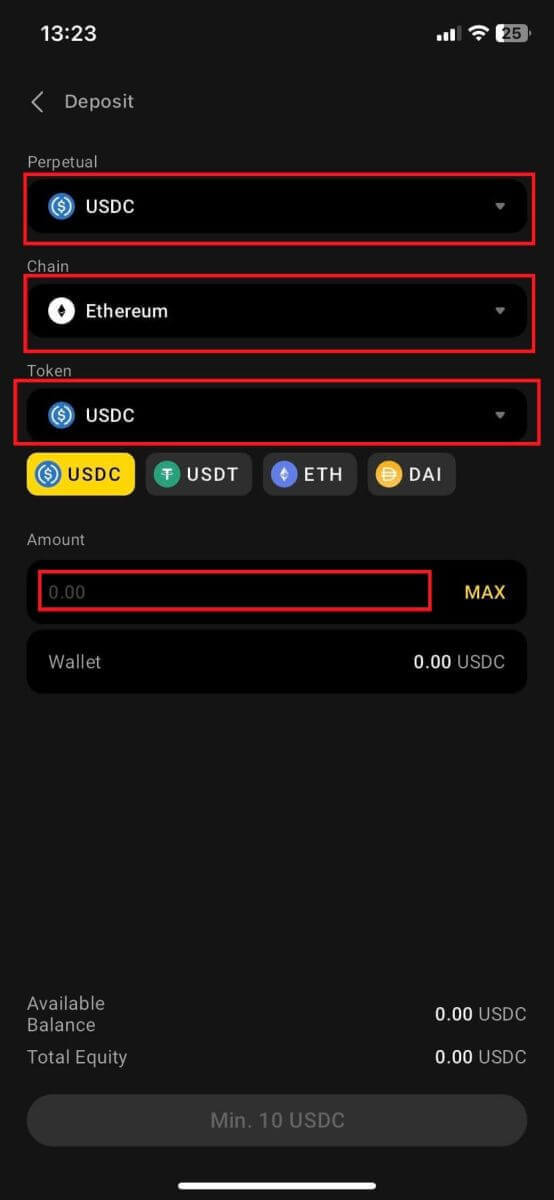
3. Here, choose the Perpetual you want to deposit, the Chain, and the Token you want to, each Token will present with the deposit ratio. Type in the amount in the box below too. After choosing all information click [Confirm] to start depositing.
How to Deposit on ApeX with MPC Wallet
1. Select your preferred social login methods under the new [Connect With Social] feature.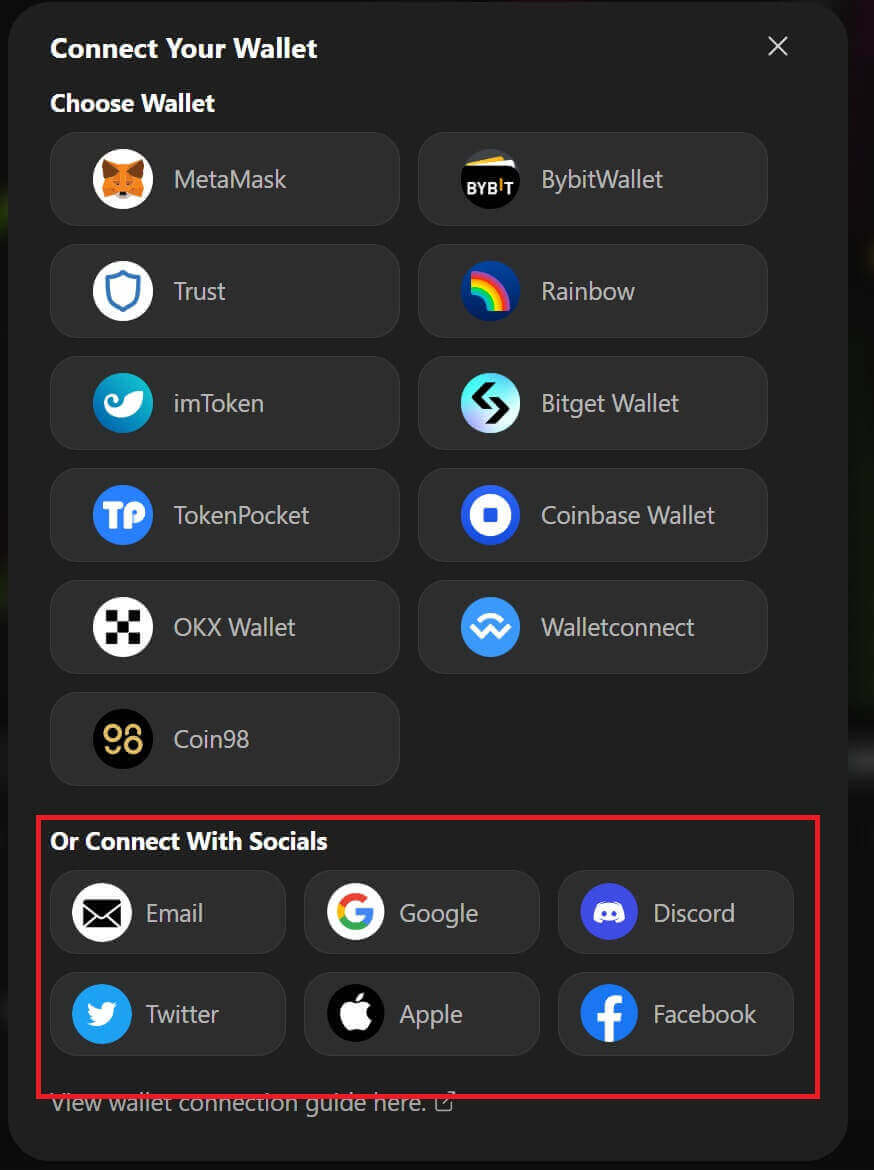
2. Receive deposited funds or make a transfer from your account.
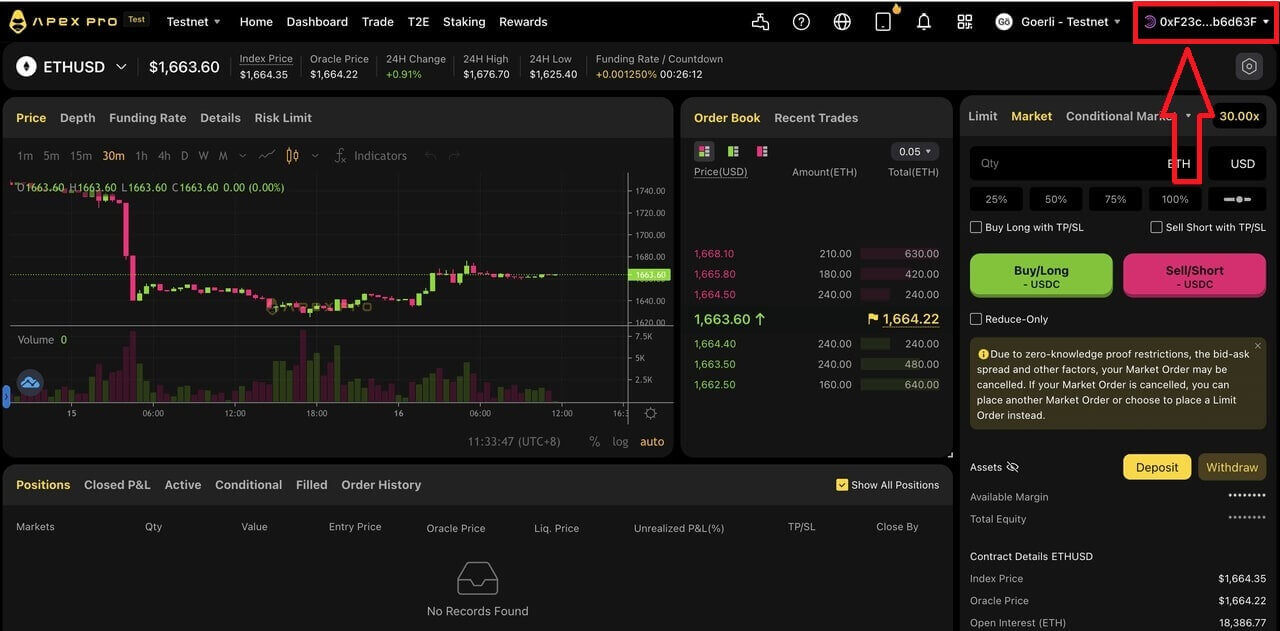
- Desktop: Click on your wallet address in the upper-right corner of the page.
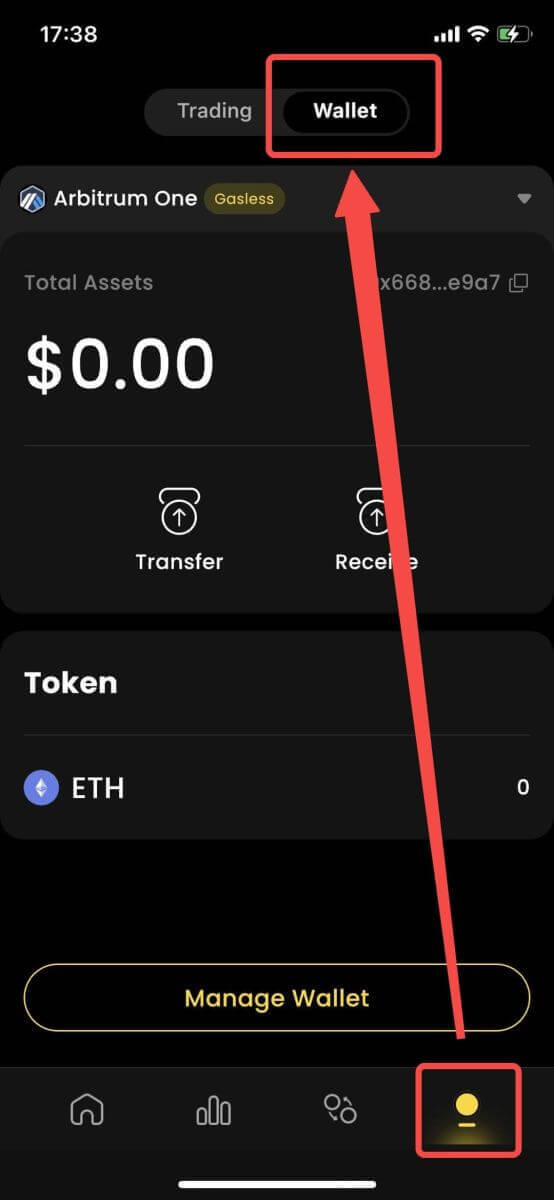
- App: Tap on the right-most icon to access your profile, and then click on the [Wallet] tab.
3. Next is what deposits look like on the Desktop and App
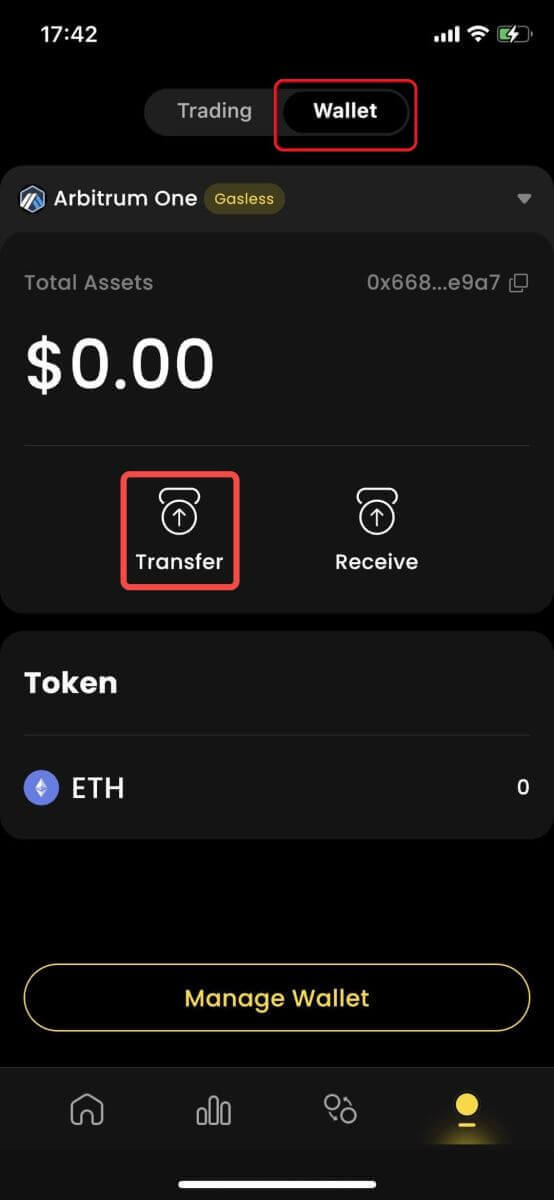
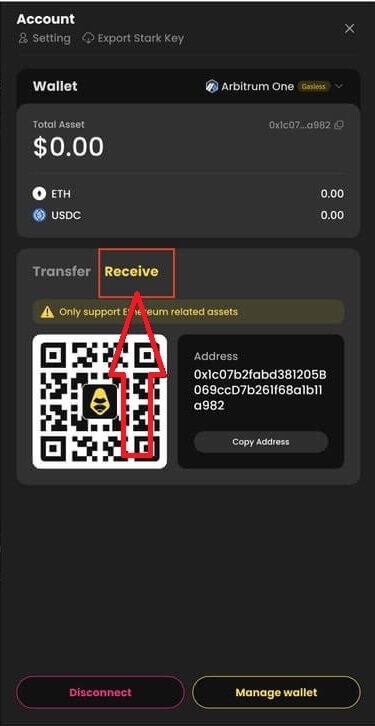
- Desktop: Click on [Receive] and copy the provided wallet address, or scan the QR code from another wallet application (you can choose to scan with your in-centralized exchange wallet or other similar wallet applications) to make a deposit into Particle Wallet. Please take note of the selected chain for this action.
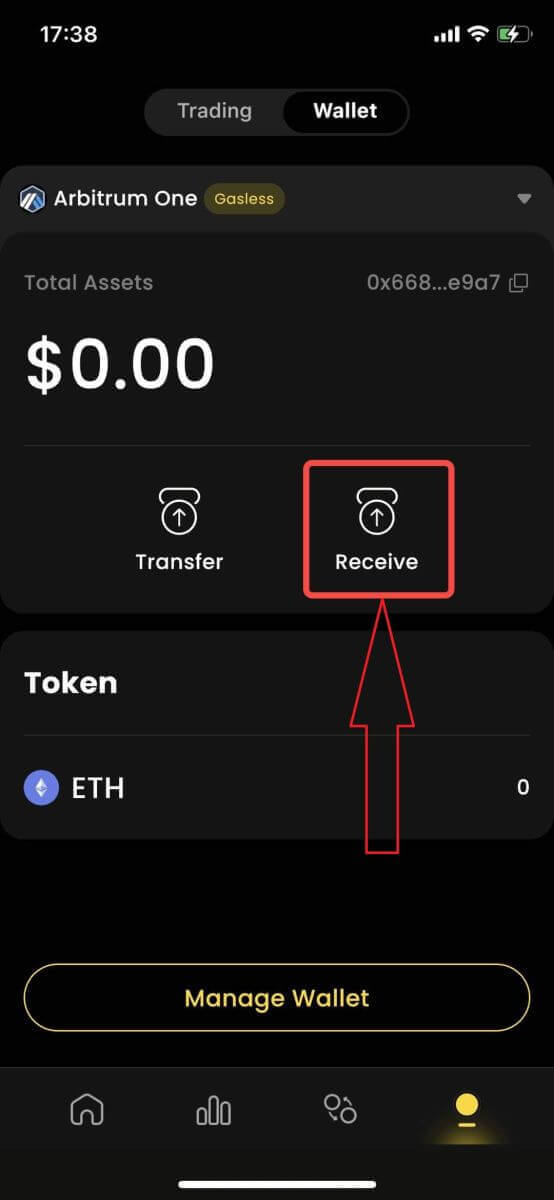
- App: This is what the same process looks like on the app.
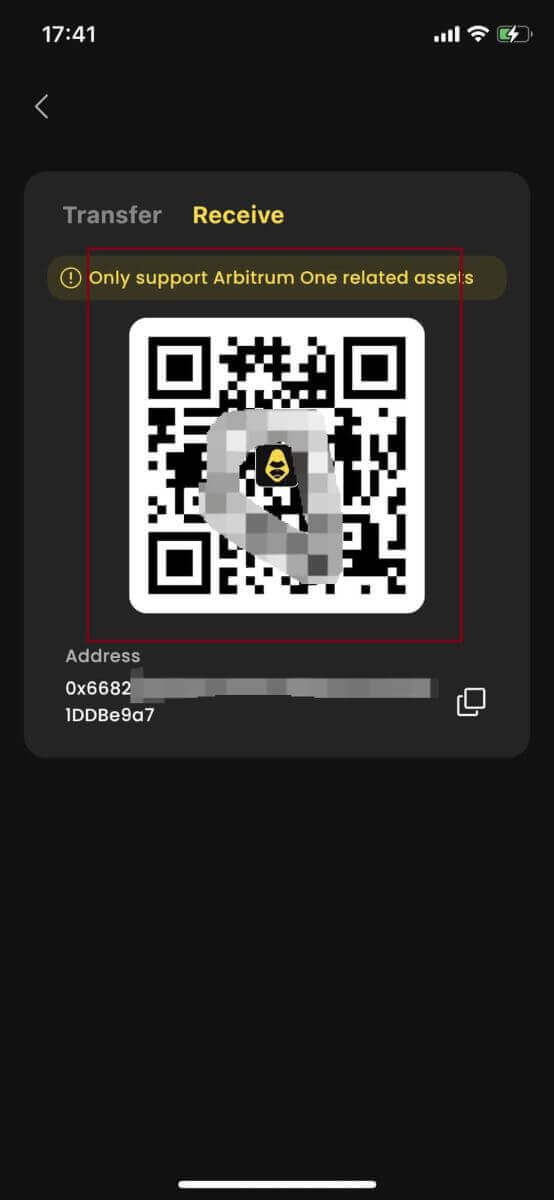
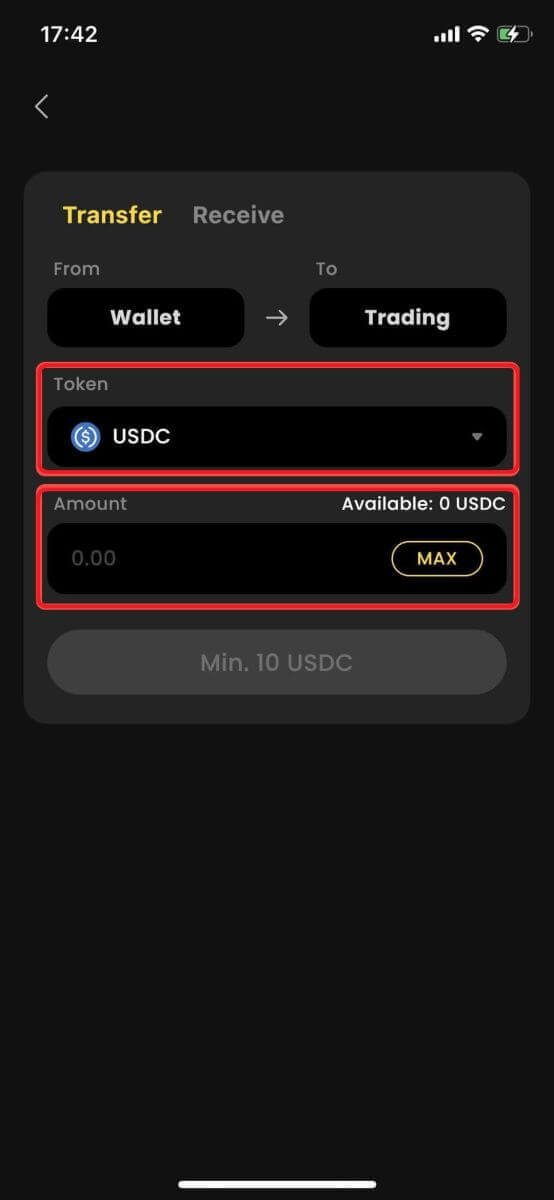
4. If you want to transfer to your trading account in [ApeX], here is what it looks like:
- Desktop: Click on the [Transfer] tab and enter your desired amount of funds for transfer. Please ensure that the amount entered is greater than 10 USDC. Click on [Confirm].
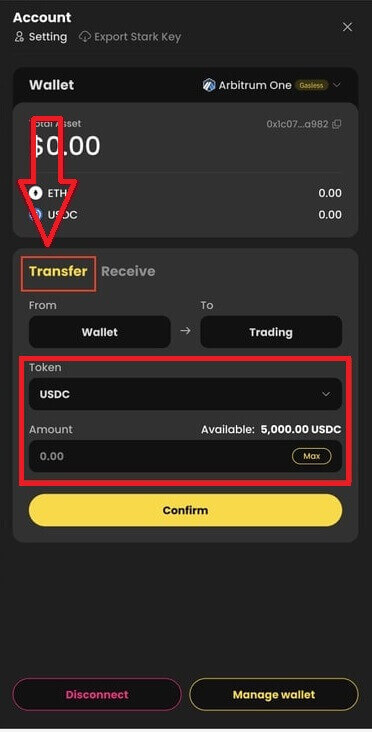
- App: This is what the same process looks like on the app.
How to Manage MPC Wallet on ApeX
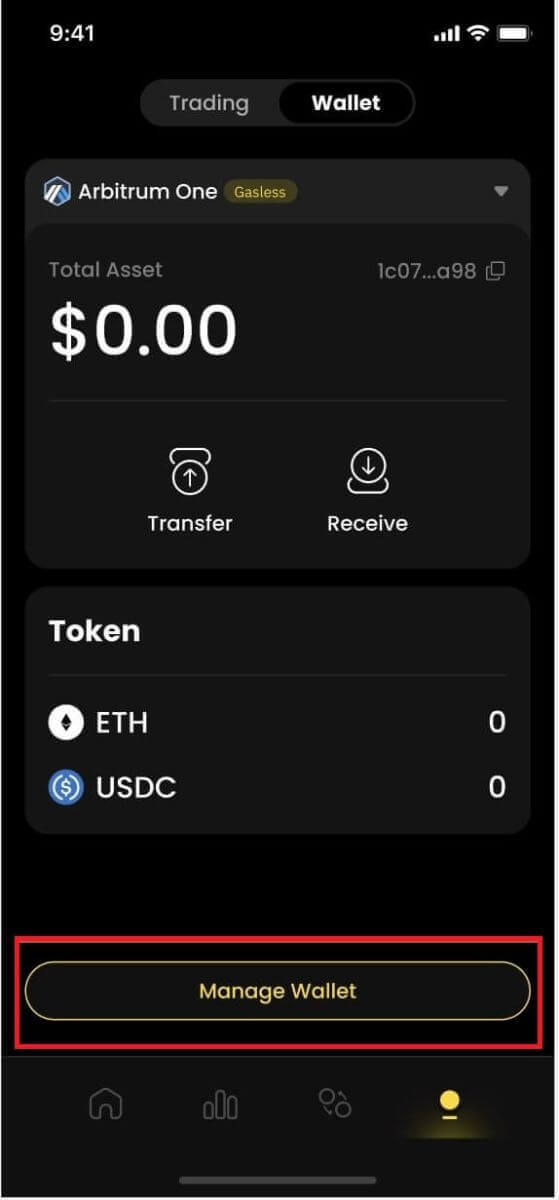
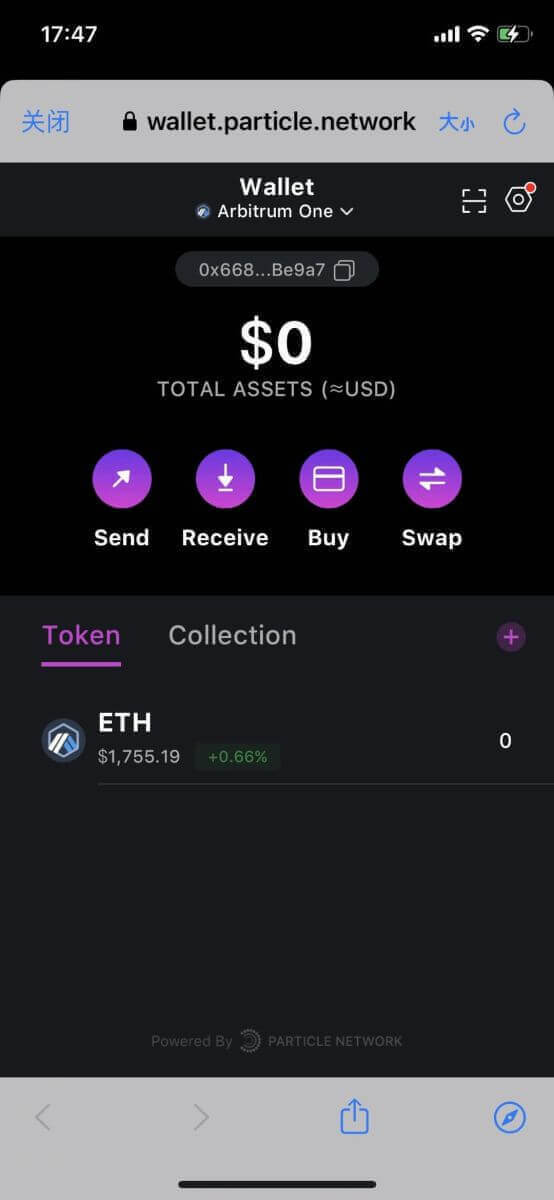
1. Manage wallet on Desktop:- Desktop: Click on Manage Wallet to access your Particle Wallet. You will be able to access the full functionality of the Particle Wallet, including send, receive, swap, purchase tokens with fiat, or view more wallet settings.
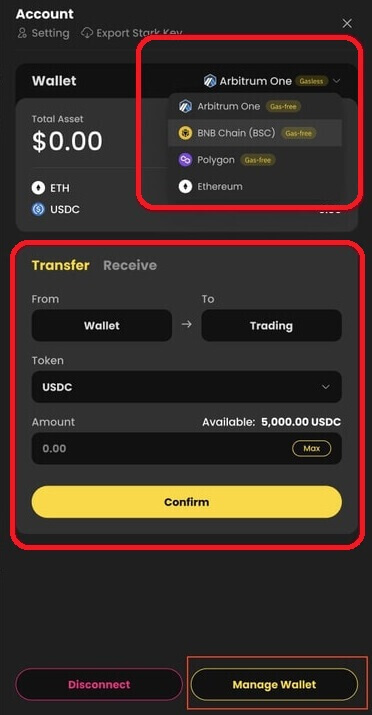
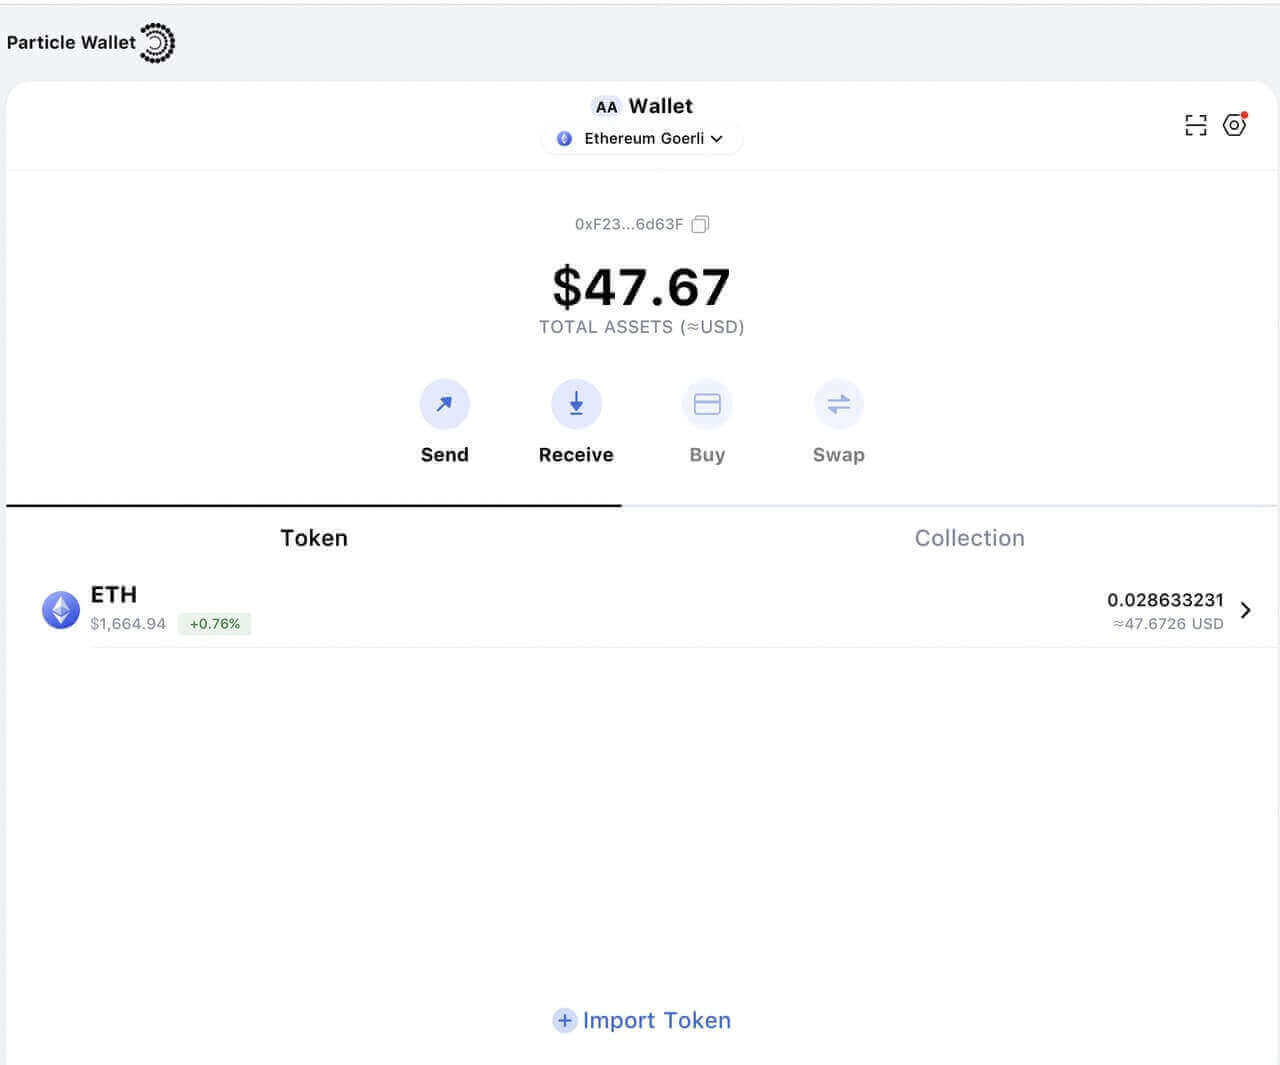
2. Manage wallet on App:
- App: This is what the same process looks like on the App.
How to Trade Crypto on ApeX
How to Trade Crypto on ApeX
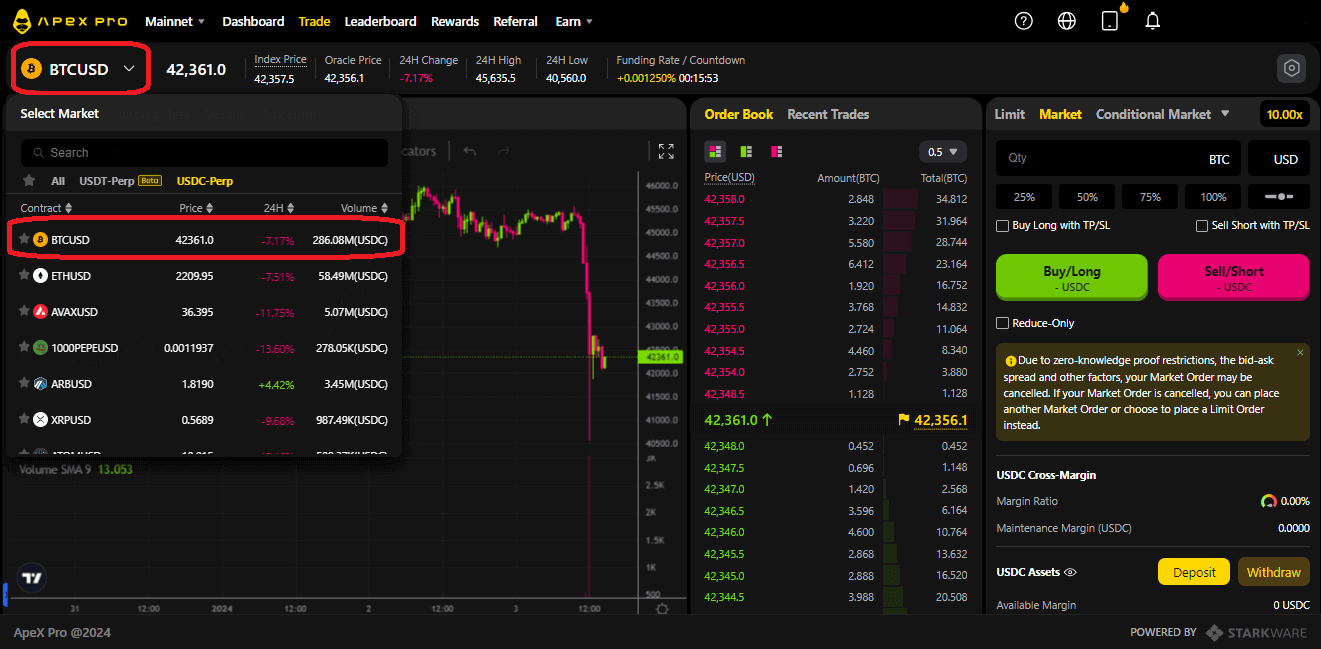
Here’s how to easily execute trades with ApeX Pro in three easy steps. See the glossary if unfamiliar with any of the terms used.
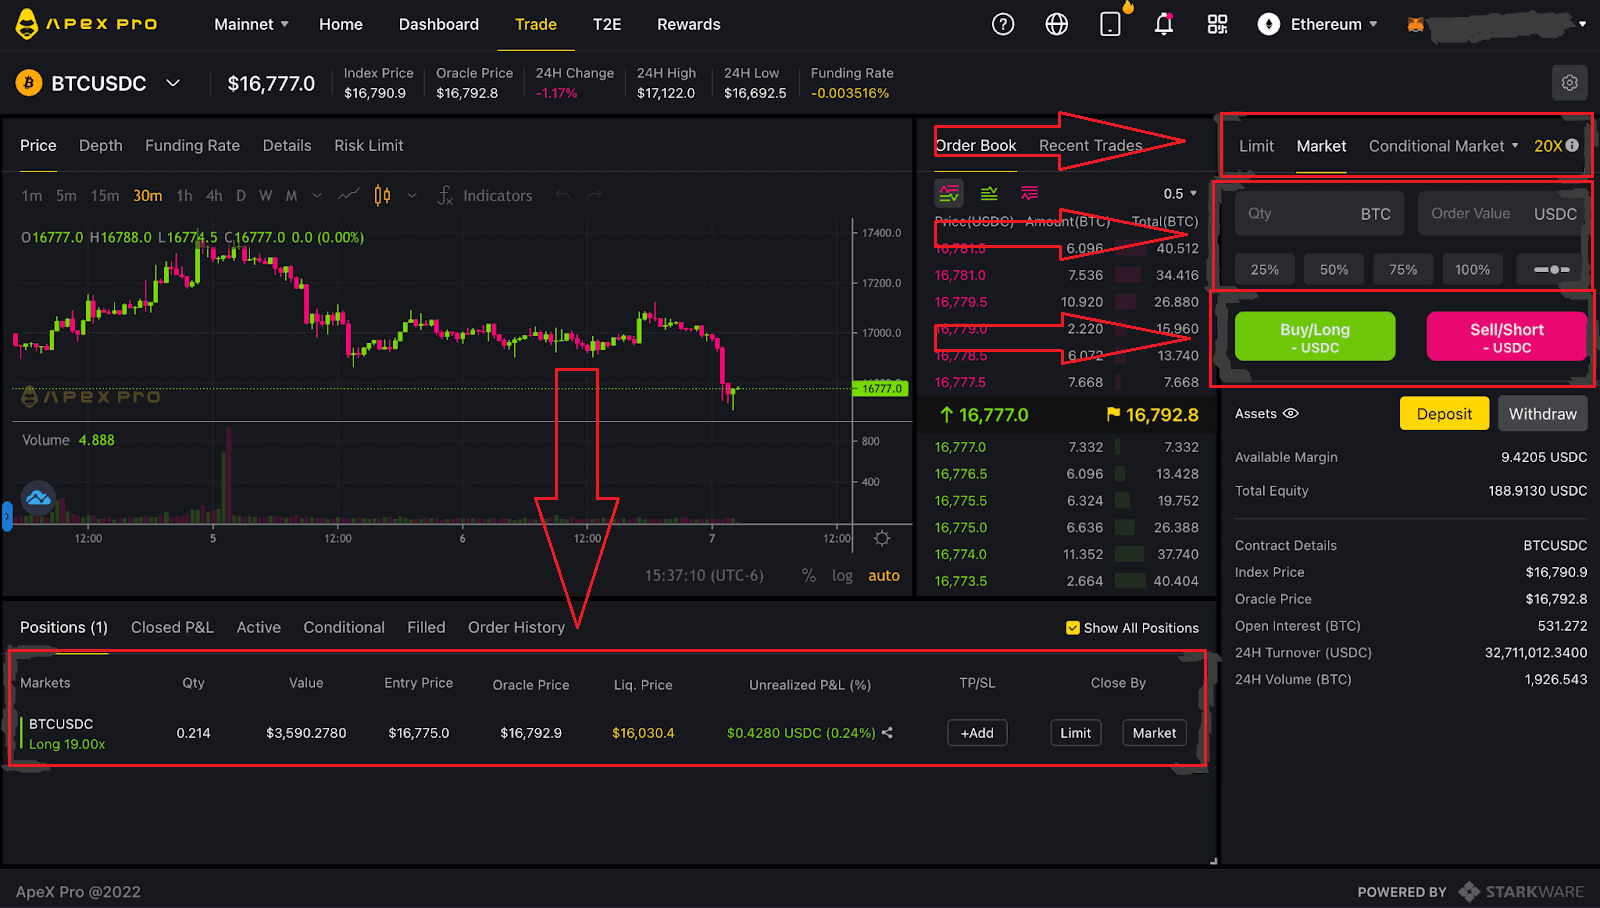
- Select your desired trading contract. That’s found in the drop-down menu at the upper left of your screen. For this example, we will use BTC-USDC.

- Next, decide on a long or short trade and choose between a Limit, Market, or Conditional Market order. Specify the amount of USDC for the trade, and simply click submit to execute the order. Double-check your details before submitting to ensure they match your trading strategy.
Your trade is now open!
For this trade, I longed for BTC with approximately 180 USDC at 20x leverage. Notice the position status window at the bottom of the screenshot. ApeX Pro shows your leverage order details, liquidation price, and updated unrealized PL. The position status window is also how you close out your trade.
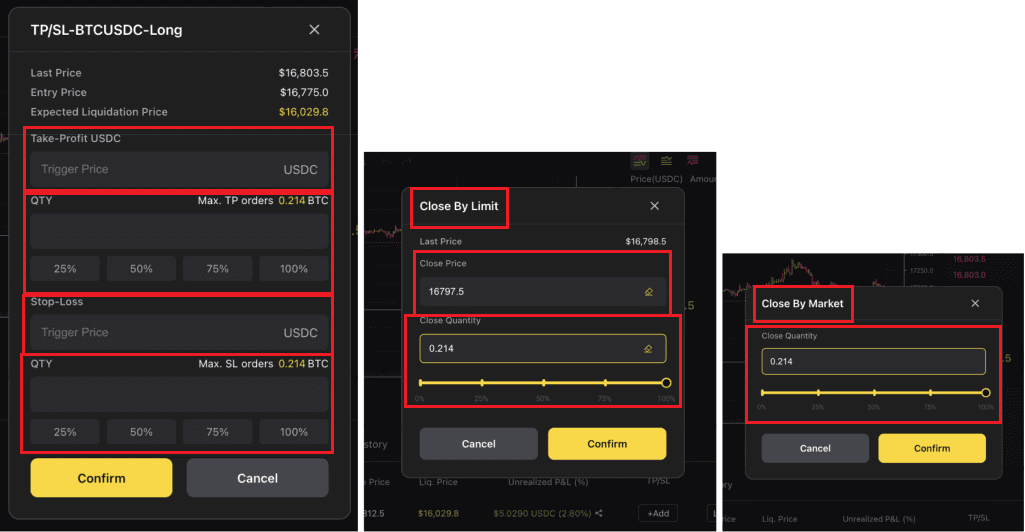
- To finalize your trade, establish your take profit and stop loss limits, or set a sell limit. If an immediate closure is necessary, click on "Market" and execute the closeout. This ensures a swift and efficient process for closing your position on ApeX Pro.

Glossary of Terms
- Cross Margin: Margin is your collateral. Cross-margin means the entire available balance under your account will be used to meet margin requirements. Thus, your entire account is at risk for liquidation if your trade goes the wrong way. Stop Loss Army Unite!!!
- Leverage: Financial tool allowing traders to increase their market exposure beyond their initial investment. For example, 20X leverage means a trader can enter a position for $20,000 worth of BTC with only $1,000 of collateral. Remember, the odds of gains, losses, and liquidation exponentially increase as leverage increases.
- Market Order: An order to buy or sell an asset at the current market price.
- Limit Order: This is an order to buy or sell at a specific price. The asset will not be bought or sold until it is triggered by that price.
- Conditional Order: Either a conditional limit or conditional market order to buy or sell an asset that only takes effect once a certain trigger price condition has been met.
- Perpetual Contracts: A perpetual contract is an agreement with another party to buy or sell an underlying asset at a predetermined price. The contract follows the price action of the asset, but the actual asset is never owned or traded. Perpetual contracts have no expiry date.
- Take Profit: A profit exit strategy that ensures that the trade is automatically closed once the asset hits a certain profitable price.
- Stop Loss: A risk management tool that automatically closes the trader’s position at a loss in case the trade goes the wrong way. Stop losses are used to avoid substantial losses or liquidation. It’s better to trim a bit off the top than be scalped. Use them.
Order Types on ApeX
Three order types are available on perpetual contract trades at ApeX Pro including Limit Orders, Market Orders, and Conditional Orders.
Limit Order
A limit order allows you to place an order at a specific or better price. However, there’s no guarantee of immediate execution, as it is fulfilled only when the market reaches your chosen price. For a buy limit order, execution happens at the limit price or lower, and for a sell limit order, it occurs at the limit price or higher.
- Fill-or-kill is an order that must be filled immediately or will be canceled
- Good-Till-Time will ensure that your order is effective until it is fulfilled or the maximum default period of 4 weeks is reached
- Immediate-or-Cancel specifies that the order must be executed at the limit price or better immediately, or will be canceled
Additionally, further customize your order by adding execution conditions with Post-Only or Reduce-Only.
- Post-Only: Enabling this option ensures that your order is posted on the order book without being matched immediately. It also guarantees that the order is only executed as a maker order.
- Reduce-Only: This option helps to dynamically reduce or adjust your limit order’s contract quantity and ensure that your position will not be unintentionally increased.
For example, Alice would like to buy an order quantity of 5 ETH worth in ETH-USDC contracts.
Looking at the order book, if the best-selling price is at $1,890, she’d like to fill her order at a limit price of no more than $1,884. She also selects the "Good-Till-Time" and Post-Only execution options on her order.
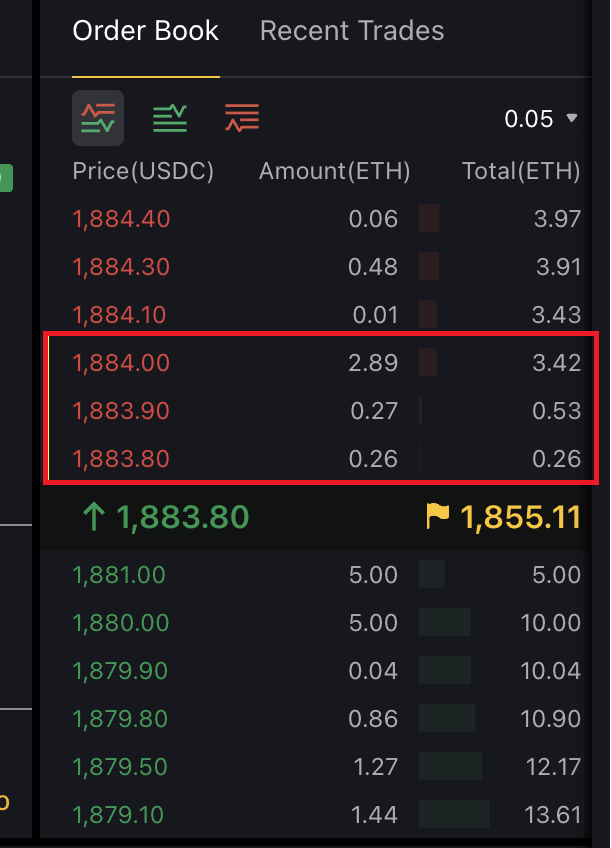 Once her limit price is reached, she checks the available quantity at her limit price and below. For instance, at $1,884, there are 2.89 ETH worth of ETH-USDC contracts available. Her order will be partially filled initially. Using the Good-Till-Time feature, the unfilled quantity is added to the order book for another attempt at execution. If the remaining order isn’t completed within a default 4-week period, it will be automatically canceled.
Market Order
A market order is a buy or sell order that is instantly filled at the best available market price upon submission. It relies on the existing limit orders on the order book for execution.While the execution of a Market Order is guaranteed, the trader cannot specify prices; only the contract type and order amount can be specified. All time-in-force and execution conditions are pre-set as part of the nature of a Market Order.
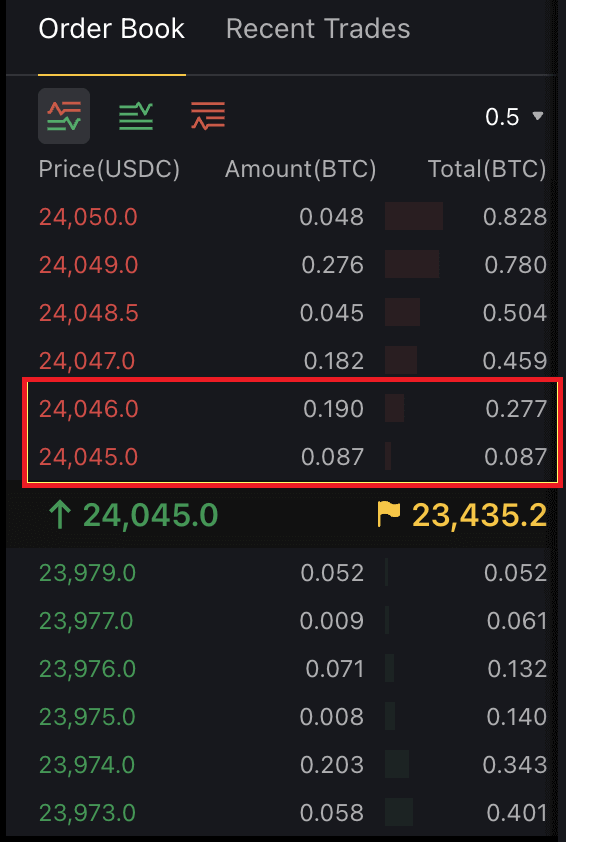 For example, if you’d like to purchase 0.25 BTC worth in BTC-USDC contracts, ApeX Pro will instantly fill the first portion of your contract with the best price available, and the remainder with the second best price thereafter as seen in the image above.
Conditional Orders
Conditional Orders are Market or Limit Orders that have specific conditions tagged to them — Conditional Market and Conditional Limit orders. This allows traders to set an added trigger price condition on either your Market or Limit Orders.- Conditional Market
For instance, if you aim to buy $40,000 in BTC-USDC contracts with a trigger price set at $23,000, ApeX Pro will execute your order at the best available prices as soon as the trigger price is achieved.
- Conditional Limit
For instance, if you set a limit order at $22,000 for 5 BTC without a trigger price, it’s immediately queued for execution.
Introducing a trigger price, such as $22,100, means the order becomes active and queued in the order book only when the trigger price is met. Additional options like time-in-force, post-only, and reduce-only can be incorporated for enhanced trade customization with Conditional Limit Orders.
How to use Stop-Loss and Take-Profit on ApeX
- Take-Profit (TP): Close your position once you’ve reached a specified profit level.
- Stop-Loss (SL): Exit your position once the asset reaches a specified price to mitigate capital losses on your order when the market moves against you.
Here’s how you can set up Take-Profit and Stop-Loss on your Limit, Market, and Conditional (Market or Limit) orders. Before you begin, please ensure that you are logged into your ApeX Pro account and that your wallet is successfully connected to the platform.
(1) On the trading page, choose the contract you want to trade. Create your order – be it Limit, Market, or Conditional (Limit or Market) – by selecting the appropriate option from the panel on the right side.
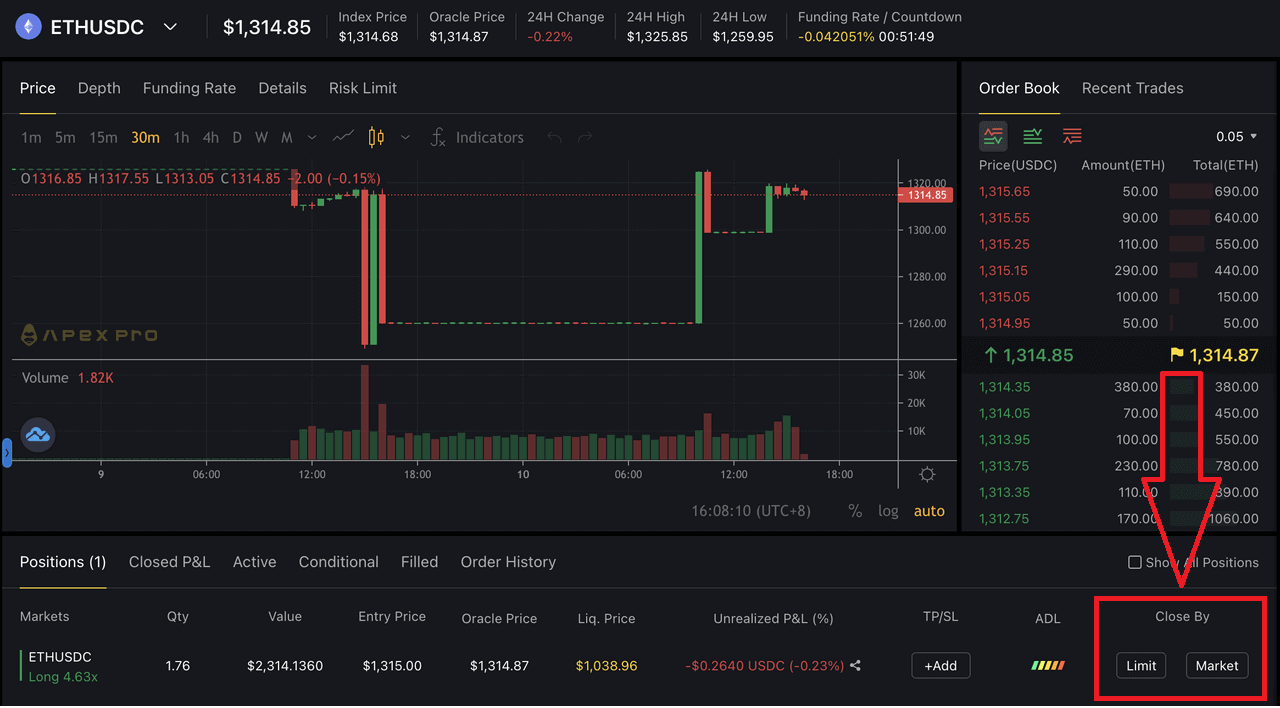 (2) Fill in your order accordingly. For a recap on ApeX Pro’s order types and how to create each order, please refer to Order Types.
(3) Please note that you can only select and configure TP/SL options after your order is executed. This means that for Limit and Conditional (Market or Limit) orders, you will need to wait for the orders to move from a pending status (under Active or Conditional) into the "Positions" tab at the bottom of the trading page here. As Market orders are immediately executed at the best available price, you will not need to wait for the order to be triggered by a set price before setting TP/SL in the same way.
 (4) By default, all TP/SL orders are Reduce-Only orders on ApeX Pro.
(5) Check out your open positions under the "Positions" tab and click on the [+Add] button to s
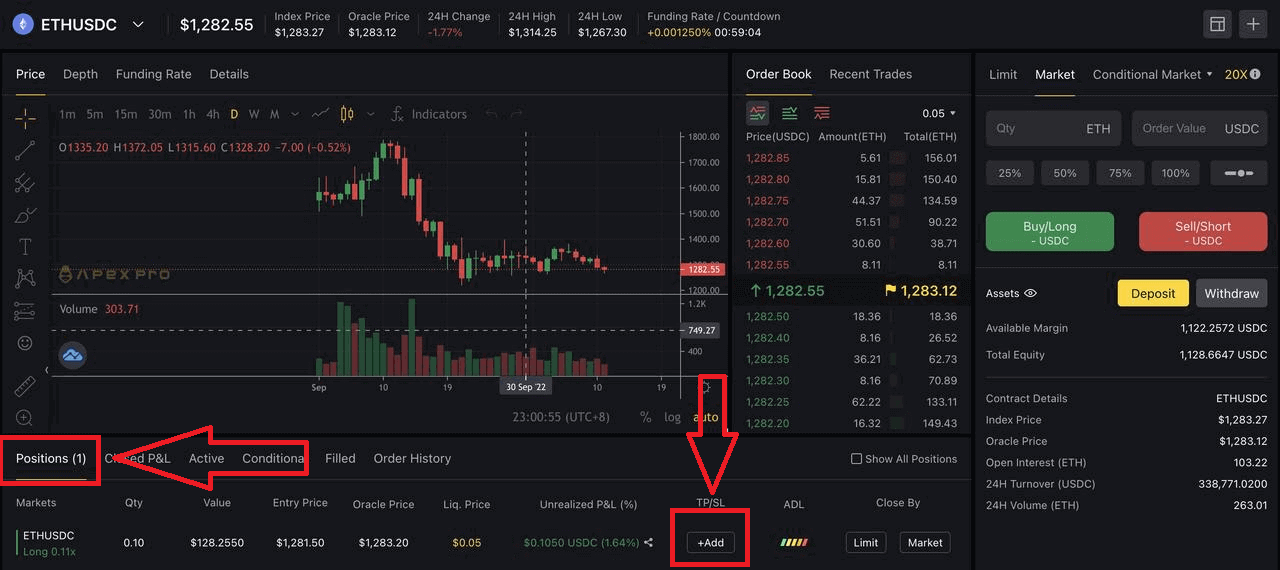
(6) A new window will pop up and you’ll see the following fields:
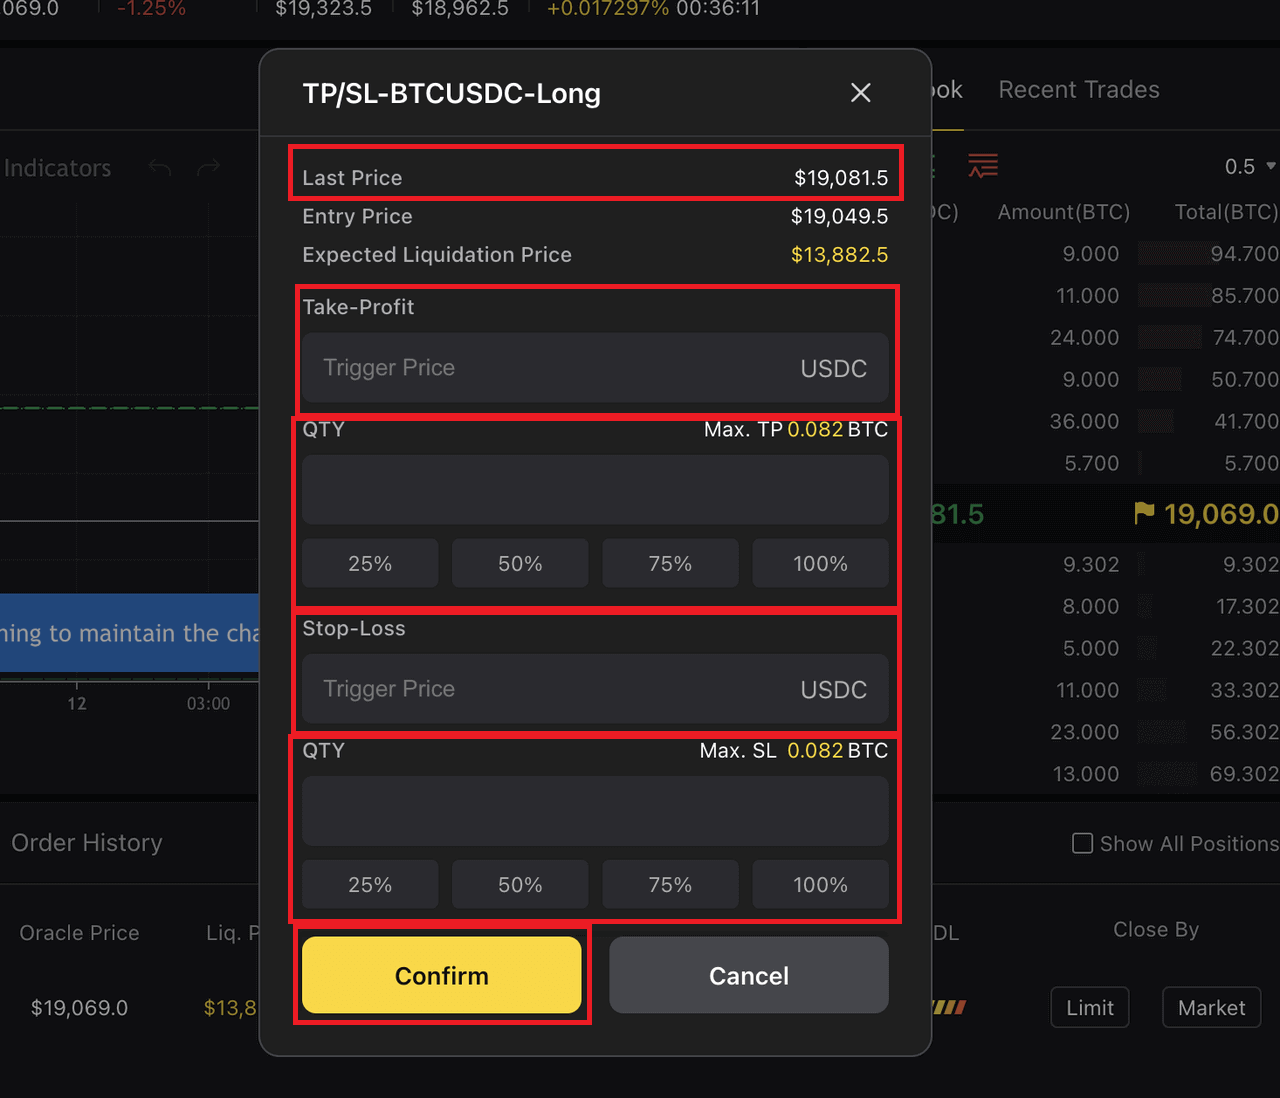
- All TP/SL orders can only be triggered by the Last Traded Price.
- You can fill up either the Take-Profit or Stop-Loss sections, or both if you would like to set both conditions on your order(s).
- Enter the Take-Profit trigger price and the quantity — you can choose to have the set TP condition apply only to a partial or the entirety of your order.
- The same applies to Stop-Loss — choose to have the set SL condition apply only to a partial or the entirety of your order.
- Click on "Confirm" once you’ve verified the details of your order.
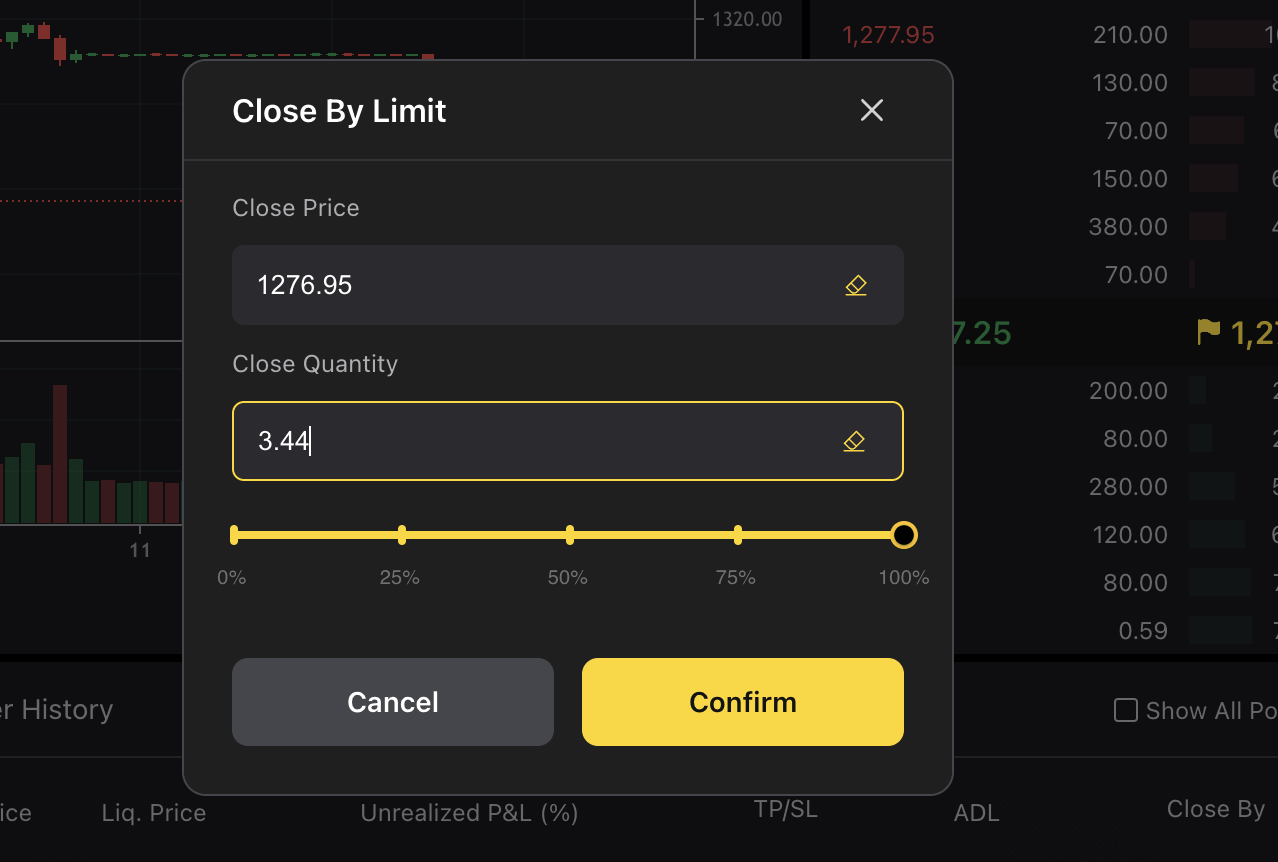
(7) Alternatively, you can employ the Close By Limit function to establish Take-Profit orders, providing a similar function as described in Step 6 above. It’s important to note that this method does not apply to setting up Stop-Loss orders.
How to Withdraw from ApeX
How to Withdraw from ApeX (Web)
Click ‘Withdraw’ on the trade screen.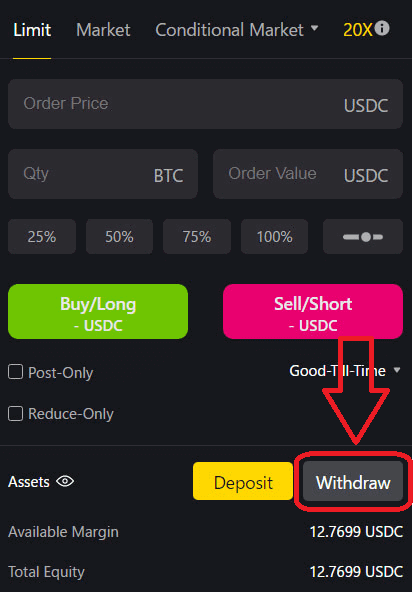
The minimum withdrawal amount for ApeX Pro is USD 10.
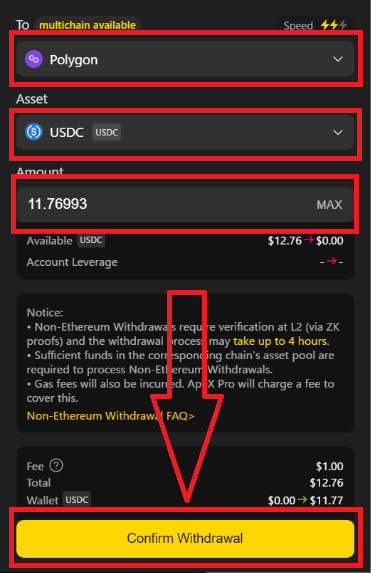
- Non-Ethereum withdrawals require verification in L2 (by ZK proof) and may take up to 4 hours to process the withdrawal.
- Sufficient funds must be available in the corresponding chain’s asset pool to process non-Ethernet withdrawals.
- There will also be a gas fee; ApeX Pro will charge a fee to cover this.
Confirm Withdrawal.
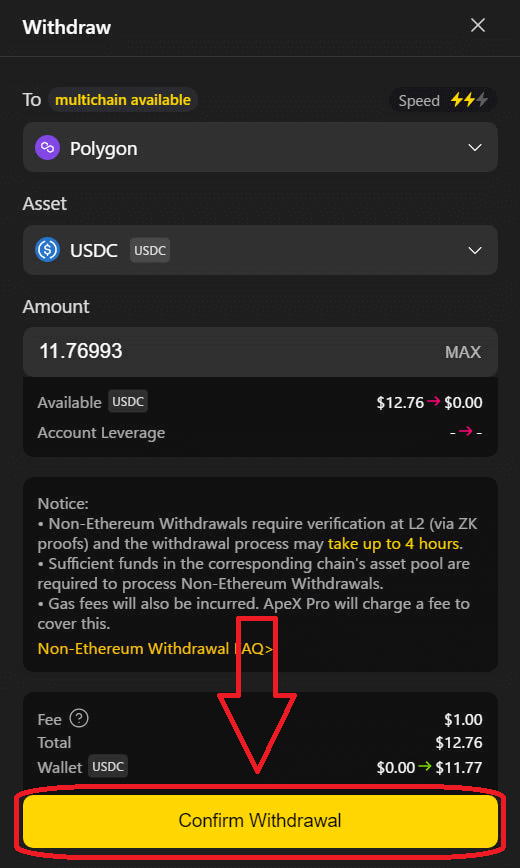

The status of withdrawals can be checked under Dashboard Transfers.
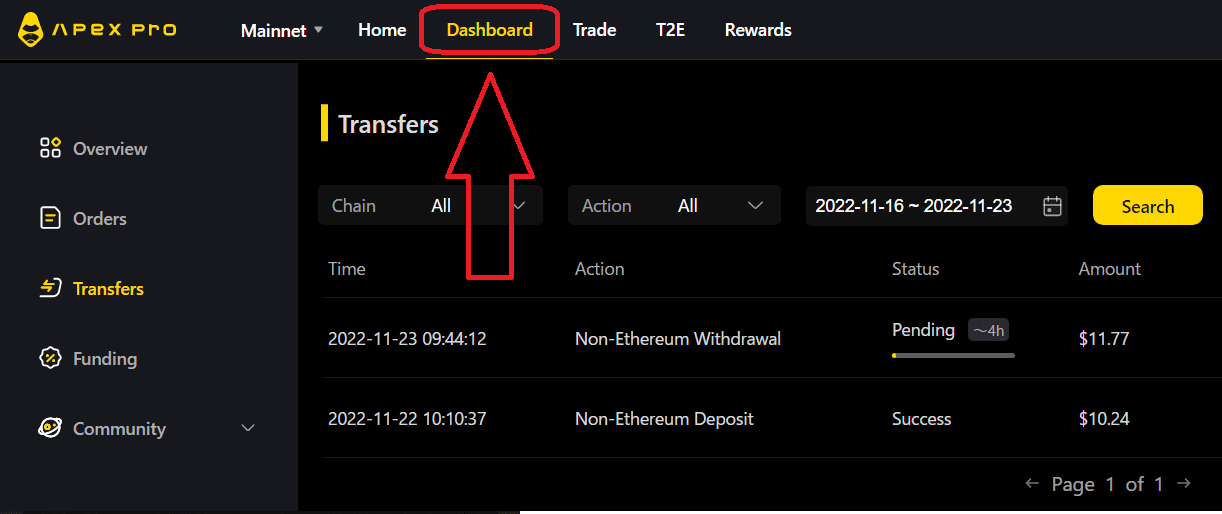
How to Withdraw from ApeX (App)
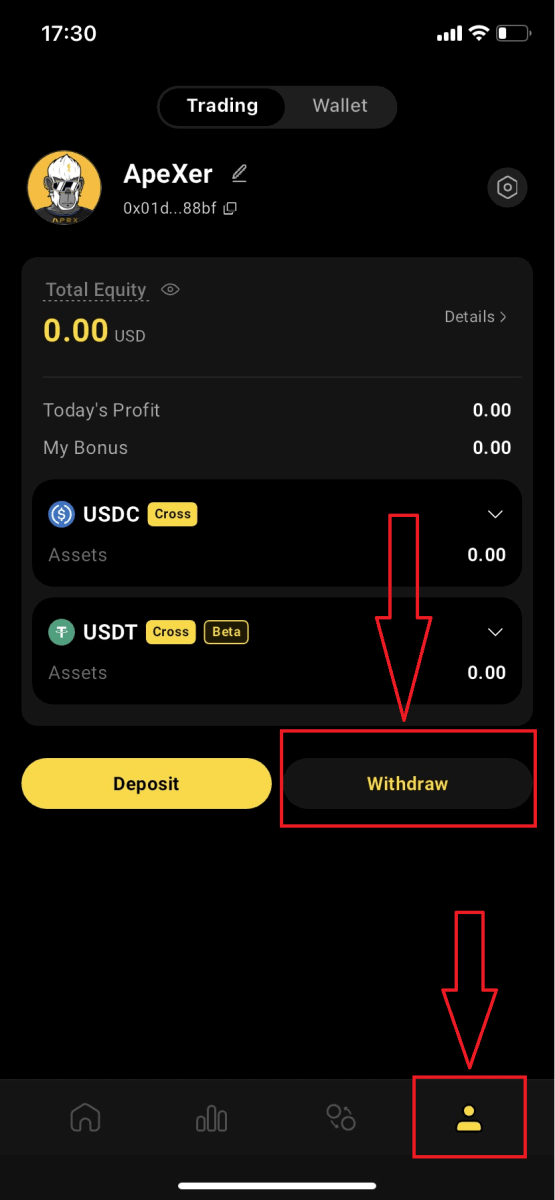
Click on the [Account] section at the right lower corner of the screen, then click on the ’Withdraw’ button.
Similar to the desktop platform, the chain, asset, and quantity are optionable before clicking on the ’ Confirm Withdrawal’ button.
Ethereum Withdrawals
ApeX Pro offers two withdrawal options via the Ethereum network: Ethereum Fast Withdrawals and Ethereum Normal Withdrawals.
Ethereum Fast Withdrawals
Fast withdrawals utilize a withdrawal liquidity provider to send funds immediately and do not require users to wait for a Layer 2 block to be mined. Users do not need to send a Layer 1 transaction to perform a fast withdrawal. Behind the scenes, the withdrawal liquidity provider will immediately send a transaction to Ethereum which, once mined, will send the user their funds. Users must pay a fee to the liquidity provider for fast withdrawals equal to or greater than the gas fee the provider would pay for the transaction and 0.1% of the amount of the withdrawal amount (minimum 5 USDC/USDT). Fast withdrawals are also subject to a maximum size of $50,000.
Ethereum Normal Withdrawals
Normal withdrawals do not use a liquidity provider to speed up the withdrawal process, so users must wait for a Layer 2 block to be mined before they are processed. Layer 2 blocks are mined roughly once every 4 hours, though this could be more or less frequent (up to 8 hours) based on network conditions. Normal withdrawals occur in two steps: the user first requests a normal withdrawal, and once the next Layer 2 block is mined, the user must send a Layer 1 Ethereum transaction to claim their funds.
Non-Ethereum Withdrawals
On ApeX Pro, you have the option to withdraw your assets directly to a different chain. When a user initiates a withdrawal to an EVM-compatible chain, the assets undergo an initial transfer to ApeX Pro’s Layer 2 (L2) asset pool. Subsequently, ApeX Pro facilitates the transfer of the equivalent asset amount from its own asset pool to the user’s designated address on the corresponding withdrawal chain.
It’s important to be aware that the maximum withdrawal amount is determined not only by the total assets in a user’s account but also by the maximum available amount in the asset pool of the target chain. Ensure that your withdrawal amount adheres to both limitations for a seamless transaction experience.
Example:
Imagine Alice has 10,000 USDC in her ApeX Pro account. She wants to take out 10,000 USDC using the Polygon chain, but the Polygon’s asset pool on ApeX Pro only has 8,000 USDC. The system will let Alice know that the available funds on the Polygon chain are not enough. It will suggest she either withdraws 8,000 USDC or less from Polygon and takes out the rest through another chain, or she can withdraw the full 10,000 USDC from a different chain with enough funds.
Traders can easily and safely make deposits and withdrawals using their preferred chain on ApeX Pro.
ApeX Pro will also use a monitoring program to adjust the balance of funds across chains to ensure sufficient assets in varying asset pools at any one time.
Frequently Asked Questions (FAQ)
Connect Crypto Wallet to ApeX
Is your platform safe? Are your smart contracts audited?
Yes, smart contracts on ApeX Protocol (and ApeX Pro) are fully audited by BlockSec. We are also planning to support a bug bounty campaign with secure3 to help mitigate the risk of exploits on the platform.What wallets does Apex Pro support?
Apex Pro currently supports:- MetaMask
- Trust
- Rainbow
- BybitWallet
- Bitget Wallet
- OKX Wallet
- Wallet connect
- imToken
- BitKeep
- TokenPocket
- Coinbase Wallet
Can Bybit users connect their wallets to ApeX Pro?
Bybit users can now connect their Web3 and Spot wallets to Apex Pro.How do I switch to testnet?
To view the Testnet options, connect your wallet to ApeX Pro first. Under the ’Trade’ page, you will find test net options displayed next to the Apex Pro logo on the top left hand of the page.Select the preferred Testnet environment to proceed.

Unable to Connect Wallet
1. There could be various reasons for the difficulty in connecting your wallet to ApeX Pro on both the desktop and the app.
2. Desktop
- If you use wallets like MetaMask with in-browser integration, ensure you’re signed into your wallet via the integration before logging in to Apex Pro.
3. App
- Update your wallet app to the latest version. Also, ensure your ApeX Pro app is updated. If not, update both apps and try connecting again.
- Connectivity issues might arise due to VPN or server errors.
- Certain wallet apps might require being opened first before launching the Apex Pro app.
4. Consider submitting a ticket through the ApeX Pro Discord helpdesk for further assistance.
ApeX Trading
Trading Fees
Fee StructureApeX Pro uses a maker-taker fee model for determining its trade fees. There are two types of orders on ApeX Pro — Maker and Taker orders.
- Maker orders add depth and liquidity to the order book as they are orders that are not executed and filled immediately
- Taker orders, on the other hand, are executed and filled immediately, removing liquidity from the order book
ApeX Pro will introduce a tiered trading fee structure soon so traders can enjoy even greater cost reductions on fees, the more they trade.
Will I be charged if I cancel my order?
No, if your order is open and you cancel it, you will not be charged a fee. Fees are only charged on filled orders.
Do I have to pay gas fees to trade?
No. Since trades are executed on Layer 2, no gas fees will be charged.
Funding Fees
Funding is the fee paid to either long or short traders to ensure that the trading price closely follows the price of the underlying asset on the spot market.Funding Fees
Funding fees will be exchanged between long and short-position holders every 1 hour.
Please note that the funding rate will fluctuate in real-time every 1 hour. If the funding rate is positive upon settlement, long position holders will pay the funding fees to short position holders. Similarly, when the funding rate is negative, short-positive holders will pay long-position holders.
Only traders who hold positions at the time of settlement will pay or receive funding fees. Likewise, traders who do not hold any positions when at the time of funding payment settlement will neither pay nor receive any funding fees.
Your position value at the timestamp, when funding is settled, will be used to derive your funding fees.
Funding Fees = Position Value * Index Price * Funding Rate
The funding rate is calculated every hour. For example:
- The funding rate between 10AM UTC and 11AM UTC, and will be exchanged at 11AM UTC;
- The funding rate between 2PM UTC and 3PM UTC, and will be exchanged at 3PM UTC
Funding Rate Calculations
The funding rate is calculated based on Interest Rate (I) and Premium Index (P). Both factors are updated every minute, and an N*-Hour Time-Weighted-Average-Price (TWAP) over the series of minute rates is performed. The Funding Rate is next calculated with the N*-Hour Interest Rate component and the N*-Hour premium/discount component. A +/−0.05% dampener is added.
- N = Funding Time interval. Since funding occurs once per hour, N = 1.
- Funding Rate (F) = P + clamp * (I - P, 0.05%, -0.05%)
This means that if (I - P) is within +/-0.05%, the funding rate is equivalent to the interest rate. The resulting funding rate is used to determine the position value, and correspondingly, the funding fees to be paid by long and short-position holders.
Take BTC-USDC contract as an example, where BTC is the underlying asset and USDC is the settlement asset. According to the formula above, the interest rate would be equivalent to the difference in interest between both assets.
Interest Rate
-
Interest Rate (I) = (USDC Interest - Underlying Asset Interest) / Funding Rate Interval
- USDC Interest = The interest rate for borrowing the settlement currency, in this case, USDC
- Underlying Asset Interest = The interest rate for borrowing the base currency
- Funding Rate Interval = 24/Funding Time Interval
Using BTC-USDC as an example, if the USDC interest rate is 0.06%, the BTC interest rate is 0.03%, and the funding rate interval is 24:
- Interest Rate = (0.06-0.03) / 24 = 0.00125%.
Premium Index
Traders can enjoy discounts from the Oracle price with the utilization of a Premium Index — this is used to raise or lower the next funding rate so that it aligns with the level of the contract trade.
-
Premium Index (P) = ( Max ( 0, Impact Bid Price - Oracle Price) - Max ( 0, Oracle Price - Impact Ask Price)) / Index Price + Funding Rate of Current Interval
- Impact Ask Price = The average fill price to execute the Impact Margin Notional on the Ask side
- Impact Bid Price = The average fill price to execute the Impact Margin Notional on the Bid side
Impact Margin Notional is the notion available to trade based on a certain amount of margin and indicates how deep in the order book to measure either the Impact Bid or Ask Price.
Funding Fee Cap
| Contract | Maximum | Minimum |
| BTCUSDC | 0.046875% | -0.046875% |
| ETHUSDC、BCHUSDC、LTCUSDC、XRPUSDC、EOSUSDC、BNBUSDC | 0.09375% | -0.09375% |
| Others | 0.1875% | -0.1875% |
*Only BTC and ETH perpetual contracts are available now. Other contracts will be added to ApeX Pro soon.
